Last updated on
Dive into the fascinating world of epoxy tray designs because they offer an underexplored avenue of bespoke creativity, unleashing a personalized aesthetic touch into your décor choices.
I’ve designed unique illustrations for these ideas. I hope you get inspired!
Dive into a world of creativity with epoxy trays, a realm where ordinary becomes extraordinary with a touch of ingenuity.
While the internet is brimming with countless ideas, this article aims to add a fresh perspective and introduce unique concepts you haven’t encountered before.
From contemporary to rustic, minimalistic to ornate, expect a myriad of novel and innovative epoxy tray ideas that will surely inspire.
To supplement this treasure trove of original concepts, resources for tried-and-true favorites will also be provided towards the end of the article.
So gear up for an enlightening journey that reshapes your understanding of what an epoxy tray can be.
Enjoy this immersive exploration and uncover a multitude of new, captivating ways to embrace this versatile decor piece.
Idea #1: Geode Inspired Epoxy Tray
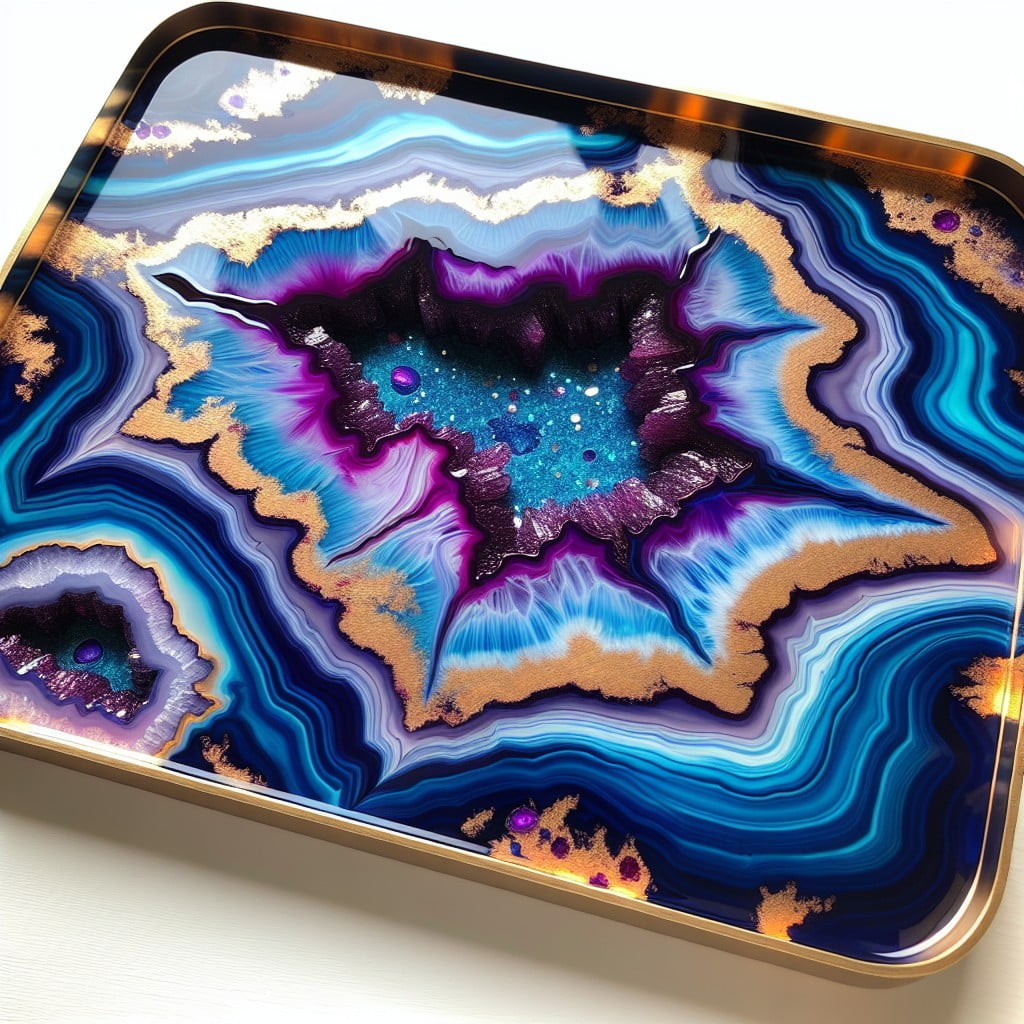
Creating this masterpiece entails a merger of artistry and chemistry. The process begins with the selection of colors mimicking the natural beauty of geodes. Greens, blues, purples, and earth tones are ideal choices, but the palette is entirely in your hands.
Next, prepare a non-stick work surface and your epoxy resin. Mixing the epoxy resin and hardener according to package instructions is important to achieve optimal results. Once mixed, divide the epoxy resin among several small cups and add your chosen colors to each cup.
The next step involves pouring these colored resin mixtures onto your tray, starting with the darkest color. Chain together splotches of color, ensuring to leave space for a crystal strip that will form the geode pattern. Use a lighter or heat gun to remove any bubbles and help meld together colors.
For the crystal strip, crushed glass, glitter, or small pebbles can be used. They should be carefully placed in the already outlined area, ensuring they are well-adhered to the epoxy resin.
Last but not least, add your final clear or white epoxy layer. This layer brings everything together, producing that desired glossy, polished, and robust finish. Following the curing instructions on your epoxy resin packaging will complete the masterpiece, leading to a beautifully unique and functional geode-inspired tray.
Idea #2: Botanical Epoxy Tray With Real Leaves
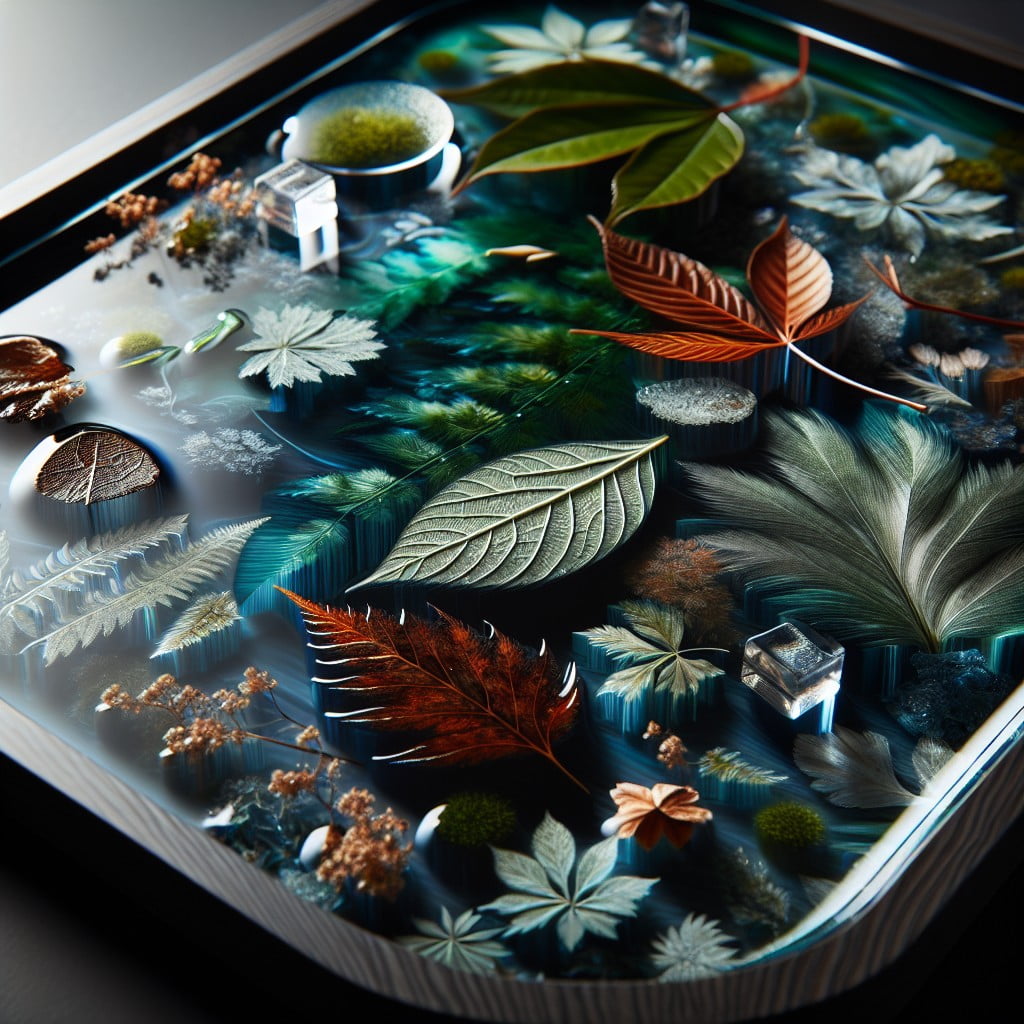
Your selected foliage plays the starring role in this creation process. Choose leaves based on both their shapes and colors, maximizing aesthetic appeal. Remember, smaller, flatter leaves tend to work best.
Start laying out your leaves on a blank tray, this will provide a rough idea of your design. It’s advised to create a balanced mixture of sizes and colors for contrast. Once satisfied, dry your leaves to preserve their color and shape; this can be done using silica gel or a press.
The next step involves pouring a thin layer of epoxy resin, just enough to form a gentle coating over the tray. Carefully place the leaves onto the epoxy, adjusting the layout as needed. Then, allow the epoxy to cure completely, forming a clear canvas encapsulating your leaf design.
After full curing, it’s time for the final layer of epoxy. This layer should entirely cover the leaves, sealing them in. Be sure to pop any bubbles that may form on the surface. Once again, leave to cure completely. Patience is essential; the perfect epoxy tray can’t be rushed.
With this method, botanical creations become timeless pieces, encapsulating the beauty of nature in a functional art form, ready for admiration at each use. Its appeal lies in preserving a sliver of the outdoors for indoor enjoyment, turning ordinary moments into exquisite experiences.
Idea #3: Sparkling Epoxy Tray With Sequins

Creating a sparkling sequin-embedded epoxy tray is about invoking a sense of glamour and luxury. These dazzling functional pieces of art can brighten up any space, especially under a light source.
1. Gathering Sequins: Select a blend of sizes and shades. For a more dynamic look, mix different shapes and colors.
2. Preparing the Base: Using a wooden tray, apply a thin layer of epoxy resin. Ensure a perfectly level surface to prevent pooling or uneven spreading.
3. Adding Sequins: Before the initial layer fully cures, sprinkle sequins across the surface. How densely packed depends on the desired look.
4. Sealing Layer: After the sequins set in place, add another layer of epoxy. It encapsulates the sequins, adding depth and protecting them from damage.
5. Curing: Allow the tray to cure completely. This step is crucial for durability. Handle the tray carefully to avoid disturbing the uncured epoxy.
Tips on Sequin Placement: Try creating patterns or gradients for additional interest. For example, a starburst pattern of sequins from the tray’s center can give a radiant effect. Similarly, a gradient with densely packed sequins at one end thinning to sparse at the other creates a falling-star effect.
While the process is straightforward, mastering epoxy work requires careful attention to detail and patience in waiting for layers to cure. With time and practice, creating a sparkling sequin epoxy tray becomes an enjoyable hobby that yields beautiful results.
Idea #4: Color-blocking Epoxy Tray
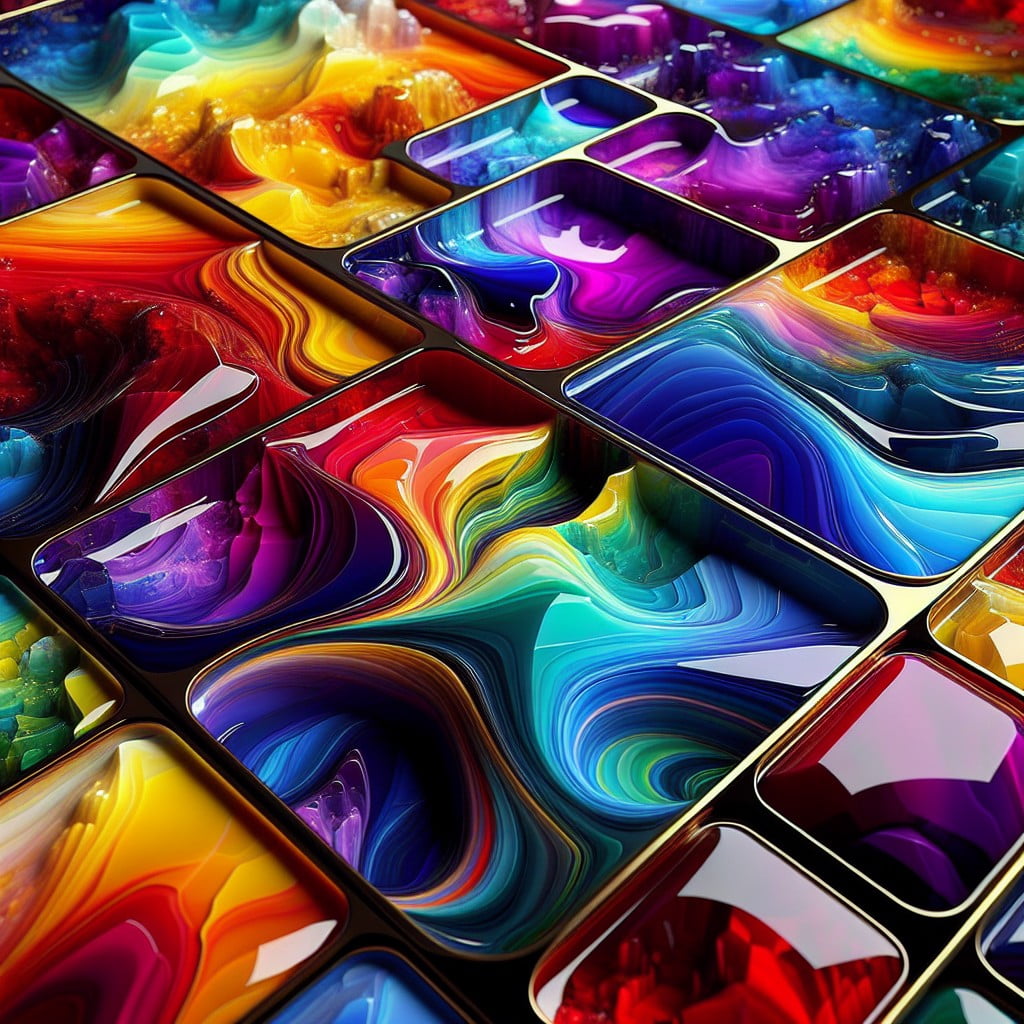
Creating a color-blocking epoxy tray involves a straightforward, yet very artistic process.
Firstly, selection of colors is vital. It’s essential to choose colors that either contrast or complement each other. A classic example might include pairing bright hues with monochrome shades or cool tones with warm ones. It’s your tray, make it reflect you!
Next, make use of tape to establish clean lines. This step adds to the color-blocking effect by creating distinct borders between different colors.
When applying epoxy, each color should be poured and cured separately to prevent them from mixing. Patience is key here, remember, good things take time!
Once cured, peel off the tape for a stunningly sharp and clean color contrast. The exciting part is revealing your unique, vibrant piece of functional art!
Finally, don’t forget the final coat of epoxy to seal everything in place. This final touch ensures your tray is protected and beautiful for years to come!
In sum, a color-blocking epoxy tray is all about bold, clean colors in distinct blocks. It can be a fun, expressive way to add a splash of color to your home. Now, it’s your turn to create your own unique masterpiece!
Idea #5: Inlaid Stone/Marble Look Epoxy Tray
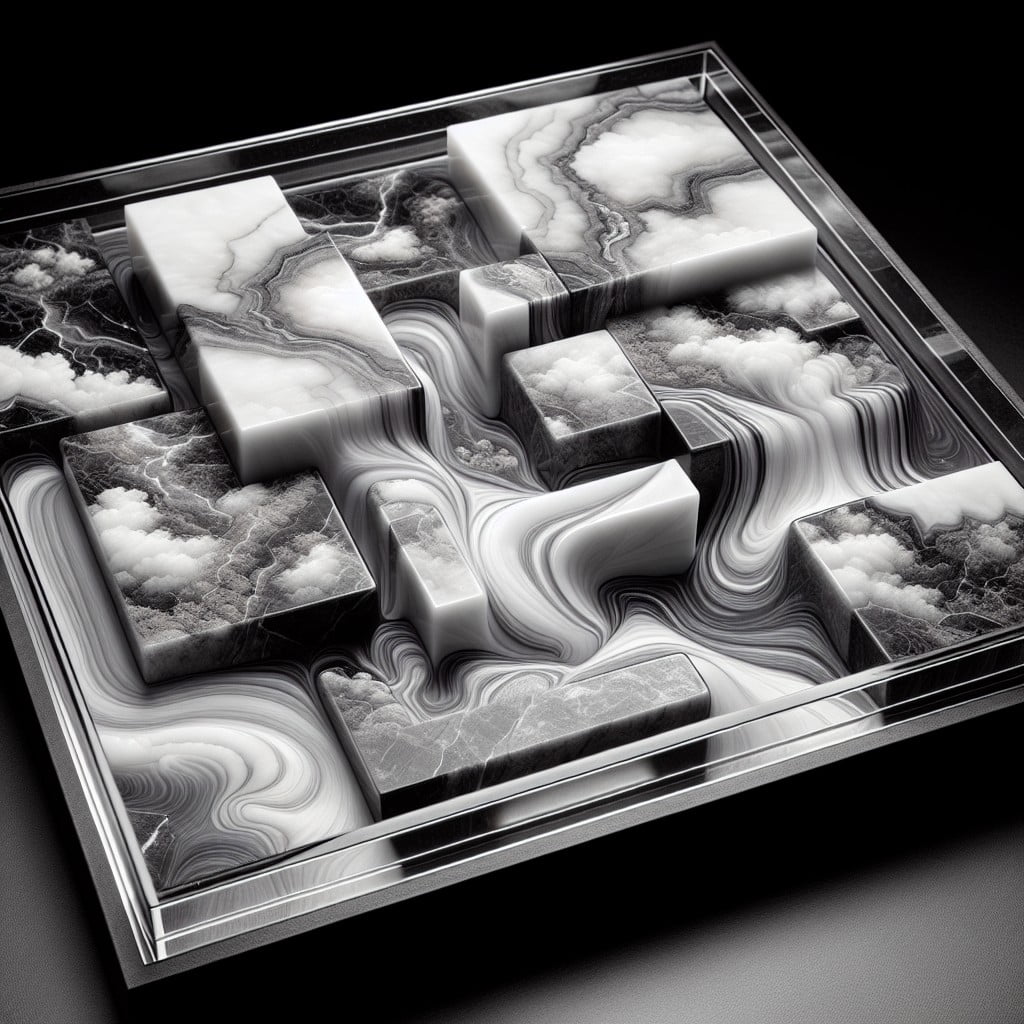
Creating an authentic inlaid stone or marble look with epoxy is easier than you think. It starts by selecting contrasting or complementary colors. Typically a tray base can be painted white, black, or metallic. Upon this base, drops of epoxy resin tinted in various shades can be added.
Using a heat gun or a blow-dryer, you can manipulate this semi-liquid epoxy around the tray to mimic authentic marbling. The key point is to create twists, turns and swirls; natural irregular patterns typical of genuine marble.
Highlighted veins can be added in gold, silver or even copper for added depth and texture. Remember, patience is crucial to let the layers dry before adding the next. This way, the textures gain dimensionality, offering the real feel of inlaid stone or marble.
Endless variations can be achieved on this theme by varying color combinations, vein thickness and the level of blending. So, go ahead and create your own signature epoxy tray, mirroring the fascinating grandeur of inlaid stone or marble.
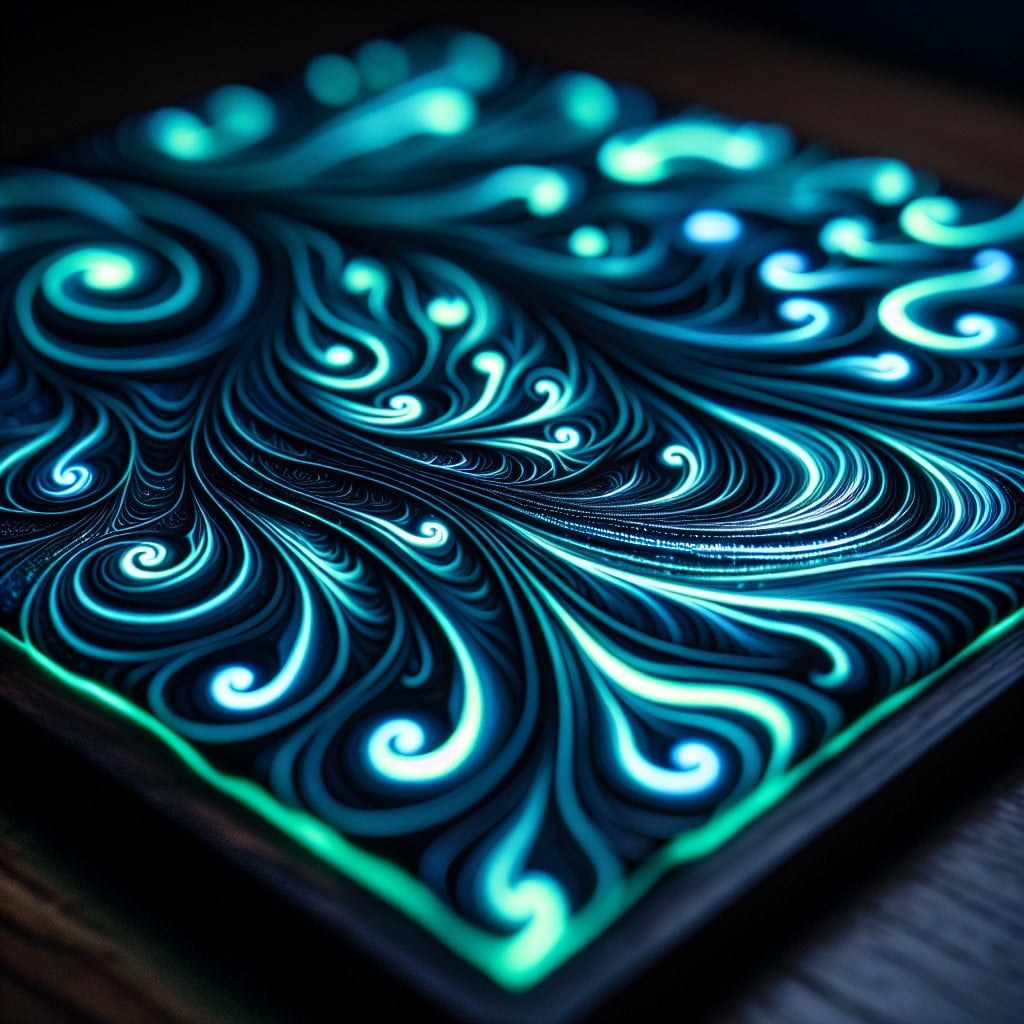
Idea #6: Galaxy Inspired Epoxy Tray
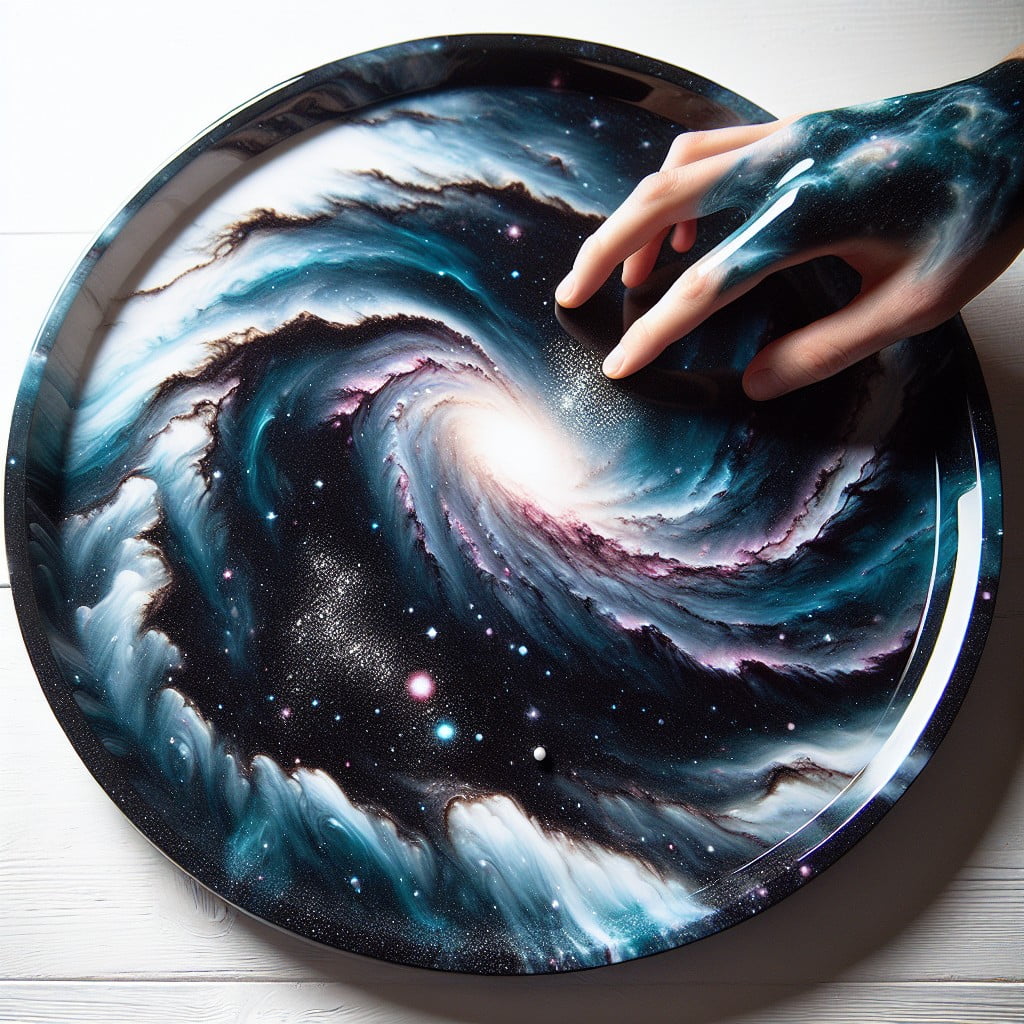
Crafting a Galaxy Inspired Epoxy Tray involves a beautiful blend of colors that mimic the cosmic spectacle. Here’s how to breathe life into the concepts of this celestial project.
1. Color Choices: Employ a palette of black, white, and blue. Gradients of purples and pinks can add depth. Silver or white specks echo distant stars.
2. Technique: Apply shades in swirls and patches to mimic the nebulae form. Interweaving dark and light tones is key to achieving the galaxy effect.
3. Star Creation: Flick white acrylic paint from a brush for a simple starry effect. Alternatively, explore glow-in-the-dark paints for a breathtaking nighttime display.
4. Finishing Touches: Incorporate glitter for an extra starlit glow. Be careful not to overdo it. Less is more when it comes to interstellar sparkle.
Remember, it’s about creating an allure of the endless universe on the tray, ensuring a captivating focal point in any setting.
Idea #7: Vintage Lace Epoxy Tray
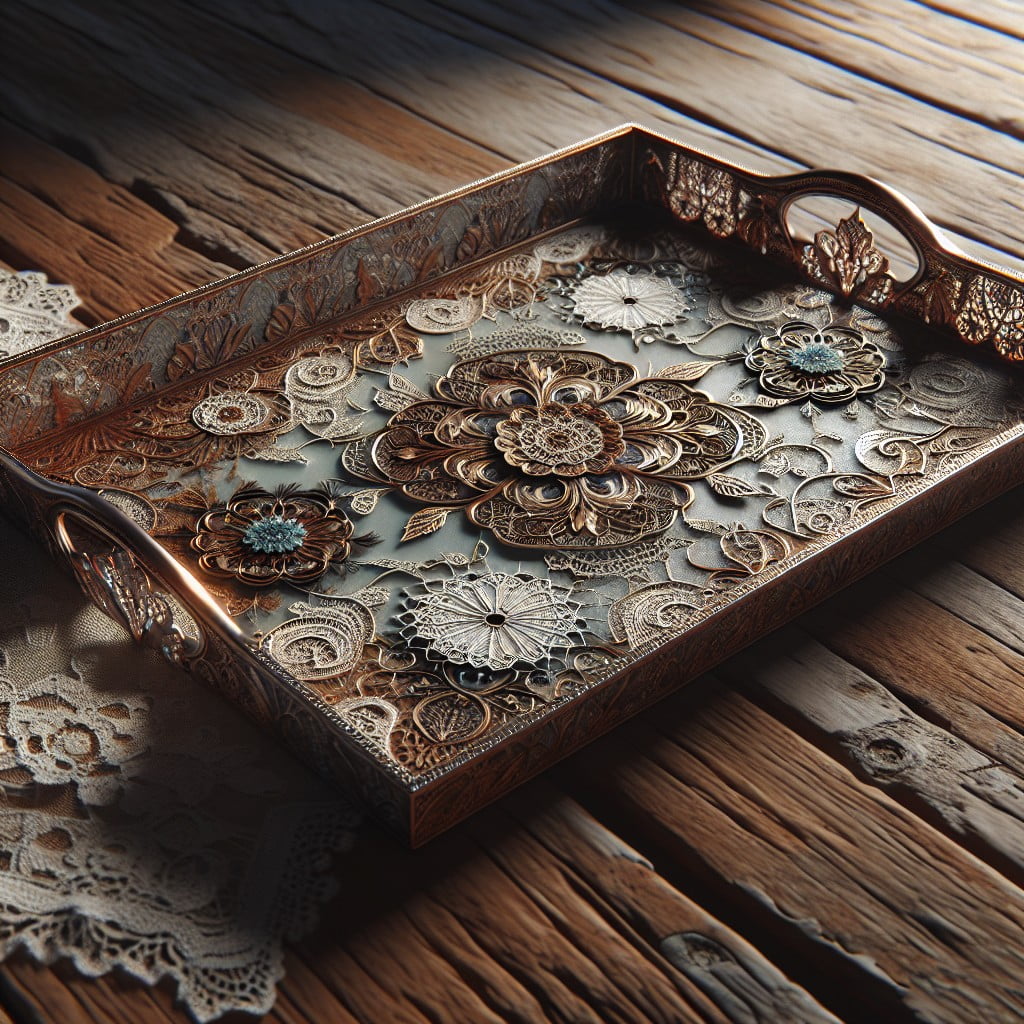
Creating an epoxy tray using vintage lace can give your serveware a classical charm. A captivating blend of old-world allure and modern functionality, this unique concept honors the timeless beauty of lace patterns.
For a successful execution, pick any lace pattern; floral patterns can lend additional depth and intrigue. Remember, intricate designs translate better owing to their pronounced details. Select your epoxy resin; clear variants ensure the lace pattern shines through.
Prepare the tray; clean and dry. Position your chosen lace on the tray, ensure it sits flat. Mix the epoxy resin as per the manufacturer’s instructions. You’ll pour this mixture over the lace, evenly coating it.
It’s imperative not to rush the curing process. Allow it full-time —usually 12 to 24 hours— for the best results. Once thoroughly cured, you have a vintage lace epoxy tray! This mix of nostalgia and craftsmanship can be a conversation starter at your next gathering. Practicing patience and precision during the process guarantees admirable results.
Maintenance is as crucial as creation. Regularly dust off with a soft cloth. Not dishwasher safe; wash by hand with mild soap and water. Indulging in this DIY project not only brings artistic satisfaction but also a durable, chic tray to your collection.
Idea #8: Abstract Art Epoxy Tray
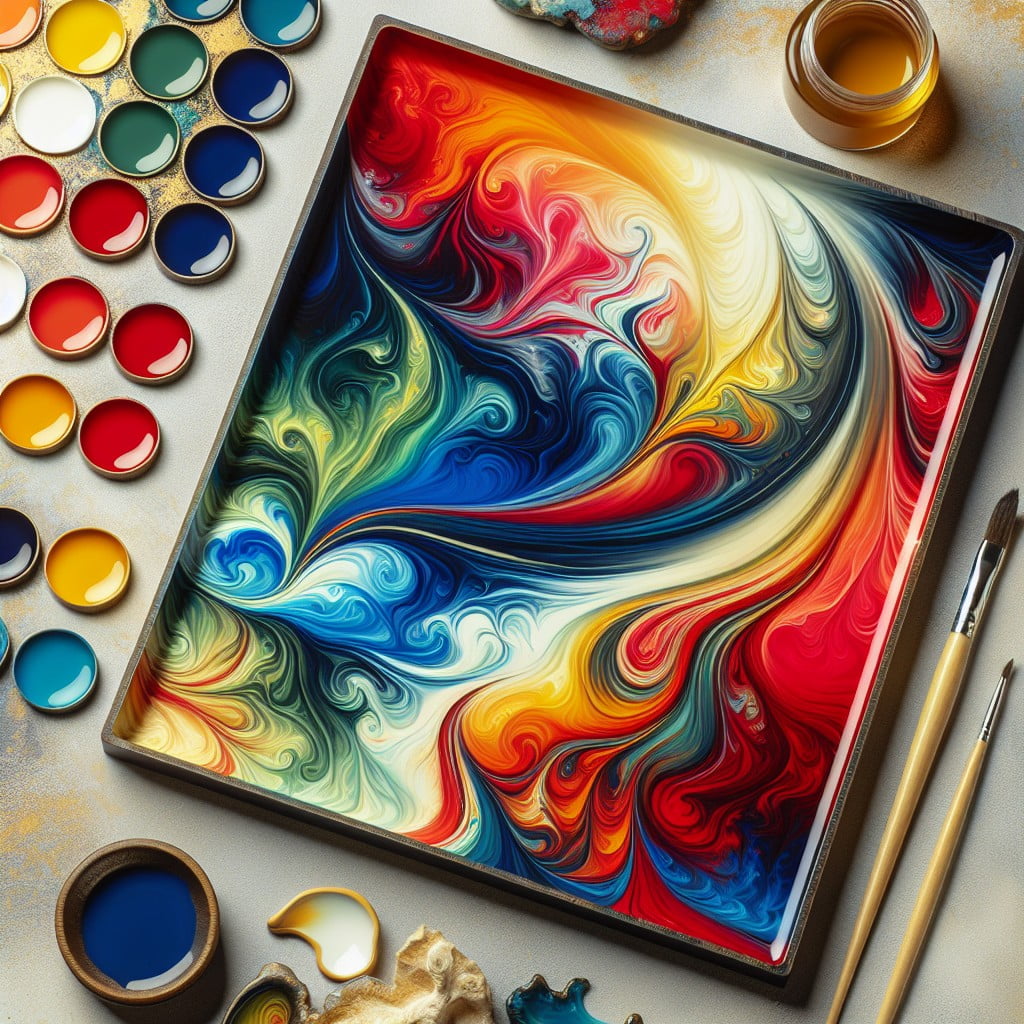
Diving straight into the actual making, you first need to gather your supplies including some acrylic paints, a variety of tools for swirling the paint, and of course, your epoxy resin.
Begin by dropping pools of various colored paints onto the tray, with no specific pattern in mind. Next, use your tools to randomly swirl and drag the paint.
The real trick comes in envisioning the abstract design you want to achieve. Remember, there’s no right or wrong in abstract art. It’s all about creating something unique and visually appealing. As you’re swirling your paints, consider balance in color distribution and swirl sizes.
The epoxy component comes in after you’re satisfied with your art. The application of epoxy resin preserves your artwork, giving it a glossy, polished finish. Ensure to follow safety instructions when handling the resin. After the curing process, your abstract art epoxy tray is ready to steal the show at your next gathering.
It’s all about letting your creativity flow and bringing your imagination to life on a functional piece of art.
Idea #9: Seasonal Epoxy Tray (Winter, Spring, Summer, Fall Themes)
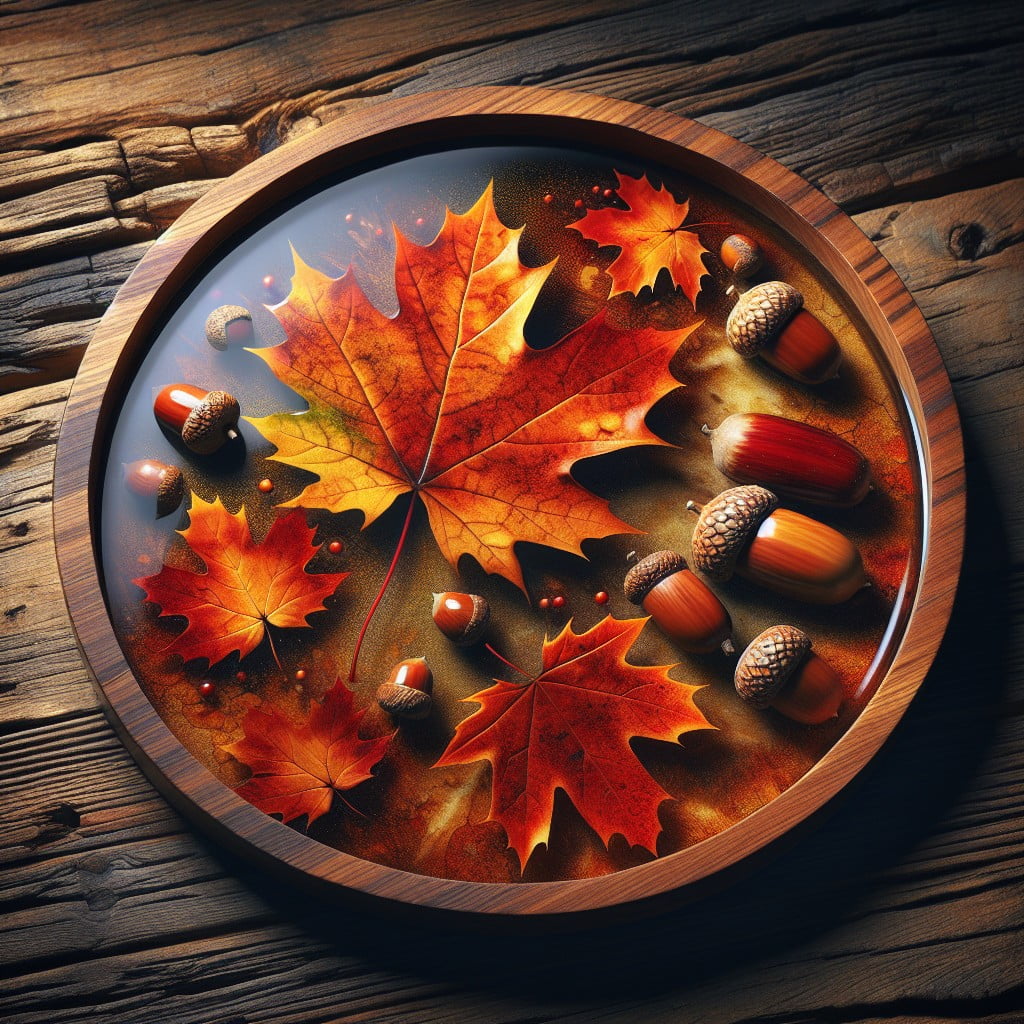
Embracing the beauty of the seasons, these trays have designs resonating with different times of the year. To realize a winter-themed epoxy tray, consider invoking the feeling of a snowy day, using blue and white swirls or adding touches of silver glitter for a frosty finish.
Come spring, you could incorporate real flower petals or images of blooming flowers into your design. Summer trays can bring to life the vibrancy of the season by showcasing bright colors or even sand and seashells to add a beach-like feel. When autumn arrives, warming colors like orange, brown, and red can depict the falling leaves.
Each lovely piece can be a unique way to celebrate the change of seasons and make for an engaging conversation starter when hosting guests. Your creative palette is limitless; experiment, have fun and let the seasons guide your designs.
Idea #10: Montage Photo Epoxy Tray
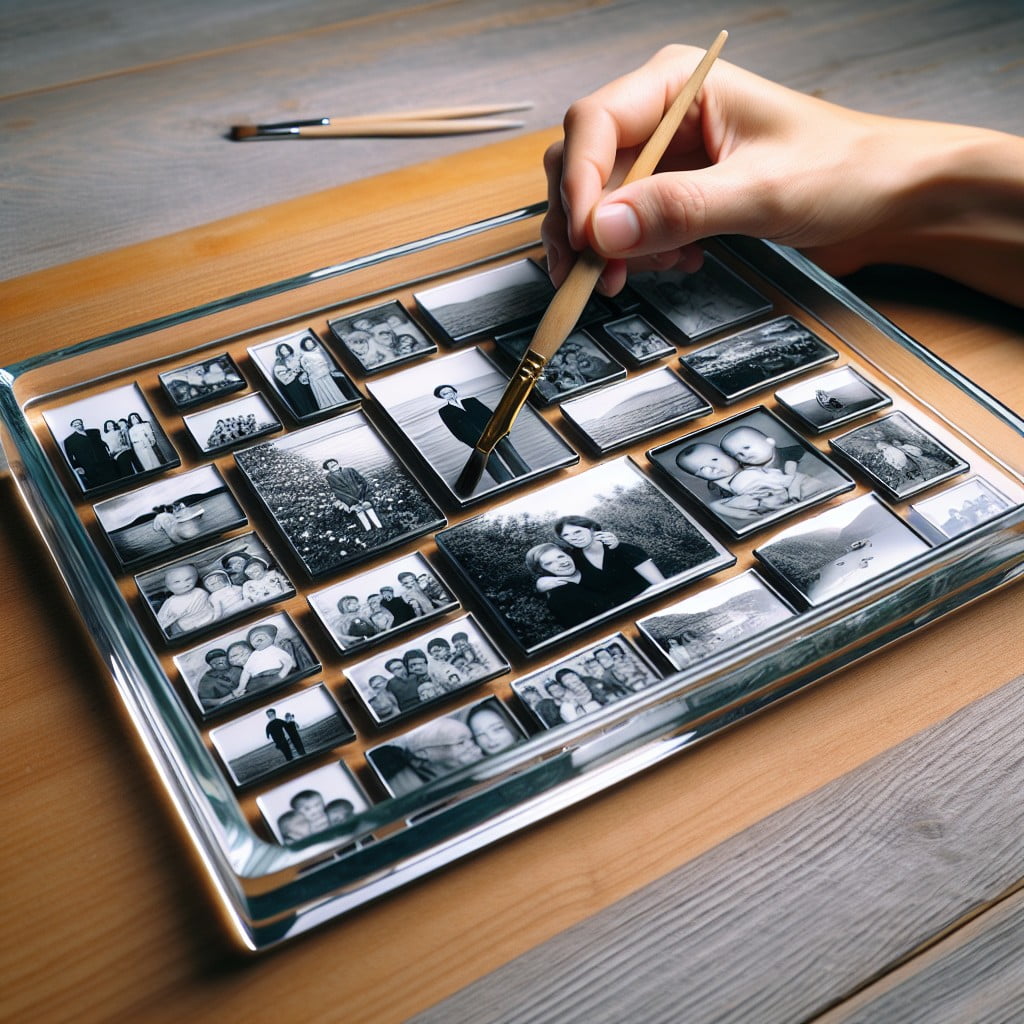
Delving into this creative endeavor, picture selection holds paramount importance – consider theme, color scheme, and sentimental value. High-quality, vivid images yield the best results. Print them on photo paper at a suitable size to comfortably fit on your tray.
Next, arrange the photos on the tray – there’s no particular rule, overlap them for a collage effect or space them out for clean viewability.
Once satisfied with the arrangement, apply a thin layer of mod podge to the tray and attach your photos. Allow this to dry fully before proceeding.
Mix the epoxy resin as per manufacturer’s instructions, and gently pour it over your photos, ensuring it reaches the tray’s edges and carefully covering all photos.
Take special care to remove any air bubbles that may have formed using a heat gun or torch. Riniculous patience is important here, wait for the epoxy resin to completely cure – this could take anywhere from 12-72 hours, depending on the brand used.
The final product – a unique, engaging tabletop accessory that not only adds aesthetic appeal, but also conjures personal memories and emotions with every glance.
Safety note: Epoxy resin should be handled with care as improper use can lead to skin irritation or eye damage. Use in a well-ventilated area, and always wear protective gloves and eyewear.
Idea #11: Nautical Theme Epoxy Tray
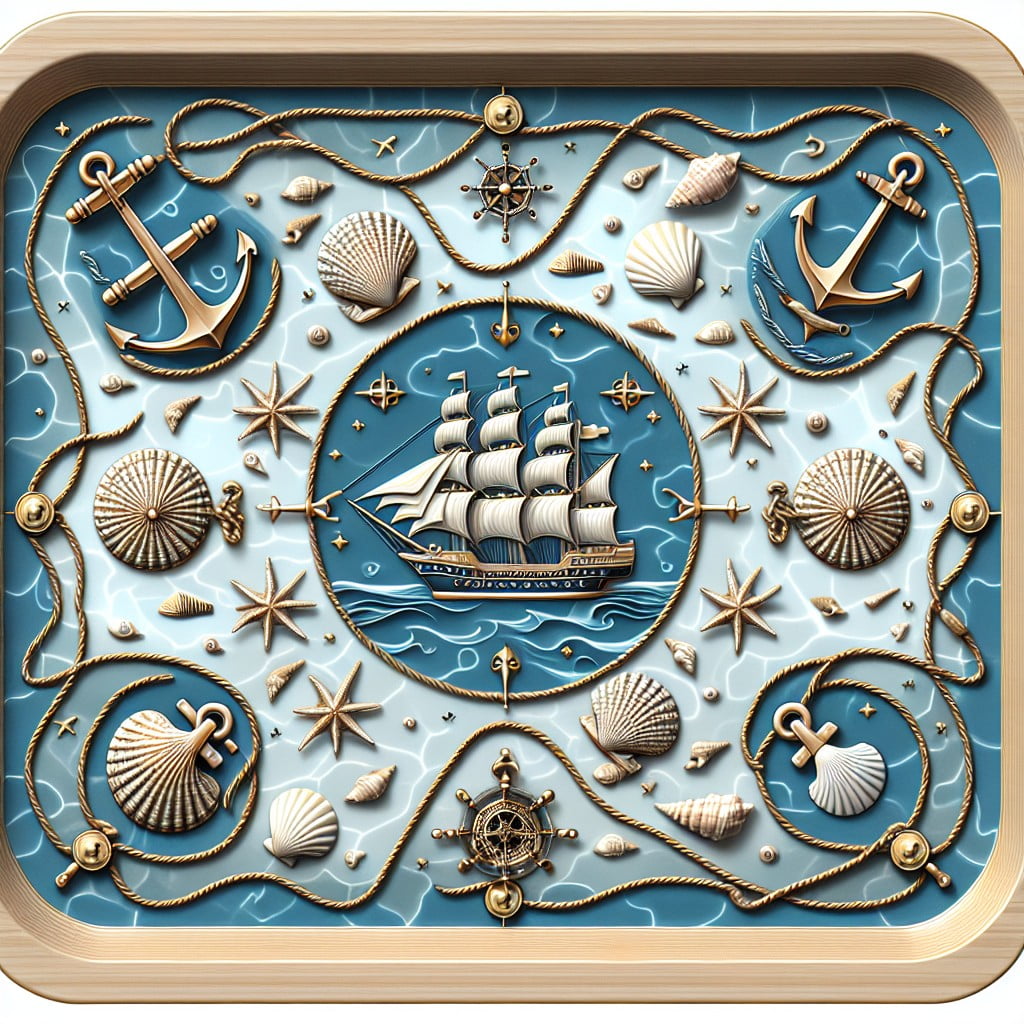
A nautical-themed tray offers a calming, seaside feel to your entertaining or decorating endeavors. To create this style, first, you have to choose your color palette. Think in terms of coastal hues like blues, whites, and sandy yellows acting as the base.
Secondly, the addition of small, real-world elements can give an authentic feel. Try embedding objects like seashells, starfish, or beach glass into the epoxy before it sets.
Lastly, consider implementing rope or sailor-knot motifs around the edge of the tray to amplify the nautical theme. Please remember: smaller, evenly spaced elements yield a cleaner and more polished finished product.
Idea #12: Floral Epoxy Tray With Pressed Flowers
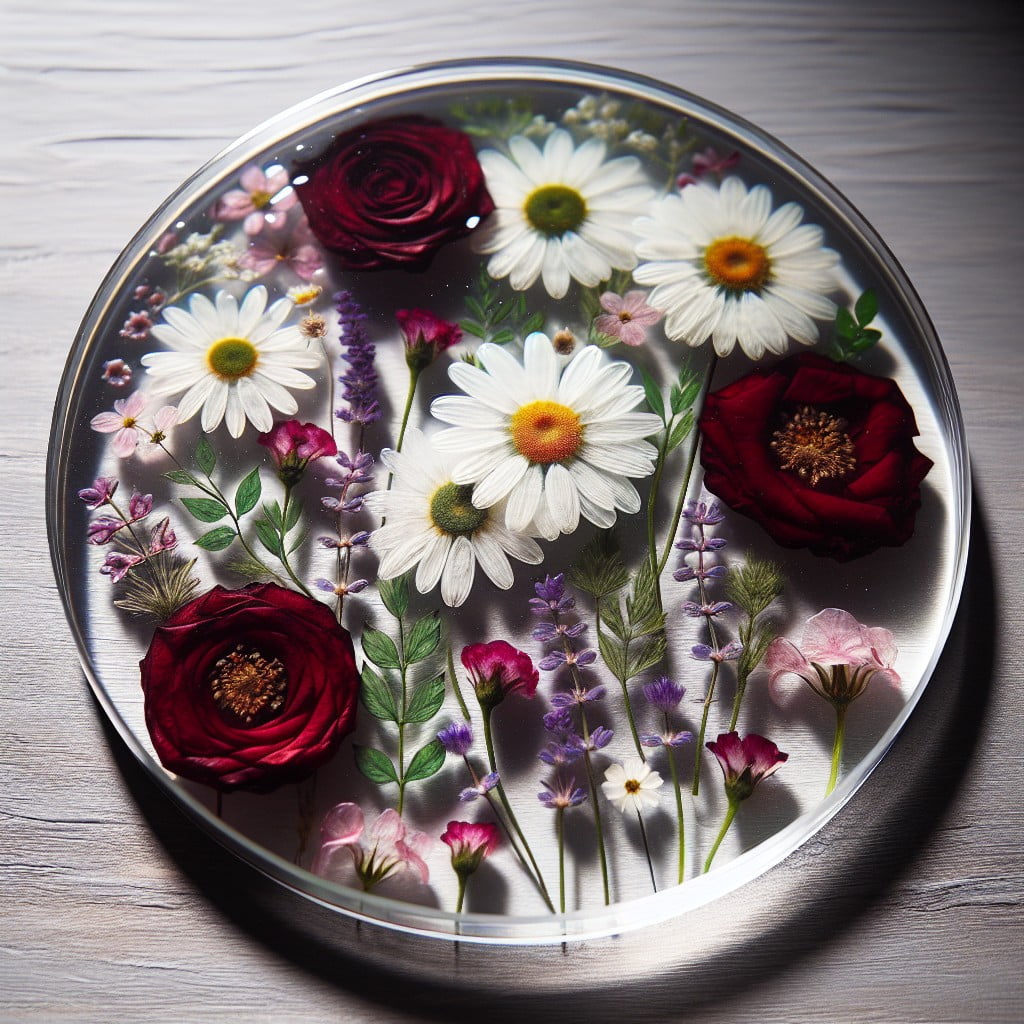
To create the enchanting aesthetic of a floral epoxy tray, start with choosing a variety of fresh flowers. Opt for colorful blooms as they’ll retain their vibrancy, even after pressing. Let’s delve into the basic steps:
1. Harvest fresh flowers: Ensure they are free from moisture and pests. Remember, morning hours are best for picking, when they’re fully hydrated.
2. Press the flowers: Lay out blooms between sheets of parchment paper and heavy books. This process will take about two weeks.
3. Arrange dried flowers: Once completely dry, arrange them on the tray to suit your design preference.
4. Prepare and pour epoxy: Use clear epoxy resin, follow the given instructions to prepare. Pour it over the arranged flowers. Use a heat gun for spreading and removing any bubbles.
5. Let it cure: Allow the tray to cure in a dust-free environment. This process usually takes around 24 hours, depending on the epoxy brand.
Handle the epoxy resin with care and always use protective gear. Take note, pressed flowers can add texture and depth to an epoxy tray, crafting an exquisite piece of decorative art.
Idea #13: Glow in the Dark Epoxy Tray
Creating a Glow in the Dark Epoxy Tray packs a significant punch visually, making it a unique artwork to display in your home. This tray is perfect for entertaining guests during late-evening parties or bringing a touch of whimsy to children’s rooms.
To make this luminescent wonder:
- You must first prepare your surface. Clean the tray thoroughly to ensure no dust or residue remains. This makes for a smoother application.
- Mix your epoxy resin as per the packaging instructions, ensure correct proportions for optimal results.
- Add a glow-in-the-dark pigment to the resin. These come in different colors, allowing you to experiment with your preferred glow effects.
- Pour the mixture into the tray. Using a heat gun can help spread the resin evenly while also popping any air bubbles that may have formed.
- Let it cure fully. This may take up to 24-48 hours. Patience is key for a beautiful, durable finish.
Remember, working with epoxy requires ventilation and protective gear – safety first! Also, avoid direct sunlight as it can cause the glow pigment to fade over time.
Idea #14: Animal Print Epoxy Tray
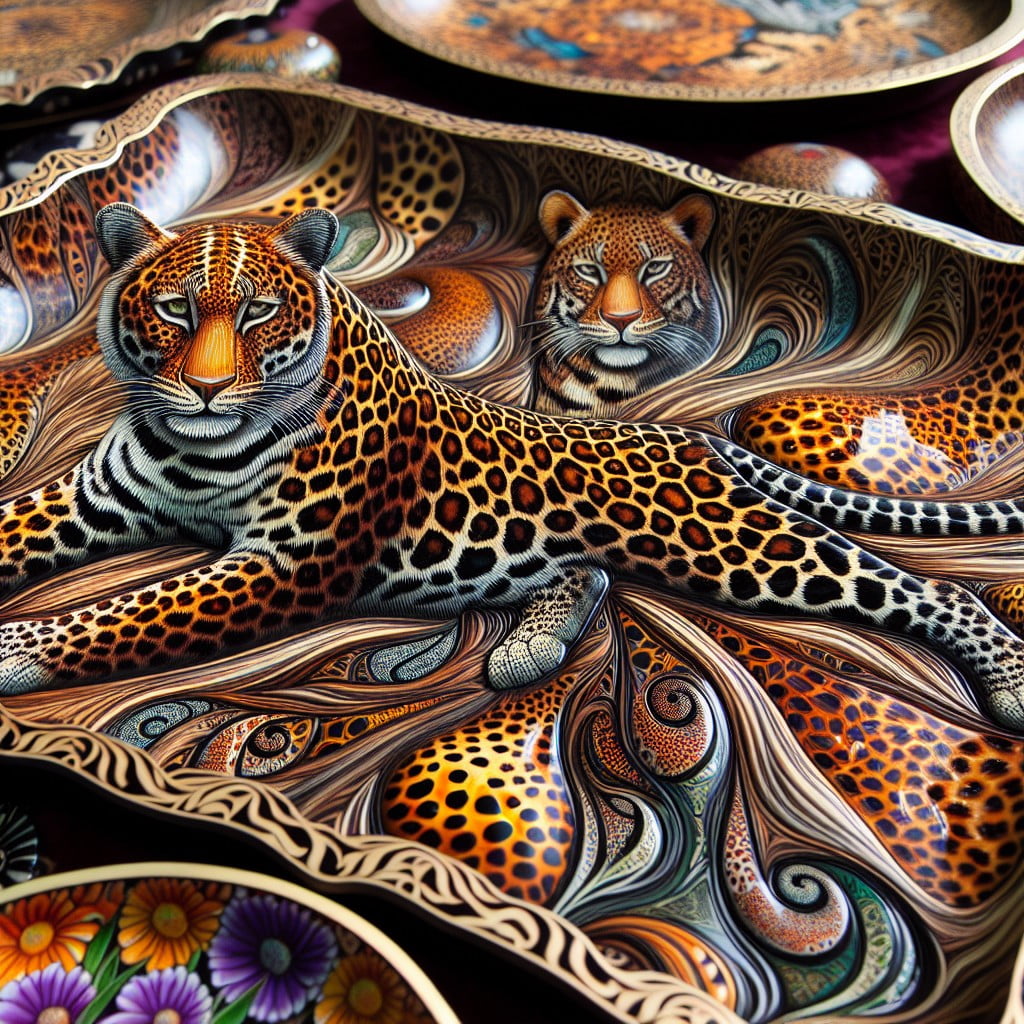
An exotic, bold choice can be channeling the wild spirit of your favorite animal! You can opt for timeless zebra stripes, dramatic cheetah spots, or even the intricate mosaic-like patterns of a python’s skin.
The key here is choosing the right contrasting colors because this will make the design stand out and look more realistic. Utilize thin brushes or sponge for detailing and work slowly to create the natural randomness of the patterns.
Remember: this is not about perfection, it’s about capturing the raw, wild beauty. With patience, a steady hand, and a bit of creative freedom, you can craft an epoxy tray that is a true homage to the animal kingdom.
Idea #15: Neon Swirl Epoxy Tray
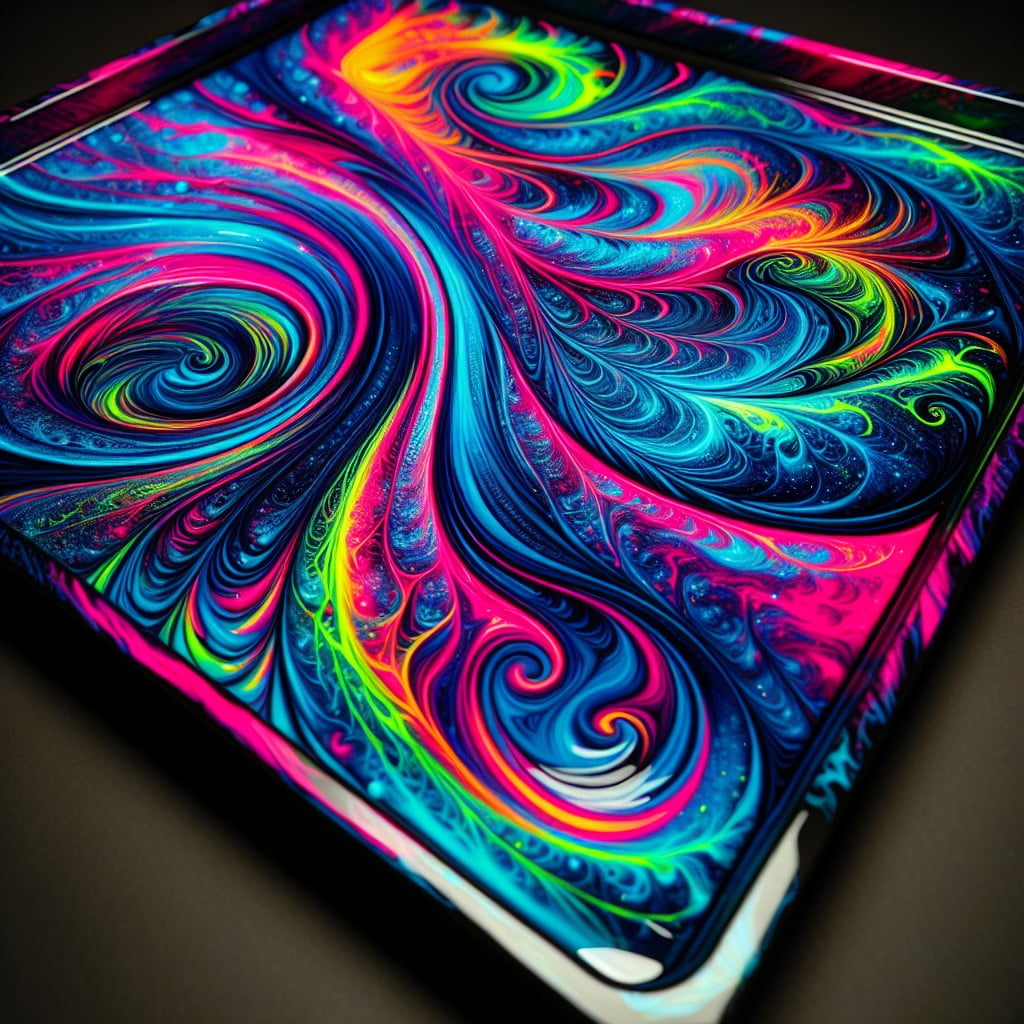
Creating a Neon Swirl Epoxy Tray requires an understanding of color blending and layering with epoxy resin. Start by selecting a few vibrant, neon colors for the project, making sure they contrast well to create a visually enthusiastic, exciting piece.
To begin the process, thoroughly mix the epoxy resin and divide it into separate cups for each color you’ve selected. Remember to add a drop or two of neon pigment into corresponding cups and carefully blend until you achieve intense, glowing hues.
Next, gently pour your colors onto the tray, starting in the center and spiraling outward. Here’s the opportune moment to let your creativity soar. Alternate the colors, mix them, and form patterns. Keep in mind, these resins take time to cure, thus giving you ample time to modify your design.
However, avoid overworking the colors to prevent ending up with a monotonous, muddy surface. Instead, strive to create vibrant swirls by making a few thorough passes with a mixing stick or a heat gun. This will create a mesmerizing, psychedelic effect on your tray, turning it into both a functional item and a statement piece.
Safety is crucial when handling epoxy resin. Always work in a well-ventilated space, and equip yourself with protective clothing, gloves, and eyewear. Remember to follow the manufacturer’s instructions to the letter for optimum results.
Idea #16: Epoxy Tray With 3D Illusion Art
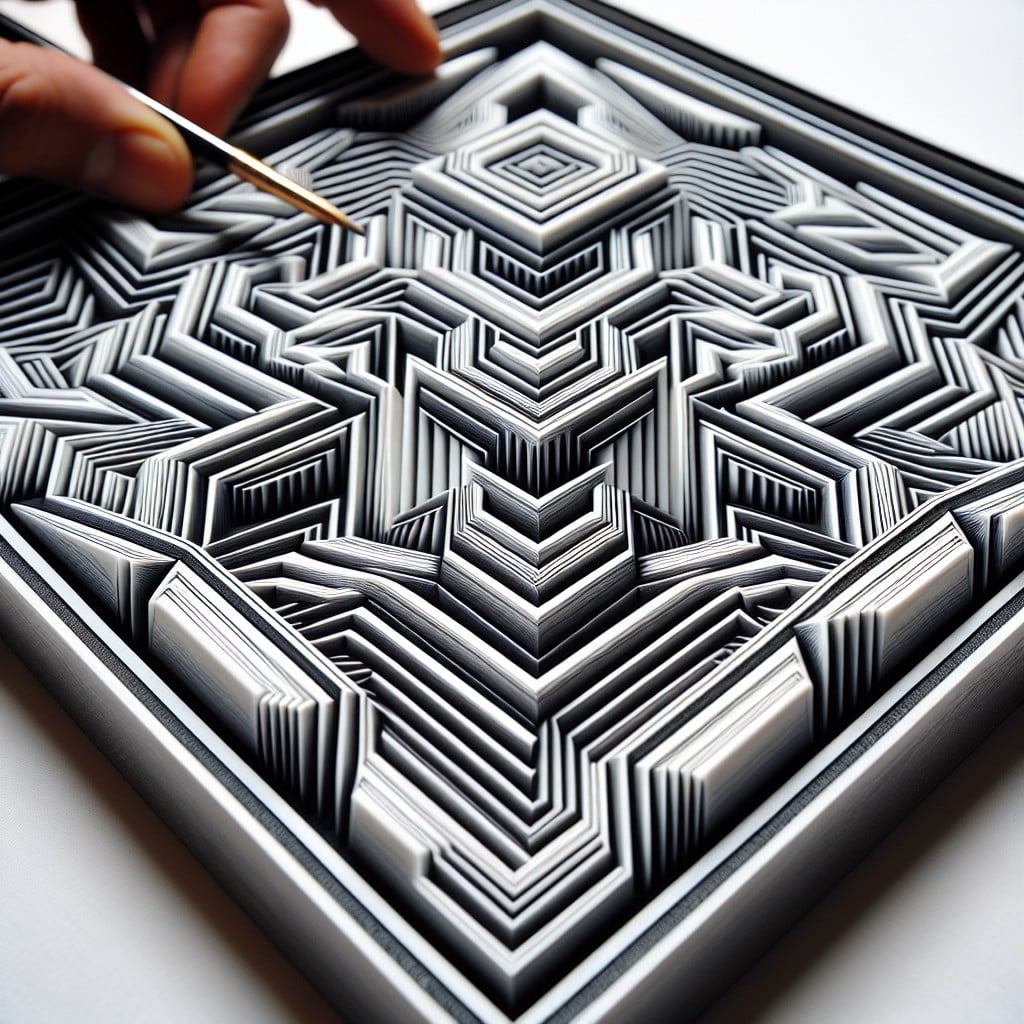
Creating a 3D Illusion Art Epoxy Tray can be a truly captivating experience. It’s about layering different shades of colored epoxy resins and adding depth to your design.
Start with a clear layer on your tray base, sprinkle some glitter or pigment powder, then wait for it to cure. Add another layer of colored epoxy and repeat the process until you achieve the desired depth.
It demands precision, patience, and creativity as you are tricking the eye into visual depth. Mastering the technique can make your tray not only a utility but a conversation starter, showcasing an underwater scene or abstract designs that seem to leap from the surface.
Remember to seal with a clear layer of epoxy to preserve your illusion art. Keep your design waterproof and wipe-clean by using heat to pop any bubbles, ensuring a smooth finish.
Idea #17: Sports Team Logo Epoxy Tray
Showcasing team spirit is no longer restricted to caps and jerseys. A sports team logo epoxy tray is a great way to display loyalty and add personality to your home. These trays are not only decorative, they can be handy during game nights for serving snacks or drinks.
The prime concept is embedding a favorite sports team logo into an epoxy mixture. Make sure to choose a high-resolution picture of the logo for clarity. Digital graphics are a better option for vibrant colors and crisp lines. Print the chosen logo on a high-quality paper to prevent it from disintegrating when embedded into the epoxy.
Once the logo is ready, carefully place it in the center of the tray. Pour a thin layer of epoxy over it, ensuring it’s fully covered. Allow it to cure fully before adding the final layer of epoxy resin.
Remember to place the tray on a level surface throughout the drying process. It’s also important to wear protective gear when working with epoxy to ensure safety. Mix the epoxy according to the manufacturer instructions for best results.
With patience and precision, the end result will be a custom sports team logo epoxy tray, perfect for celebrating game day in style. A fantastic conversation starter, it can also be an excellent gift for sports lovers. The process can also be replicated for other themes, offering limitless customization possibilities.
Idea #18: Personalized Epoxy Tray With Initials/Name
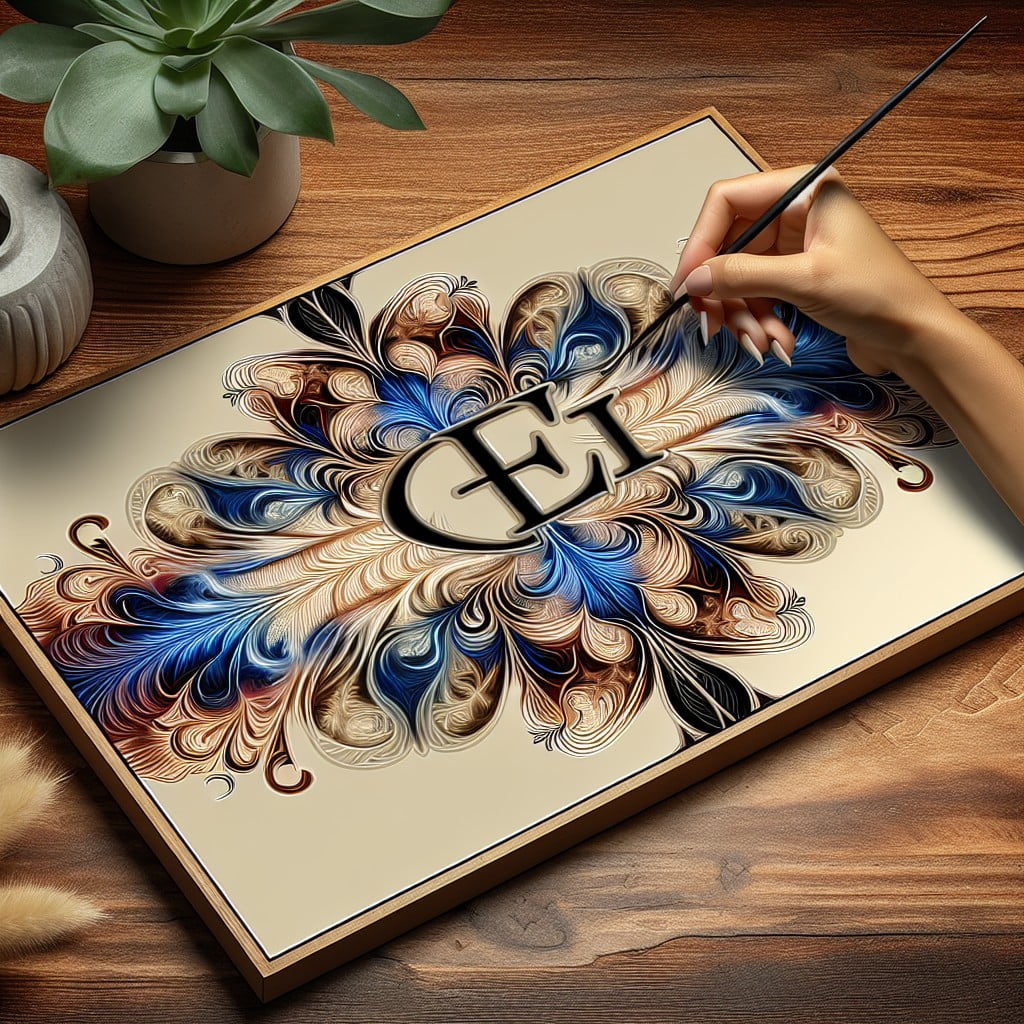
Firstly, consider the layout and font style. This will determine how your initials or name will appear visually on your epoxy tray. High contrasts like white on black or gold on navy could give your tray a distinguished edge.
Next, embedding the lettering. Options range from using adhesive vinyl stencils to custom silicone molds. Vinyl stencils, cut to your chosen font, are stuck onto the tray before the epoxy pour. After curing, peel off for a polished look. On the other hand, silicone molds allow epoxy letter casts, creating an upscale three-dimensional effect.
Thirdly, select the right epoxy. For a clear, glossy finish, choose a high-quality, clear drying epoxy resin. If you’re seeking a colored background, add pigments.
Finally, prepare and pour the epoxy. Ensure your tray is clean, dry, and level before starting. Mix your epoxy according to the manufacturer’s instructions and pour it over your tray. Allow it to cure fully before using to protect your personalization.
Idea #19: Epoxy Tray With Embedded Coins/Currency
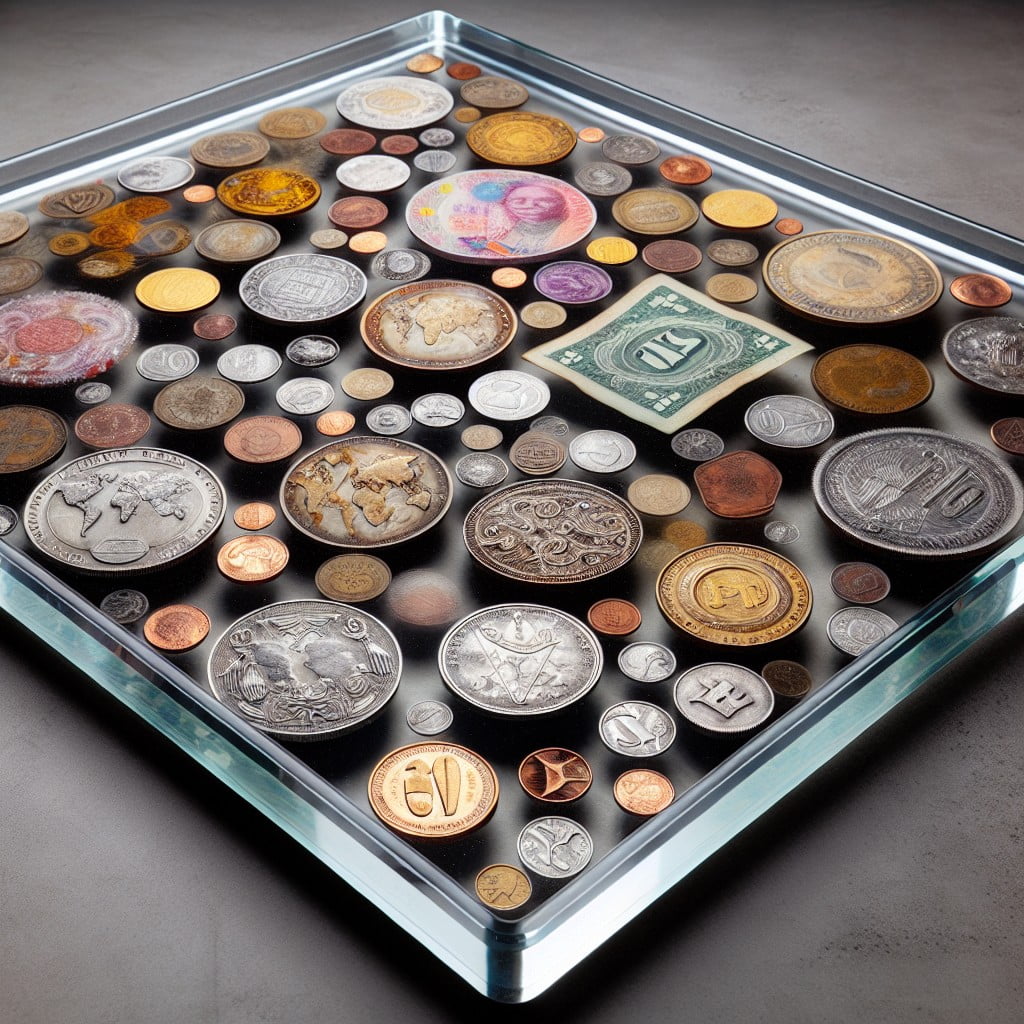
In this unique variation, coins, paper money, or even infrequently circulated currencies could be integrated into the design. This concept presents an innovative technique to feature elements of travel or history right in the comfort of your home.
To start, select an assortment of coins or bills. Perhaps you have leftover currency from your global adventures, a collection of vintage coins, or newly minted coins that are simply shinier.
Next, arrange these items on a plain tray, aiming for a pattern that evokes curiosity or tells a story. Consider featuring coins from specific years or particular countries. Similarly arranged bills can also create interesting visual patterns.
Pour a thin layer of epoxy resin over your arrangement to secure the position of the coins or bills. Make sure each piece is thoroughly cleaned and dried; any moisture can affect the setting process.
Allow this first layer to cure fully. This is critical to prevent the coins or bills from floating around when the final layers are applied. Remember, patience here will help to ensure the success of the final product.
After the first layer is cured, pour the final layers of epoxy over the tray. These additional applications help to create visual depth and protect the embedded coins or money.
Each stage of the process guarantees careful preservation and presentation of the elements, creating a one-of-a-kind tray with a clear foreground and background. A memorable anecdote accompanying each coin or bill greatly enhances the intrigue and personalization of your creation.
Idea #20: Celestial Inspired Epoxy Tray
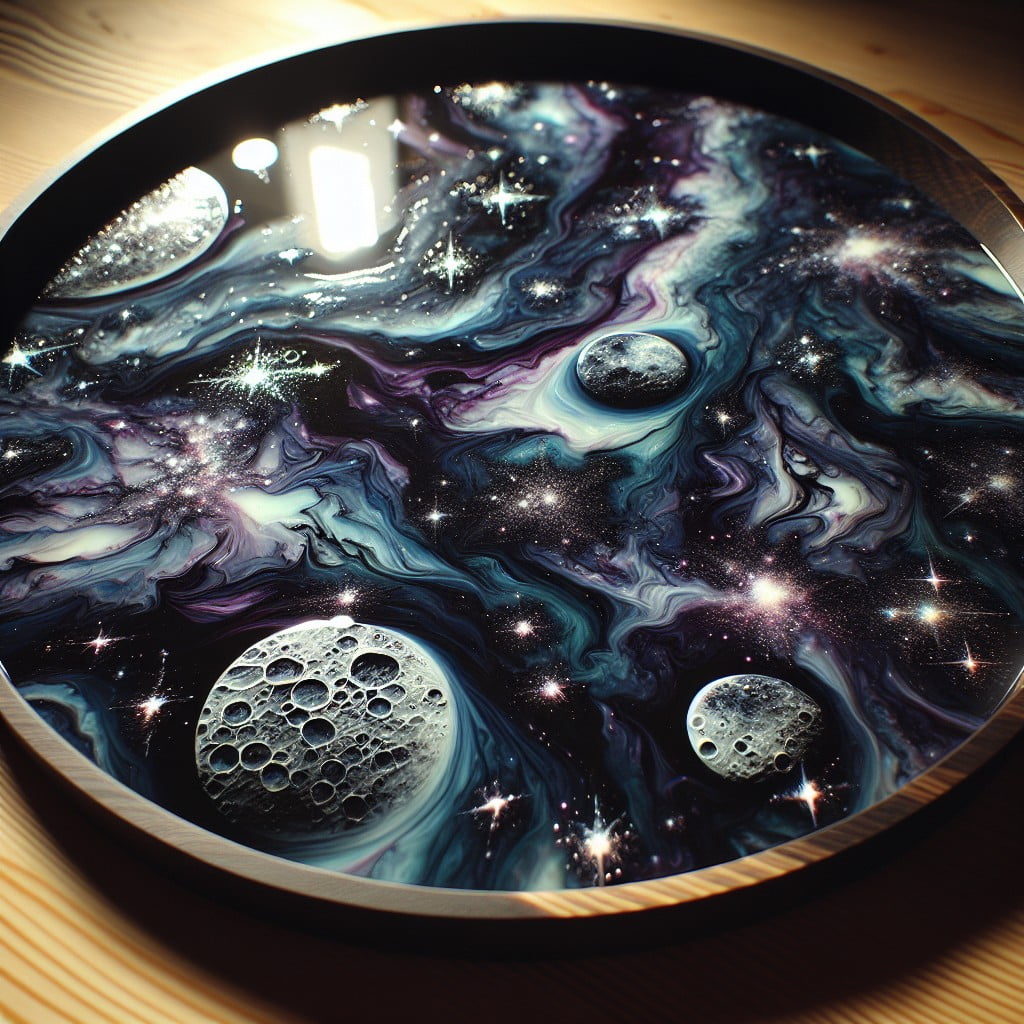
Begin this marvelous project by selecting a color palette that embodies the night sky, typically varying shades of blue, black, and purple. You can also include whites and metallics for stars. Start with a clean, smooth tray, prepared per epoxy instructions. After properly mixing your epoxy resin, add your chosen color pigments, allocating more to the shades you’d like to dominate your design.
Pour the colored epoxies onto the tray in layers, using darker colors for the backdrop and lighter ones to add a nebula effect. Swirl these together gently using a stick or palette knife to create the impression of distant galaxies. To create stars, flick white or metallic acrylic paint from a paintbrush over the tray surface.
For added celestial touch, you might consider adhering glow-in-the-dark stars or astrological symbols before applying your final resin layer. When done correctly and allowed to properly cure, your end result will be a mystical tray bringing a piece of the cosmos into your home. Just remember that safety is paramount when handling epoxy, always work in a well-ventilated area and use protective equipment.
Ideas Elsewhere
- https://www.intoresin.com/blogs/intoresin-guide/diy-resin-tray-ideas-step-by-step-instructions
- https://www.diyncrafty.com/diy-resin-tray-projects/
- https://www.bestbartopepoxy.com/blogs/ultraclear/resin-tray-ideas
- https://www.facebook.com/DIYwithHometalk/videos/resin-serving-tray/267293241516349/
- https://sustainmycrafthabit.com/upcycled-diy-resin-tray-with-driftwood/
Read More Like This
 15 Funny Graduation Cap Ideas to Make Your Big Day Unforgettable
 15 Unique DIY Christmas Decorations Ideas for a Festive Home
 15 Creative Science Fair Board Ideas to Amaze Your Audience
 15 Handmade Envelope Decoration Ideas for Creative Gifting
 10 DIY Gifts for the Whiskey Lover in Your Life
Recap: