Last updated on
In this blog, we’ll guide you step by step on how to install a vent roof tile, ensuring proper ventilation and enhancing your home’s overall efficiency.
Welcome to my latest blog post, where I will be sharing with you the step-by-step guide on how to install a vent roof tile. As a seasoned home decorator, I have had the pleasure of working on various roofing projects, and one thing that always comes up is the importance of proper ventilation.
A well-ventilated roof not only helps to regulate temperature but also prevents moisture buildup that can lead to mold and other damages. Installing a vent roof tile may seem like a daunting task, but with the right tools and instructions, it can be done easily.
So, whether you are a DIY enthusiast or just looking to learn something new about home improvement, read on for an informative guide on how to install a vent roof tile like a pro!
Key takeaways:
- Different types of vent roof tiles: ridge vents, static vents, turbine vents, solar-powered fans.
- Tools needed: roofing hammer, pry bar, measuring tape, underlayment material, ventilation tiles, roofing nails/screws, caulk/sealant.
- Safety precautions: appropriate clothing, sturdy ladder, avoid wet or windy weather, have someone assist.
- Removing old tiles: locate and pry off damaged tiles, wear protective gear.
- Installing underlayment: measure and roll out underlayment, secure with staples/nails, avoid puncturing holes.
Vent Roof Tile Types
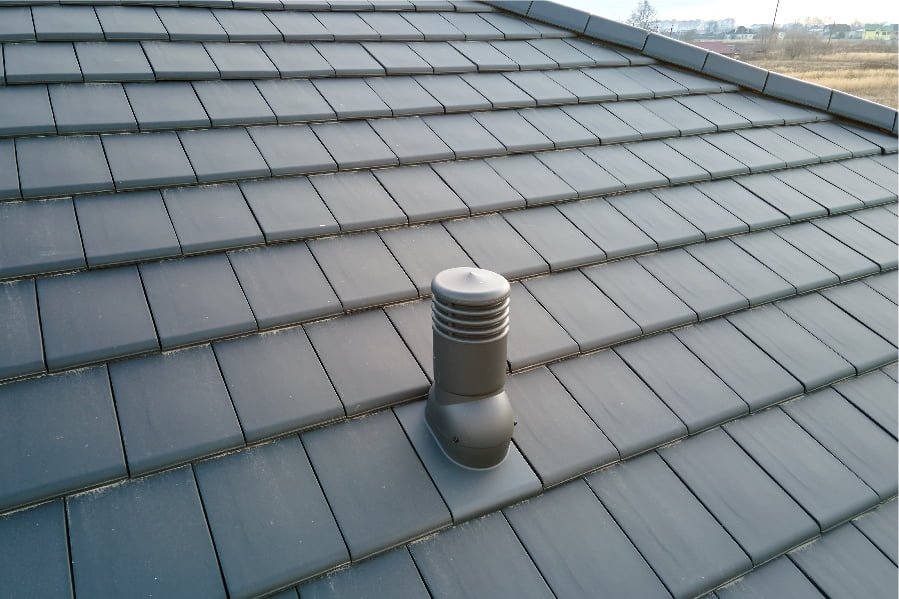
Before we dive into the installation process, it’s essential to understand the different types of vent roof tiles available. The most common types are ridge vents and static vents.
Ridge vents run along the peak of your roof and allow hot air to escape from inside your attic, while static vents sit on top of a hole cut into your roof and provide ventilation without moving parts.
Another type is turbine or whirlybird vent that uses wind power to rotate its blades, drawing hot air out through its base. These come in various sizes depending on how much ventilation you need for your home.
Lastly, there are solar-powered fans that use energy from sunlight to power their motors; these can be an excellent option if you want a more eco-friendly solution for ventilating your home.
Choosing which type of vent tile will depend on several factors such as climate conditions in your area or personal preference.
Tools and Materials

Here are some of the things you’ll need:
- Roofing hammer: This is a specialized tool that has an adjustable gauge for setting nail depth.
- Pry bar: You’ll use this to remove old tiles from your roof.
- Measuring tape: To ensure accurate measurements when cutting underlayment or positioning vent tiles.
- Underlayment material: A waterproof layer that goes beneath your roofing material and provides extra protection against moisture buildup.
- Ventilation tile(s): These come in different sizes, shapes, and colors; choose one that matches your existing roofing style for aesthetic purposes.
- Roofing nails/screws: Used to secure both underlayment and ventilation tiles
- Caulk/Sealant: For sealing edges around the installed ventilation tile.
Safety Precautions
Roofing projects can be dangerous, and accidents can happen if proper care is not taken. Here are a few things to keep in mind before you start installing your vent roof tile:
- Wear appropriate clothing: Make sure you wear non-slip shoes or boots with good traction and avoid loose-fitting clothes that could get caught on something.
- Use a sturdy ladder: Ensure that the ladder is stable and secure before climbing up.
- Check weather conditions: Avoid working on the roof during wet or windy weather as this increases the risk of slipping.
- Have someone assist you: It’s always best to have someone else around when working on a roofing project for added safety measures.
Removing Old Tiles
This step is crucial as it ensures the new tile fits correctly and provides adequate ventilation. To remove old tiles, start by locating the damaged or worn-out ones and carefully prying them off using a flat bar or chisel.
Be sure to wear protective gear such as gloves and goggles during this process to avoid injury.
Once you have removed all the damaged tiles, inspect the surrounding area for any signs of damage or rotting wood that may need repair before proceeding with installation. It’s also important to clean up any debris left behind from removing old tiles before moving on to installing underlayment.
Installing Underlayment
The underlayment acts as a barrier between the roofing material and the roof deck, preventing moisture from seeping through and causing damage. To install an underlayment, start by measuring your roof’s dimensions to determine how much material you will need.
Next, roll out the underlayment over your entire roof surface with at least six inches of overlap between each row. Make sure that there are no wrinkles or bubbles in the material as this can cause issues later on.
Once you have laid out all of your rows of underlayment, use a staple gun or roofing nails to secure them in place along their edges and seams. Be sure not to puncture any holes in areas where water may pool up during heavy rainfalls.
Positioning Vent Tile
The first step is to determine where on your roof you want to place it. Ideally, this should be in an area that allows for maximum ventilation while also being aesthetically pleasing.
Next, measure and mark out the exact location of where you want your vent tile placed using a chalk line or other marking tool. Once marked out, carefully cut through both layers of underlayment with a utility knife or roofing scissors.
Now comes the tricky part – positioning the actual vent tile onto its designated spot on top of both layers of underlayment. Make sure that it fits snugly into place without any gaps around its edges.
Secure your newly positioned vent tile by nailing down each corner with roofing nails or screws (depending on what type of material was used).
Securing Vent Tile
Start by nailing down the corners of the tile using roofing nails. Make sure that each nail is driven through a solid part of the roof deck and not just into an old hole or gap.
This will ensure that your vent tile stays securely attached even during harsh weather conditions.
Next, apply roofing cement around all edges of your vent tile to create a watertight seal between it and surrounding tiles. Use enough cement to cover any gaps or spaces between tiles but avoid applying too much as this can cause bulges on your roof surface.
Add additional nails along with more cement around all sides for extra security before moving onto installing other tiles nearby.
Sealing Edges
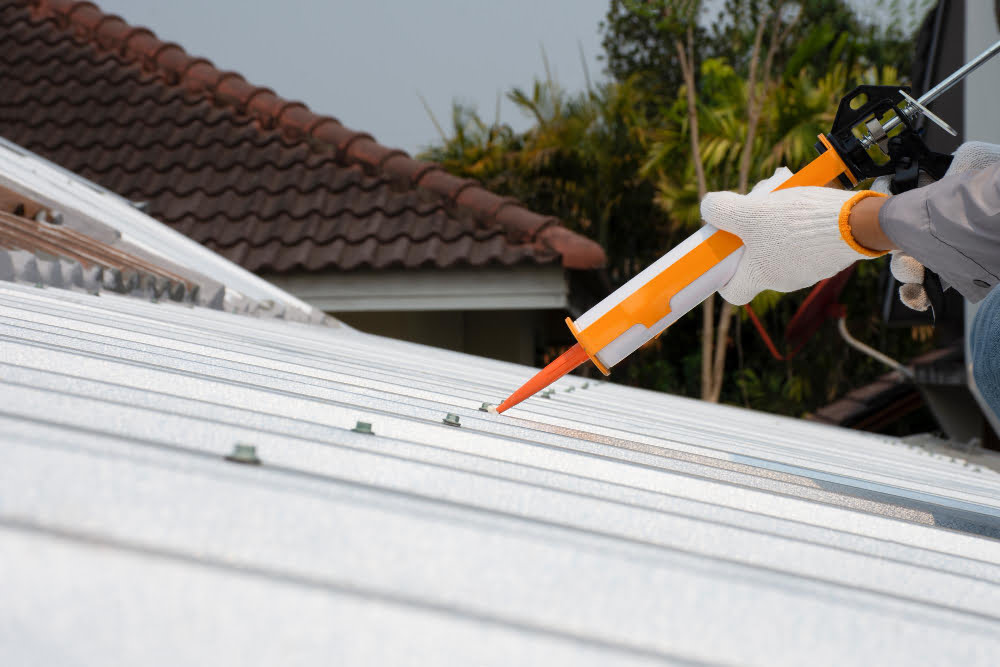
This will prevent any water from seeping through and causing damage to your roof or home. To do this, apply roofing cement around the edges of the vent tile using a putty knife or trowel.
Make sure that you cover all sides of the tile and create a tight seal between it and surrounding tiles.
After applying roofing cement, press down on each edge firmly with your fingers to ensure that there are no gaps left behind. Once done, allow some time for drying before testing for leaks by spraying water over your newly installed vent roof tile.
Sealing edges is an important step in installing a vent roof tile as it ensures proper ventilation while preventing moisture buildup in your attic space. By following these simple steps outlined above carefully, you can install a new vent roof tile like an expert!
Read More Like This
 15 Funny Graduation Cap Ideas to Make Your Big Day Unforgettable
 15 Unique DIY Christmas Decorations Ideas for a Festive Home
 15 Creative Science Fair Board Ideas to Amaze Your Audience
 15 Handmade Envelope Decoration Ideas for Creative Gifting
 10 DIY Gifts for the Whiskey Lover in Your Life
Recap: