Last updated on
Transform your space with vintage metal containers because they blend elegance and functionality unlike anything else.
I’ve designed unique illustrations for these ideas. I hope you get inspired!
Vintage metal containers: they’re not just for storage anymore. These chic and practical items have undeniable charm and lend themselves to a variety of innovative uses.
While there are countless ideas out there, this article aims to deliver a fresh angle on vintage metal container utilization. After delving into a myriad of unique and novel applications, we’ll also provide resources for the best existing ideas out there.
From functional to whimsical, let’s unravel the untapped potential that these metallic treasures hold. Embark on this creative journey and discover a fresh perspective on transforming vintage metal containers into stylish and useful elements for your decor.
Retro Candy Dispenser
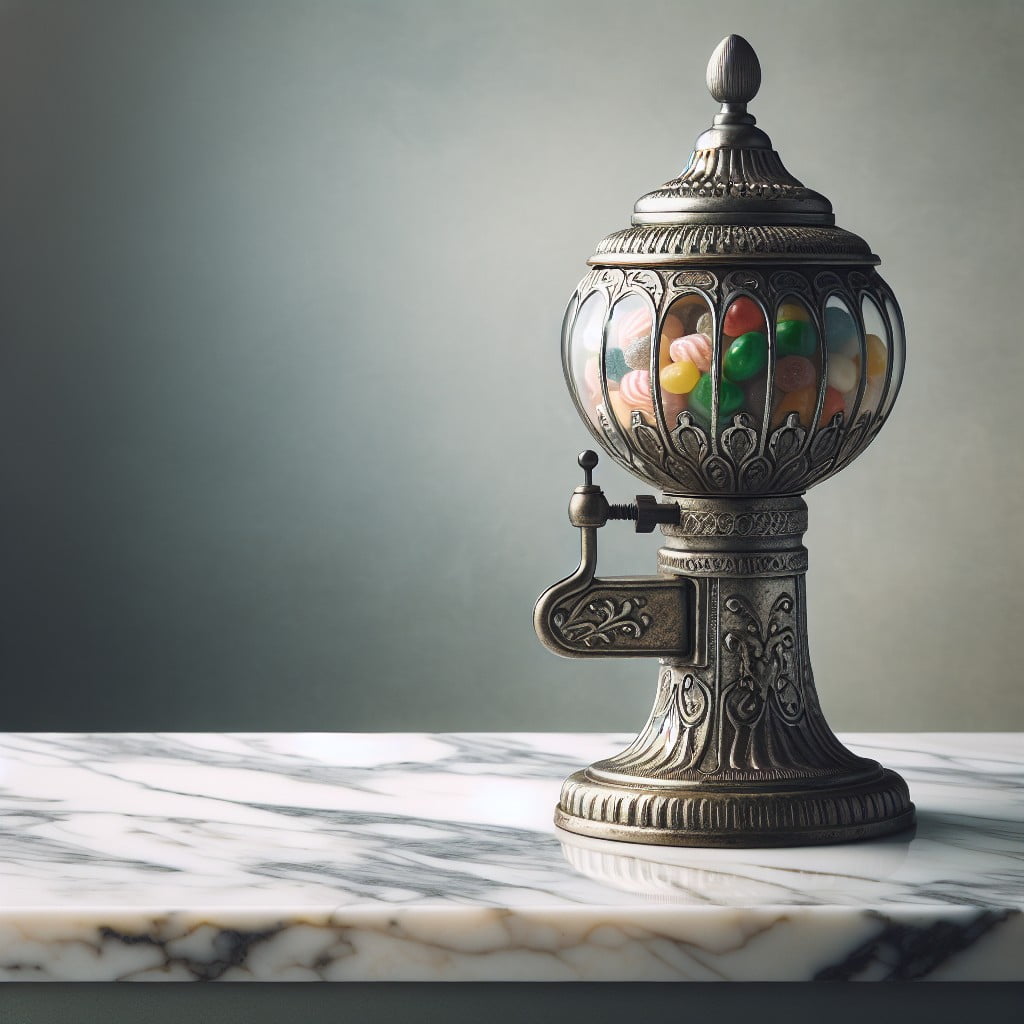
Turning an antique metal container into a candy dispenser can be a delightful adventure. Opt for a tin with a spout or a classic gumball shape for a truly nostalgic touch. The tin’s natural patina will contribute an authentic vintage appeal.
When selecting candies to fill your dispenser, consider the theme. Classic candies like gumballs, runts, and mints all have a timeless appeal. You can also tailor your candy selection to different occasions or seasons.
The location is another crucial factor to consider. A home office desk or kitchen counter is an ideal spot, adding a pop of color and a hint of whimsy. Plus, it serves as a convenient pick-me-up during daily tasks.
Remember to refill it periodically to keep it from becoming merely a decorative piece. Your candy dispenser should be as practical as it is charming. The sweet treats inside are a joyful reminder of simpler times.
Vintage Tin Spice Rack
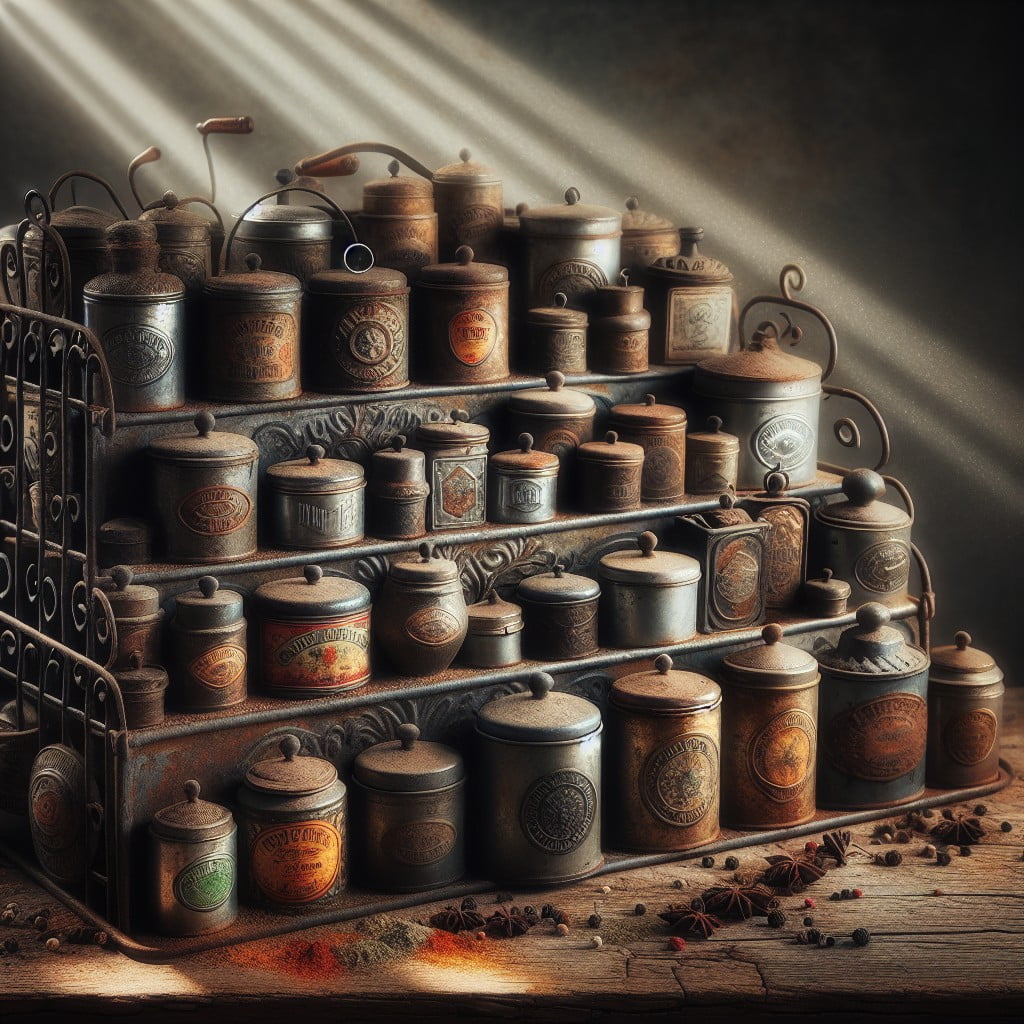
One unique application of old metal bins is their utilization as unconventional spice racks. For a rustic or retro look, simply arrange variously sized vintage tins on a shelf or worktop. Remember to clean them thoroughly before filling your different spices.
1. Practicality: It’s easy to access spices while cooking. These tins are suitable for various spice quantities, making it easy to personalize them to fit individual needs.
2. Aesthetic Appeal: Vintage spice racks add a rustic appeal to kitchens and recall the charm of old-fashioned kitchens.
3. Versatility: Tins can be painted, labeled, or modified in myriad ways to match the home’s decor.
4. Cost-Effective: Re-purposing vintage tins as a spice rack reduces expenses compared to purchasing a new rack.
5. Space-Efficient: Vintage tins efficiently use vertical space and can be strategically placed to ensure a clutter-free kitchen.
Old Metal Cookie Molds Artwork
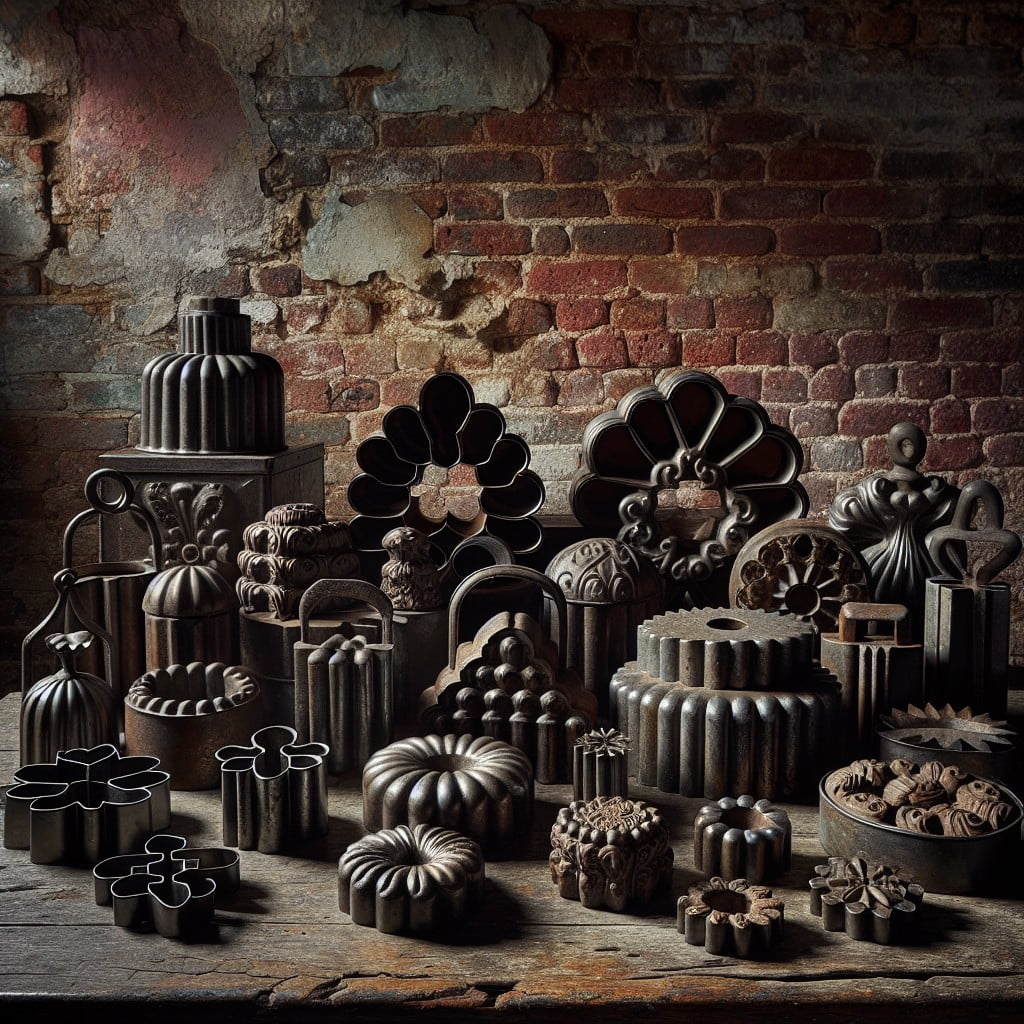
Crafting with old metal cookie molds can provide a vintage charm to any space. These molds, often found at thrift stores, hold a distinctive aesthetic and antiquity. They can be used to create a unique wall artwork.
Here’s how:
1. Gather a variety of shapes and sizes to create visual interest. From distinctive shapes like vintage stars, hearts or animals, variety adds a robust detail to your design.
2. Mount the molds onto a wooden board or directly on the wall. Use hot glue or small nails to secure each mold. Ensure it’s firmly attached to avoid mishaps.
3. For a more cohesive look, spray paint the molds and the board in identical colors. Gold or silver often gives a classic touch, while bold hues can add a modern twist.
4. Arrange the molds creatively. Consider a random assortment or make a particular design or pattern. The choice is yours.
5. Consider using it in unconventional spaces such as a kitchen or a reading corner to add an unexpected element.
Remember, creativity is key here. With patience and a keen eye, you can turn overlooked cookie molds into a statement piece of artwork.
Tin Can BBQ Grill
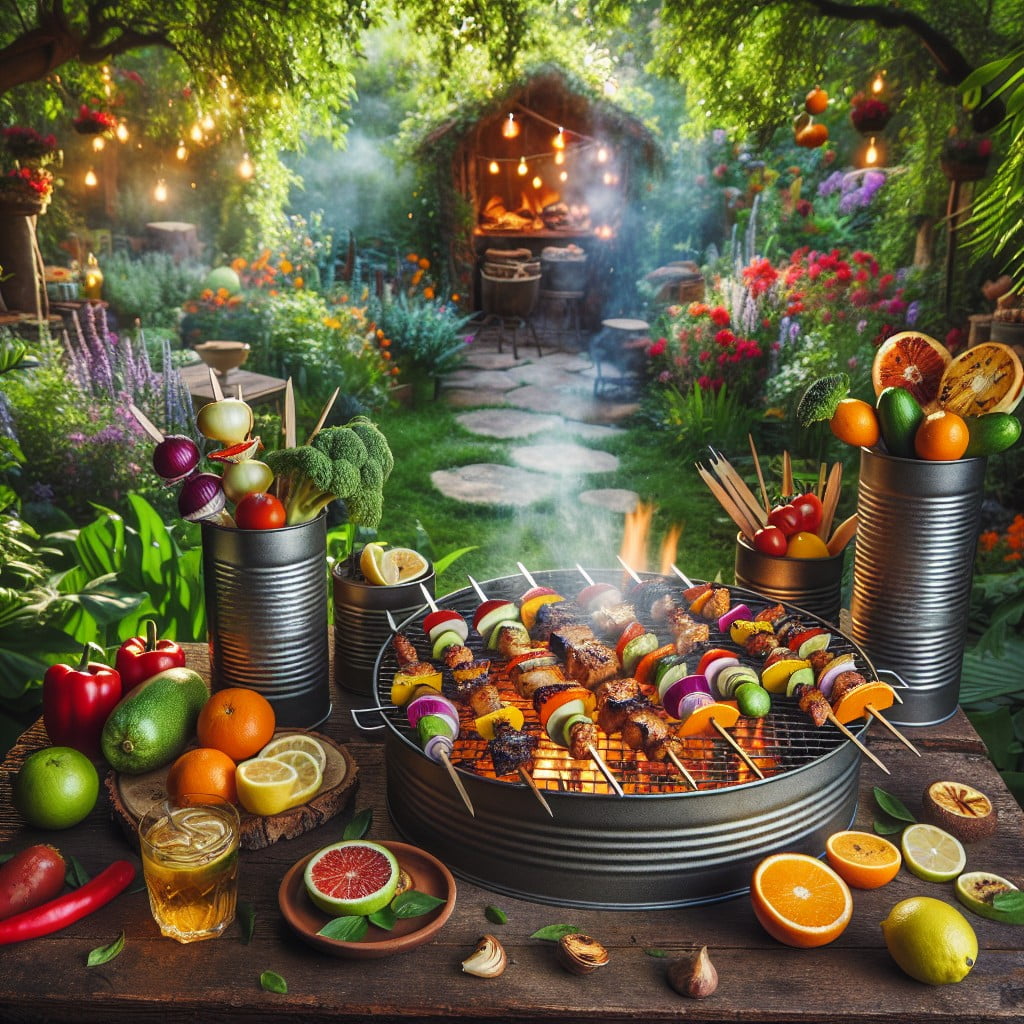
Creating your own Tin BBQ Grill is a crafty, efficient means of putting a vintage metal can to good use. Grab these items: a smooth-edged can opener, a steel wool pad, a drill with a ¼ inch bit, and a barbecue grill grate.
Step one, use your smooth-edged can opener to remove both tops of the can. Following this step, eliminate any adhesive residue inside the can with the steel wool pad to prevent unnecessary smoke during grilling.
For ventilation, drill about 15 holes around the lower third of the can. Ensure your configuration considers fuel placement and airflow. Place slightly raised to the bottom, an aluminum baking tray serves a dual function: catches the ash while insulating any surface from heat damage.
Choosing the right grill grate is essential. Ideally, it should rest flatly and securely on top of your grill. Finally, your new Tin BBQ Grill is ready. Perfect for small gatherings, camping, or a simple roast in the backyard. Adaptable, portable, and versatile, this grill redefines sustainable fun.
Vintage Metal Beehive
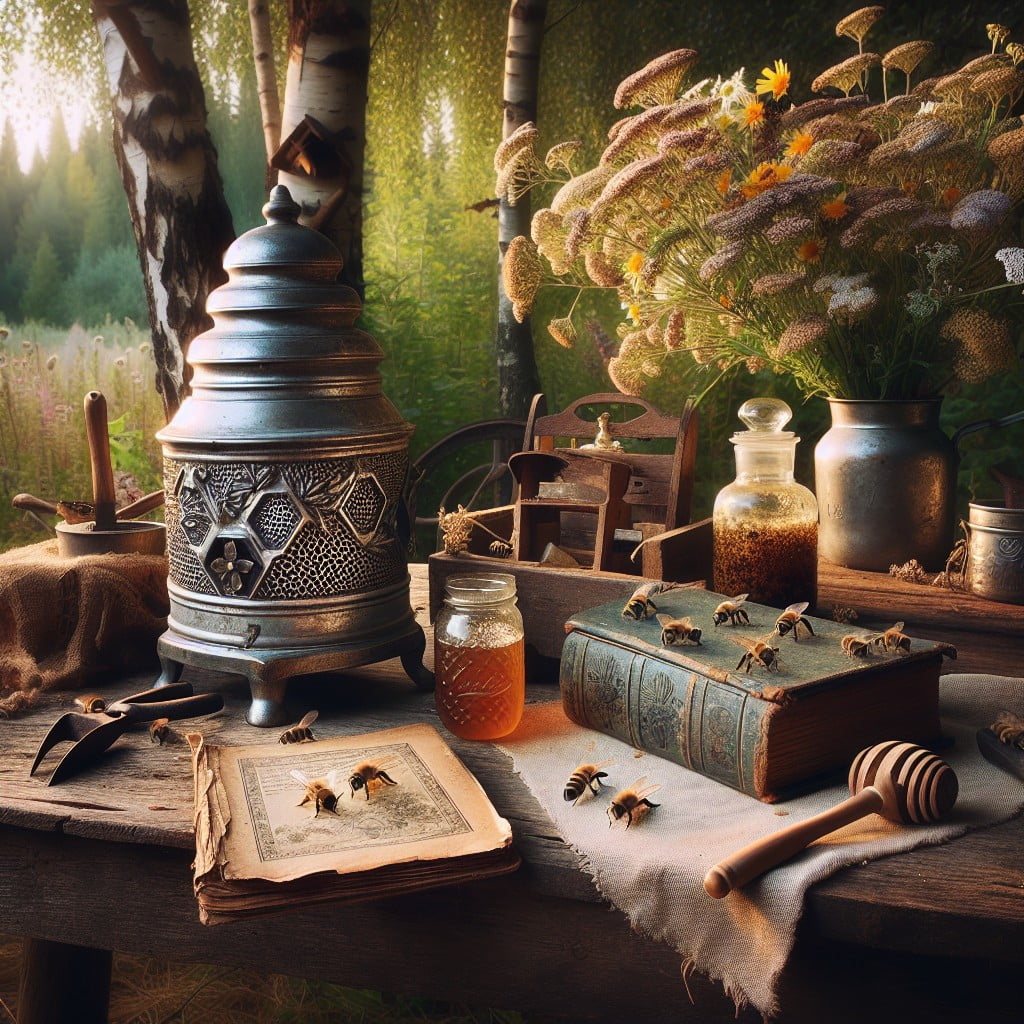
Unraveling the rustic charm of an old, discarded metal container, you can craft a charmingly vintage beehive. This stellar concept not only adds a unique touch to your backyard but also demonstrates an innovative recycling technique.
To start, ensure the container is clean to provide a safe environment for the bees. Drill entrance holes near the bottom, while the top can be fashioned into a removable lid for easy access to honeycombs. Most importantly, place the container at a height that is unreachable for pests but accessible for you. Ensure to fasten it appropriately to avoid any unfortunate accidents due to the beehive’s weight when loaded with honeycomb.
Lastly, make your container feel inviting to bees by adding a bit of beeswax within. Gradually, you’ll see the buzzing guests move in, converting your vintage container into a functional, thriving beehive.
Repurposed Tin Can Chandelier
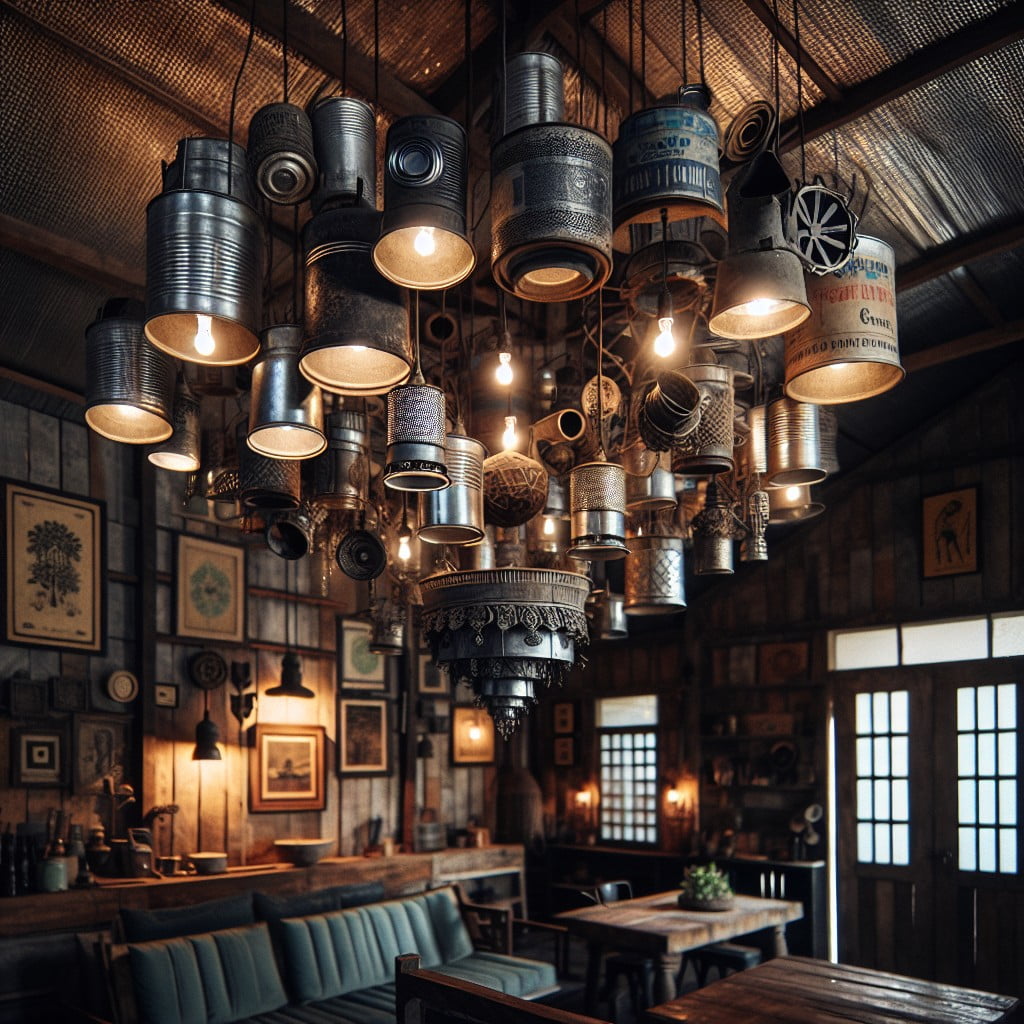
Bringing a twist of vintage elegance to your decor, this repurposed piece attests to creativity and sustainability in home decor. Here’s how to transform old tin cans into a striking chandelier.
1. Gather Your Materials: You’ll need multiple tin cans, varying in size for visual interest, along with a ceiling hook, a chain, and a light fitting kit.
2. Prepare the Cans: Cleanse the cans thoroughly, removing any labels. Using a nail and a hammer, punch holes in desirable patterns into each tin can. This aspect allows you to personalize your design.
3. Assemble: Attach each can to the chain at different lengths, ensuring balance. A strategically uneven arrangement can produce attractive visuals.
4. Install the Light: Fix the light fitting kit into your central can.
5. Hanging: Secure the chandelier to the ceiling hook. Consider professional installation to ensure safety.
Remember, safety comes first when dealing with electricity. If uncertain, seek help from an electrician. This one-of-a-kind light fixture surely adds a dose of vintage charm and glow to any space.
Vintage Tin Mini Barbecue
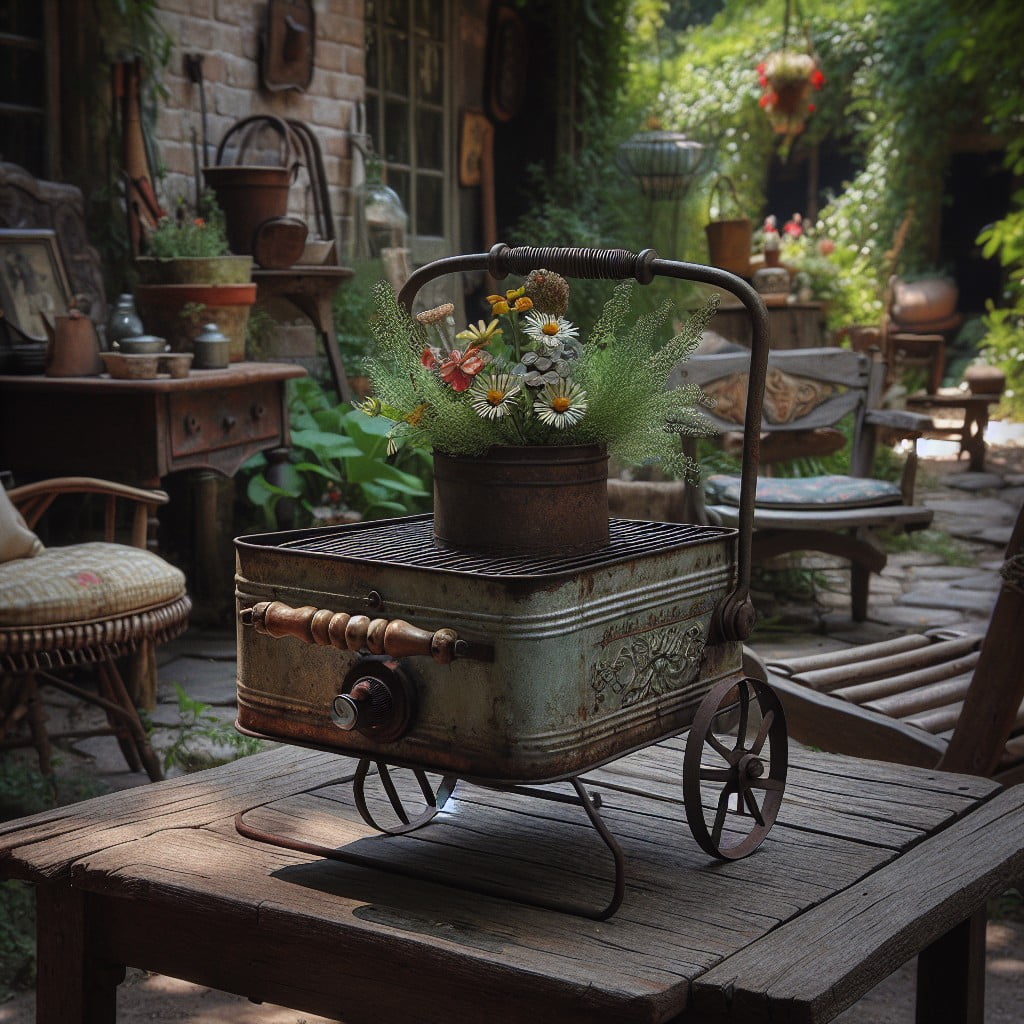
A mini barbecue, cleverly crafted from a vintage tin, makes a charming addition to any outdoor gathering. This unique, functional piece of decor adds a nostalgic touch while offering a practical use.
Consider these factors:
- Authenticity: Use an antique tin to enhance the vintage feel.
- Safety: Ensure the chosen tin is free from rust and chemicals. Maintain a safe distance when cooking to prevent any mishaps.
- Functionality: The barbecue should have enough ventilation and a wire mesh to hold the charcoal.
- Appearance: Leave the exterior as is to keep its vintage charm or add personal touches like paint or decals.
- Versatility: Your mini barbecue isn’t solely for cooking; when not in use, it can serve as a quaint centrepiece or funky plant holder.
Always remember to use barbecue tools when grilling. Keep it fun, keep it safe, and above all, keep it vintage!
Refurbished Candle Tins

Through a simple cleaning process and the addition of an inexpensive wick and wax, vintage tins can be transformed into charming, functional, and eco-friendly candles. Refurbished candle tins are ideal for vintage themed decor, generating a soft gleam and fostering a cozy atmosphere.
Here’s how to go about this easy DIY project:
- Clean each tin thoroughly, ensuring they are dry before starting the candle-making process.
- Pick up a candle wax of your choice from any craft store. Beeswax and soy wax are great options.
- Use bleached square braided wicks for a controlled flame that goes well with these kinds of wax.
- Secure a wick to the bottom using some melted wax, then pour in your heated wax.
- Ensure the wick is center-aligned as the wax cools and hardens.
- Trim the wick down to size once your candle is ready.
Additionally, resized tins housing these handmade candles become an ideal gifting item, embodying both thoughtfulness and creativity.
Antique Tin Can Birdhouse
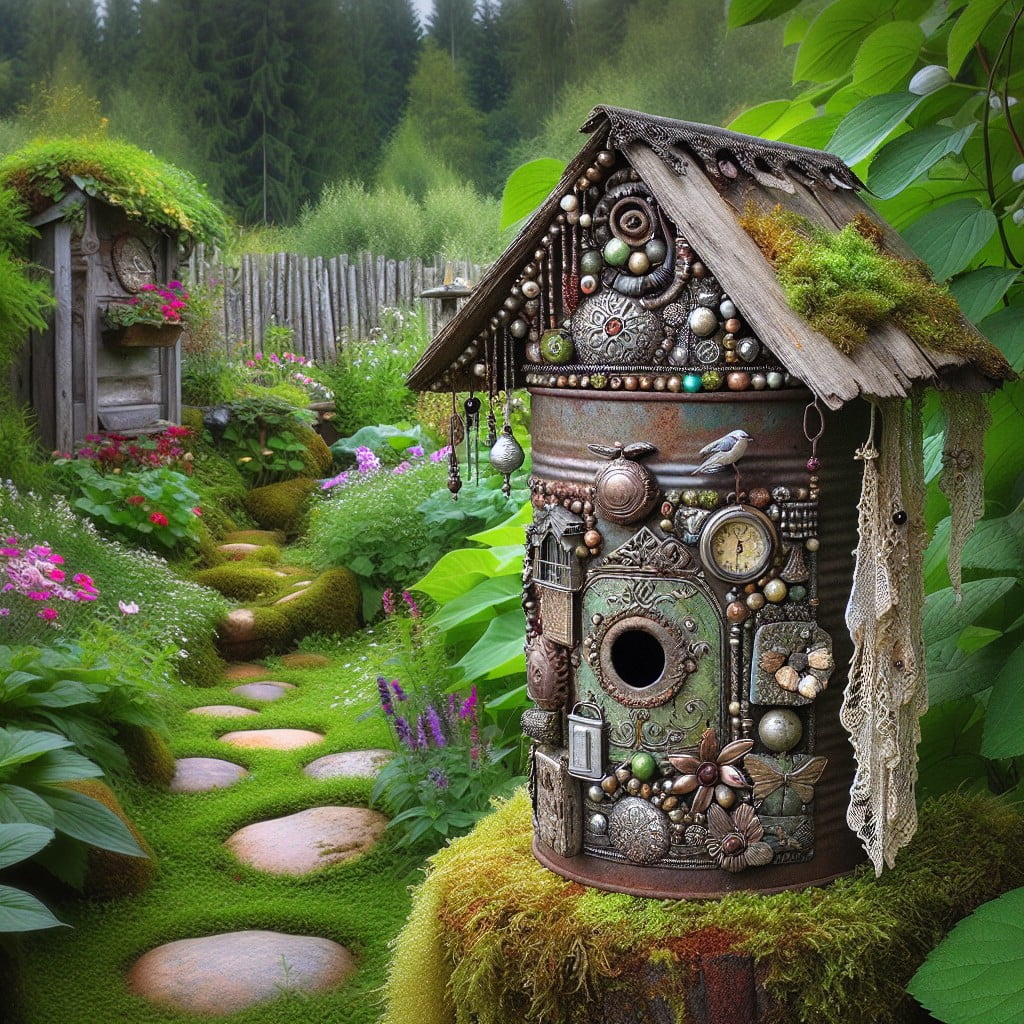
Crafting a birdhouse from an antique tin isn’t merely a delightful project; it also invites nature into your yard in an eco-friendly way. Here are three key factors to keep in mind:
1. Tin Selection: Opt for tin cans with interesting designs or beautiful patterns. The visual appeal often lies in the weathered, imperfect, and rusty look of such tins, lending a rustic charm to the birdhouse.
2. Proper Construction: Creating a bird-friendly environment is crucial. Ensure the tin is thoroughly cleaned and the sharp edges are smoothed to prevent harm to the birds. Drill a hole for an entrance and add ventilation on the sides. The house should have drainage and a point to access for cleanout.
3. Proper Placement: Once finished, place the birdhouse at an appropriate height, preferably on a pole or in a tree that provides birds with ease of access and safety from predators. Keep the house slightly tilted for rain to drain out. Place it in a quiet area, with a mix of sun and shade.
Remember, using antique tins for birdhouses not only offers an interesting decor piece but also promotes recycling and wildlife preservation.
Metallic Vase With Vintage Tin Cans
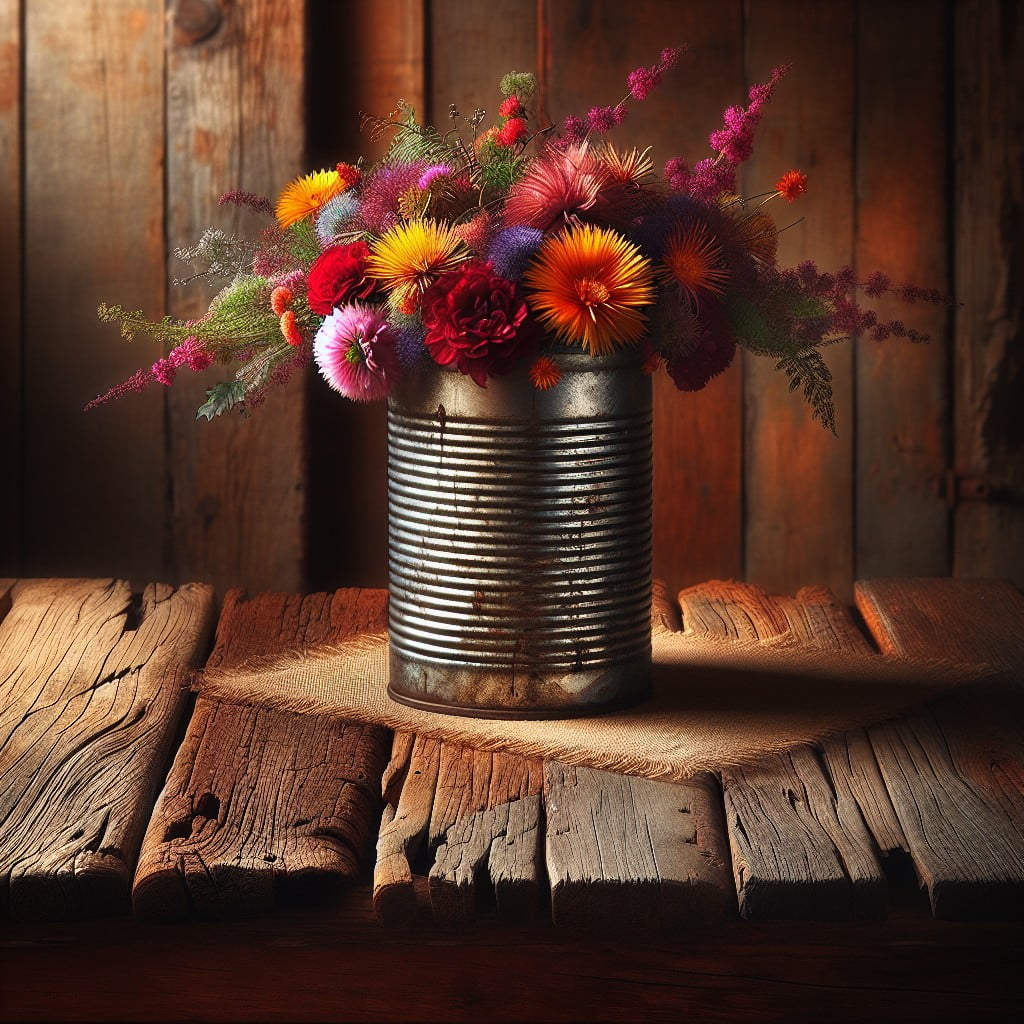
For this unique project, you first need several old cans of different sizes – taller ones work best. Start by removing any sharp edges and giving them a good wash.
A clear metal sealant can be applied to retain the rustic look, or you could opt for a spray paint in your chosen color for a more customized touch.
The real highlight of this project is the arrangement. Group the cans together closely, varying the height to add depth. Secure them in place with a strong adhesive, ensuring each one is secure before adding the next.
The end product can be used as a standalone decorative piece or as a functional vase for fresh flowers, dried botanicals, or even holiday-themed decorations.
Perfect for contemporary, vintage, and rustic decor alike, this versatile DIY decor option adds a unique flair to any room.
DIY Tin Can Drum Kits
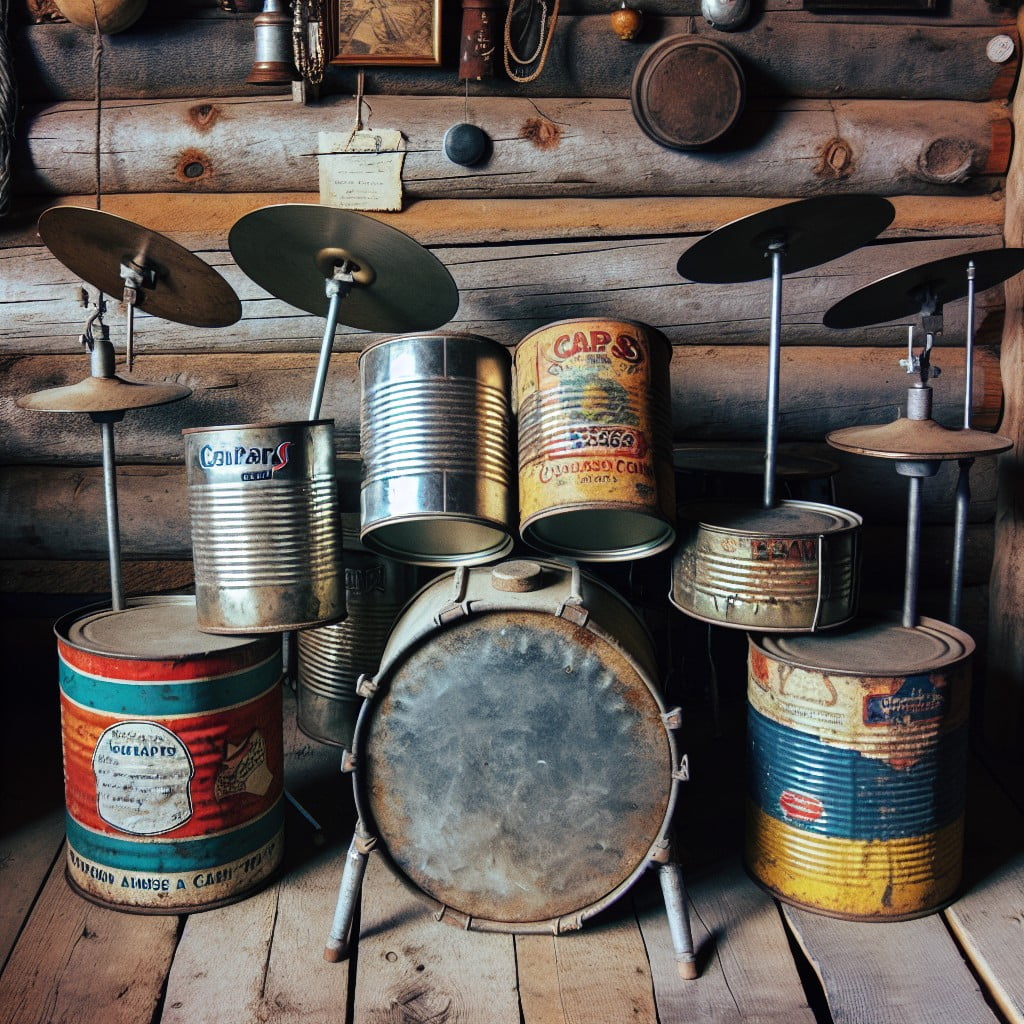
For a creative and practical project, take your old tin cans to create unique drum kits. It’s not only a fun way to recycle but also a great way to entertain the kids. Here’s a quick guide:
1. Gather Different Sized Tins: Range in size from small spice tins to large coffee cans, the different sizes will produce different sounds.
2. Decorate the Tins: Use non-toxic paint or adhesive paper to add a personalized touch. Just ensure the interior of the can remains untouched for the best sound quality.
3. Create the Drums: Attach a balloon or plastic wrap over the top of each can and secure it in place with a rubber band. This will create the drum skin.
4. Use Wooden Spoons as Drumsticks: These are a safer way for kids to play the drums, without risking any damage to the tins.
5. Arrange and Play: Arrange your set and let the fun begin!
Remember, safety is paramount. Make sure there are no sharp edges on your tins before you start playing your new drum kit!
Decorative Sewing Kits Storage
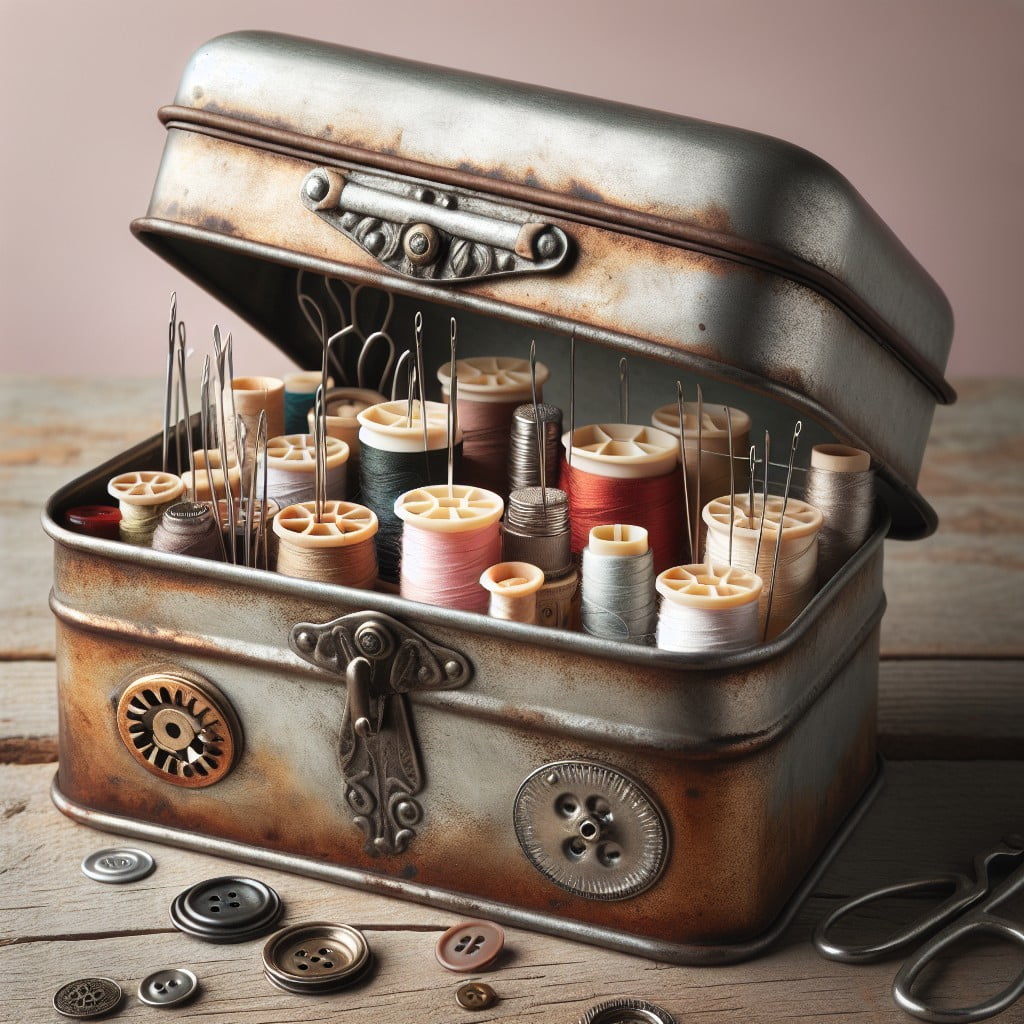
Utilizing a vintage metal container can add a charming touch to your sewing area while ensuring all necessary elements are organized and easily accessible. That includes threads, needles, scissors, buttons, pins, and measuring tapes.
Here are a few points to consider:
- Size: Choose a metal container based on the amount of your sewing essentials. Bigger tins can hold more items, while smaller ones are great for travel kits.
- Compartments: Look for containers with various sections aiding in the arrangement of sewing items.
- Durability: Vintage metal is sturdy, ensuring it will stand the test of time and numerous sewing projects.
- Portability: With a handy container, transport your sewing toolkit effortlessly between rooms or out of the house.
- Versatility: These vintage containers aren’t limited to sewing items. Should you need, they can also store craft supplies or small hardware items.
- Reminders of the Past: Vintage metal containers also provide a nostalgia aspect, enhancing the enjoyment of your sewing sessions.
Considering these points should guide you into making the best use of your vintage metal container for sewing storage.
Vintage Metal Cash Box Planter
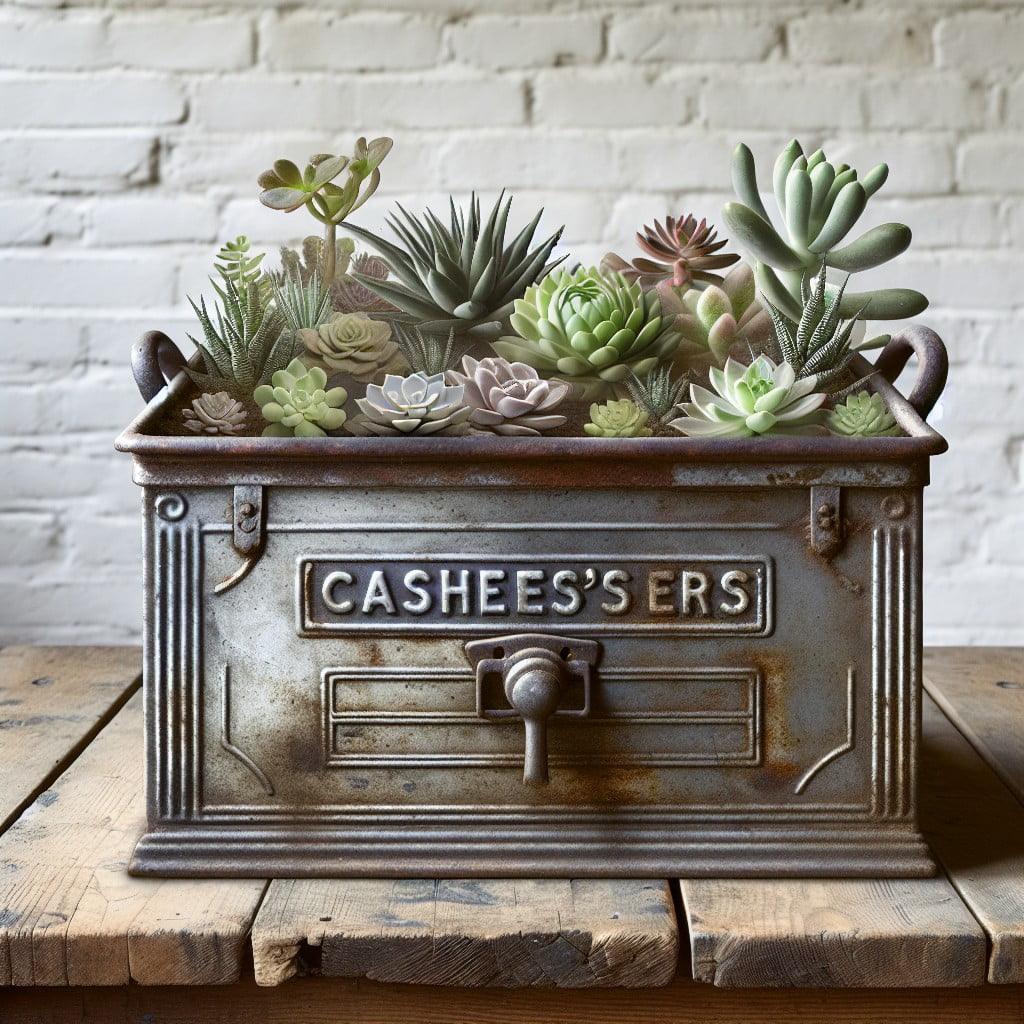
Transforming an old cash box into a planter can add a unique vintage charm to your home. Begin by treating the box to prevent rust and fill with properly drained potting soil.
When choosing plants, consider slow-growing ones such as succulents or cacti that don’t need a lot of room to flourish.
Don’t forget to place your planter in a spot where it gets enough natural light. Moreover, remember to water it sparingly, as metal containers can amplify heat and become super hot.
This fun and innovative concept brings together the beauty of nature with the rustic allure of vintage metal.
DIY Herb Garden With Vintage Tins
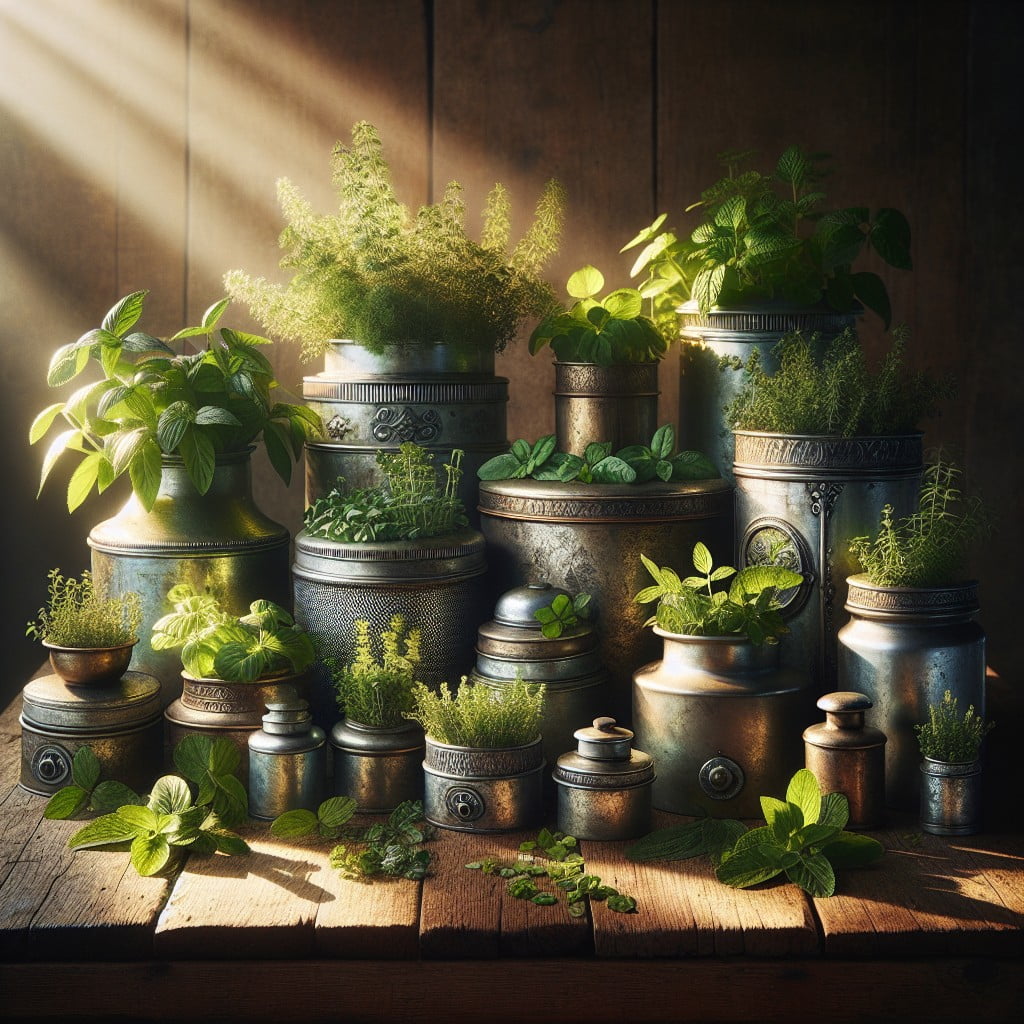
Let’s gather your materials—you’ll need vintage tins, pebbles for drainage, potting soil, and your choice of herbs.
Begin by adding a layer of pebbles to the bottom of the tin, essential for proper drainage and preventing the roots from becoming waterlogged.
Next, fill the tin with potting soil and plant your herbs, leaving about an inch of space from the top. This breathing room helps prevent water overflow.
Keep in mind the size of your tin when selecting herbs. Smaller tins are ideal for herbs such as thyme and oregano; larger tins can successfully house basil and cilantro.
Position your tin garden in an area with plenty of sunlight, and remember to hydrate it frequently, but moderately.
This vintage twist not only adds a rustic flair to your home but helps you cultivate your fresh herbs. Revamping vintage tins into herb gardens is an excellent way to recycle, save space, and involve the kids in a fun weekend activity.
Tin Keepsake Box
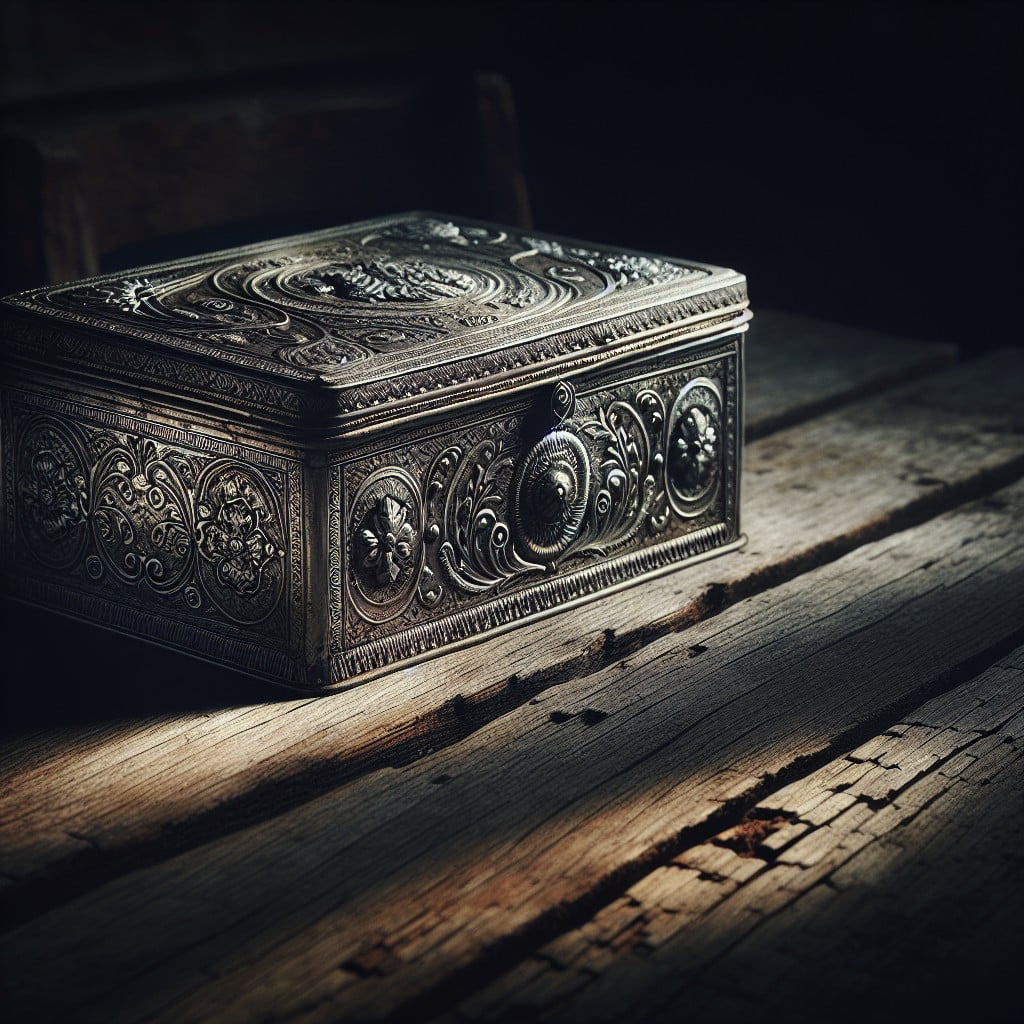
Delving into the notion of a vintage tin as a keepsake box offers a throwback to yesteryears combined with practicality. This is the perfect solution for storing sentimental items. Why not make the container as charming as the memories it holds?
1. Material: Seek a vintage tin that’s robust and rust-free for longevity.
2. Size: Consider the type of mementos stored; photos might require a larger container, while jewelry suits smaller tins.
3. Decoration: Opt for polished, etched, or stenciled finishes. Some tins already boast beautiful old-age designs.
4. Interior: The inside could be lined with felt or soft fabric to add extra protection for delicate items.
Employing a tine keepsake box curates a nostalgia-evoking display while serving as a functional sanctuary for your cherished items.
Vintage Metal Cake Stand
Adorning your dining table with a vintage metal cake stand can evoke a rustic, old-world charm. There’s something special about displaying your freshly baked goods on a pedestal with a story to it.
Finding a genuine antique might take a bit of hunting – flea markets, garage sales, and online vintage shops are your best bet.
You might come across beautifully ornate stands with intricate detailing or simpler designs for a minimalist aesthetic. Regardless of style, make sure it has a sturdy base.
Cleanliness is crucial when dealing with food items, so ensure you can clean it well without damaging its appeal.
Consider height and number of tiers based on your needs – single-tier stands offer a traditional feel, while multi-tier ones add drama and dimension to your display.
Balance is key though – too grand a stand might overshadow the cake itself.
With a touch of creative flair, even a tarnished, pre-loved cake stand can become a centerpiece that exudes vintage elegance.
Vintage Tin Pencil Holder

Creating a pencil holder from a vintage tin is not just economical but also fetches an impeccable retro appeal to your workspace. This project offers an ideal way to repurpose old, unused tins.
Firstly, ensure the tin is cleaned thoroughly, inside and outside. Rinse and let it dry completely before using it. Maintaining cleanliness is key to any DIY project. A clean tin is also more appealing.
Secondly, you may want to add personal touches by painting your tin or covering it with decorative paper. However, if the tin sports vintage graphics, leave it as it is to preserve the charm. The method you choose will depend on the tin’s original state and your preferences.
Lastly, apart from storing pencils, these containers can accommodate pens, markers, or even paintbrushes. In short, they can serve as a storage unit for various art and office supplies.
Remember, a vintage tin pencil holder can add a touch of nostalgia to modern spaces, blending the sophistication of the present with the charm of the past.
Tin Ice Buckets for Parties
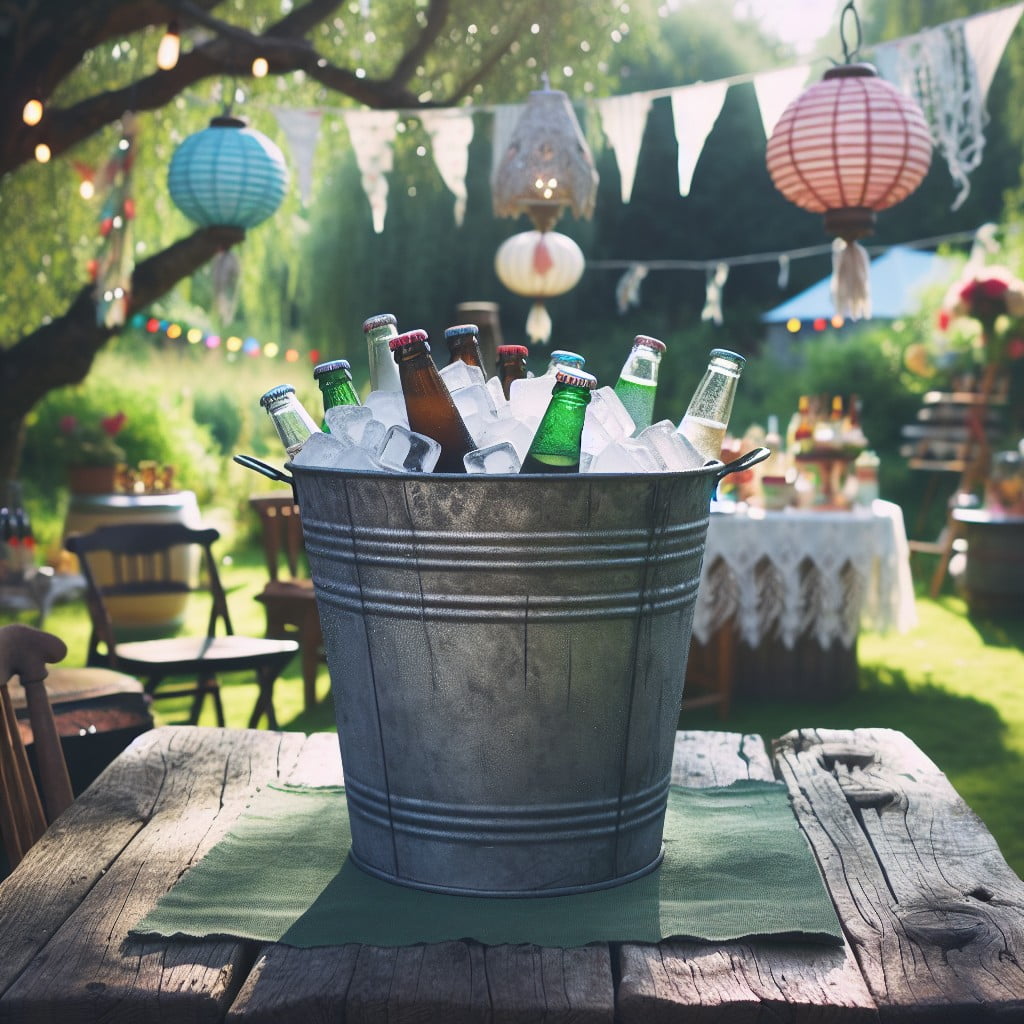
Consider these vintage metal containers as a stylish alternative for keeping drinks chilled. They come in various sizes, making it easy to cater to different quantities of beverages. Some characteristics that make them party favorites:
- Aesthetic value: Their unique, old-world charm adds to any party decor, setting the rustic tone.
- Functionality: They retain cold efficiently, keeping beverages refreshingly cool for longer.
- Versatility: They can be used to chill a variety of drinks, from soda cans to wine bottles.
- Mobility: Equipped with handles, they can be moved around with ease, making them ideal for gatherings, where drinks are often served in different locations.
Before the party, fill the bucket with ice and your choice of beverages. For an authentic retro vibe, accessorize the bucket with a bottle opener affixed by a vintage beaded chain.
Remember, these tin buckets, while resilient, can rust. Ensure they are fully dried after use to preserve their vintage allure. For dented or scratched containers, don’t fret; these imperfections only add to their character.
Pertified Vintage Can Utensil Holder
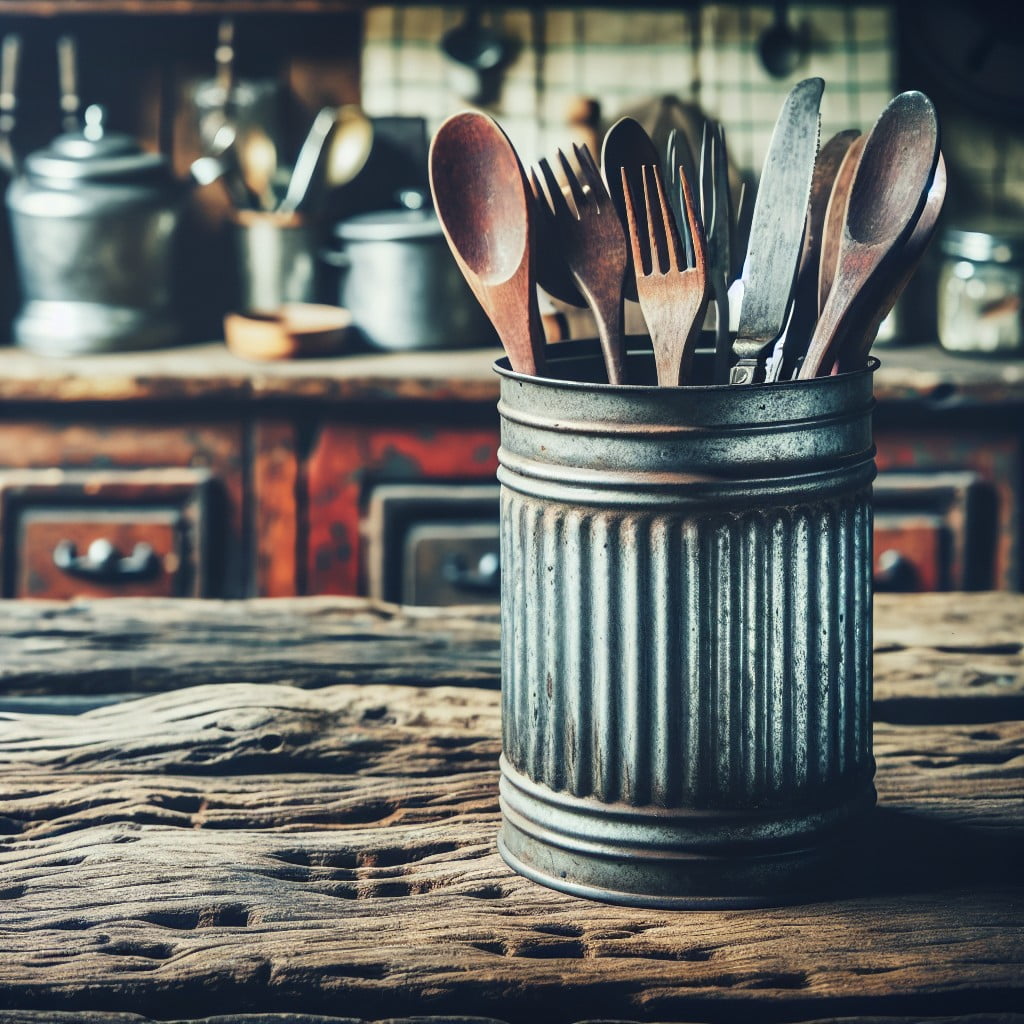
To transform an old vintage can into a utensil holder, here are a few steps to follow which will yield an aesthetically pleasing result with a dash of vintage charm:
- Start by completely cleaning out the can, removing any residue or rust.
- Add a dash of creativity through painting or adorning it with fabric, stickers, or other decorative items. Distressed paintwork often adds a nostalgic charm.
- Seal your design with a clear coat of varnish to ensure its longevity.
- For a unique touch, consider adding personalized labels or decals to distinguish utensil categories.
- For added stability, affix a cork, wood, or rubber bottom to your can to protect your countertops and to keep the can from sliding around.
This process not only repurposes a vintage item, but it offers a unique, stylish solution to everyday kitchen clutter.
Vintage Canister Set Clock
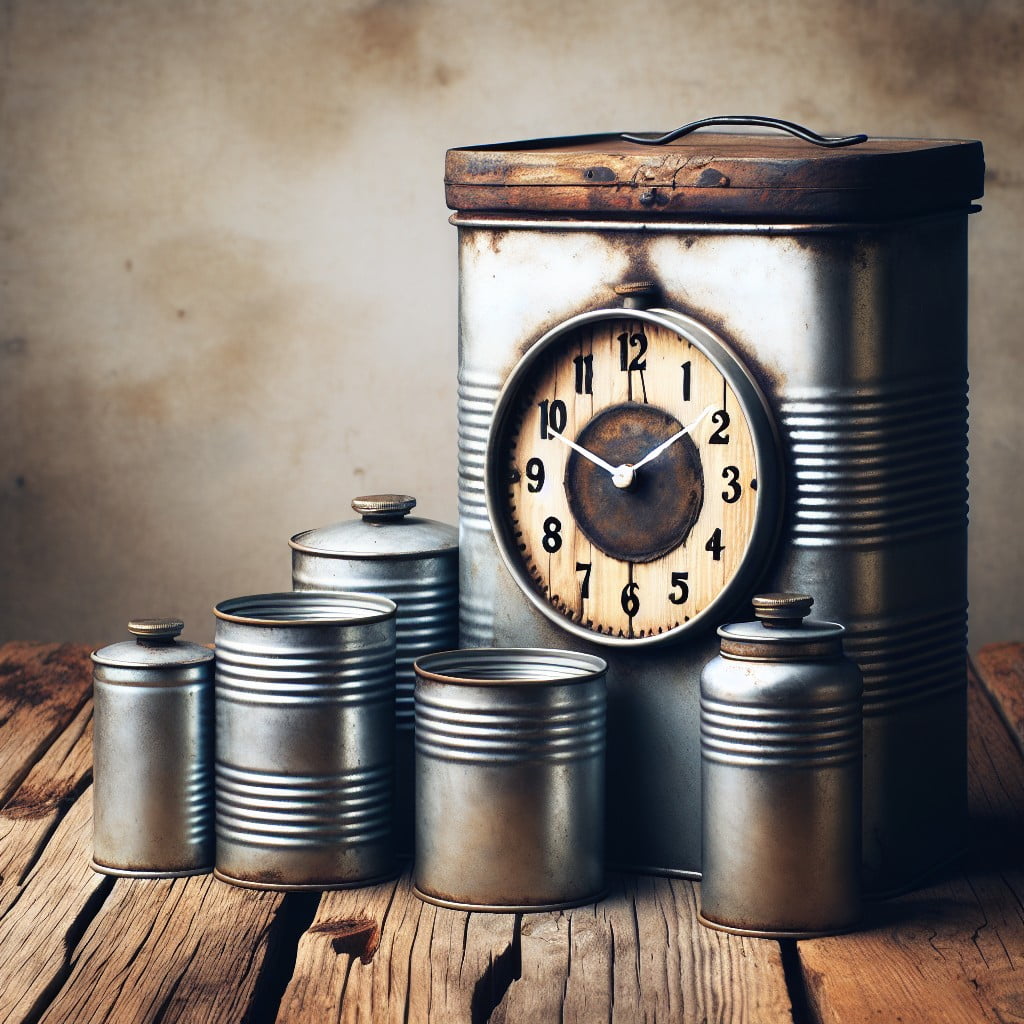
This quaint creation infuses a classic sense of timekeeping aesthetics into the world of vintage decor. Making use of an old canister set, the process involves transforming these antique containers into a unique, functional clock. It’s all about clever repurposing: the bigger tins may serve as an ideal clock face, while the smaller ones can function as decorative elements or even pendulum weights.
Materials often required include a basic clock mechanism and a drill to create the necessary hole for the clock hands. Suitable paints, including clear protective enamel spray, can be deployed for appropriate finishing. Don’t forget to explore personal decorative additions: photo transfers, chalk labels, or hand-painted details could do wonders.
This piece speaks volumes when displayed in a kitchen, hallway, or even a home office, providing an unprecedented blend of aesthetics, nostalgia, and functionality.
Ideas Elsewhere
- https://www.craftidly.com/upcycle-vintage-tins/
- https://www.pineconecottageretreat.com/vintage-metal-containers/
- https://lorabloomquist.com/creative-ideas-for-galvanized-buckets-and-vintage-containers/
- https://diy.allwomenstalk.com/crafty-ways-to-upcycle-beautiful-vintage-tins/
- https://www.countyroad407.com/how-i-use-my-5-favorite-vintage-galvanized-containers-for-flowers/
- https://fleamarketgardening.org/2013/02/16/how-to-make-garden-containers-from-old-funnels/
Read More Like This
 15 Homecoming Decoration Ideas to Elevate Your Celebration
 15 Christmas Cake Decorating Ideas to Sweeten Your Holidays
 15 Outdoor Party Tent Decorating Ideas for a Magical Celebration
 15 Ideas for Welcome Home Decorations
 15 Cheap Table Decoration Ideas to Elevate Any Gathering
Recap: