Last updated on
MDF is a common hardwood fiber construction material that has been compressed and then screened with wax and resin. As a result, MDF is robust and durable, but it does not effectively absorb water. This will adversely affect the finish of water-based paints.
Let’s have a look at some of the painting MDF Tips to follow for better results.
Sanding the Surface of the Water
A joint compound should be applied to the edges of the MDF board
By applying joint or drywall compound to the porous edges of the MDF, you will be able to achieve a smooth finish. To finish the edges of the MDF, use a clean finger or an applicator such as a putty knife to apply a thin, uniform coating of the compound to all edges.
After the compound has dried, sand the edges to smooth them out
Allow the compound to dry thoroughly before using it. The length of time required for this should be specified on the label of the joint chemical in question. After it has dried, put on a mask and goggles, use medium-grit silicon-carbide sandpaper, such as 220-grit, for this task. Light to moderate pressure should be used to sand the areas where the compound has been applied until smooth and even.
Sand the remaining MDF board to a smooth finish
Continue to work with your dust mask and safety goggles on while using fine-grit sandpaper, such as one rated 120-grit, to gently sand all of the surfaces of the MDF board that you want to paint. Fine wood dust will be produced throughout the sanding process.
Remove any dust from the MDF
Clean the MDF with a clean cloth to remove any dust or other dirtiness that has accumulated. For really filthy MDF, you may need to wet your cloth with water before wiping it off. However, if you want to do so, you will need to allow your MDF to dry thoroughly before continuing the painting procedure.
Preparation of the Surface
Prime the MDF with a water-based primer
Take your paintbrush and dunk it into the primer to start painting. Excess priming should be wiped away onto the inside lip of the paint container. Cover the areas of your MDF that will be painted with priming using lengthy, overlapping strokes to prevent bleeding.
It may be tough to polish the edges of MDF smoothly and professionally. Make sure that all of the advantages are primed. It is easy to overlook the corners or the edges.
In many instances, after applying your initial coat paint primer, it may not even seem as though you have done much more than lightly prime. The initial coat of primer is often thin enough that you can see through it to the original finish, which is an excellent sign.
Alternately, you may use a solvent-based primer to coat the MDF
A solvent-based primer, such as oil, alcohol, or lacquer-based primer, would not be adversely impacted by the MDF’s low water absorption, as can a water-based primer. To remove any extra priming from your brush, dab it against the inside lip of the primer’s container. Long, overlapping strokes are used to apply a thin, uniform coating of primer to the face. For the most significant effects, apply two or three thin coats of primer to the surface. In between coats, let the primer dry completely and gently sand it.
After priming, sand the MDF down to a smooth finish
Wait until the primer has dried for the amount of time specified in your primer’s use directions. When sanding primer, apply slight pressure and fine-grit sandpaper to avoid scratching the surface. When you’re done, the surface should feel smooth to the touch, as seen in the photo. Using a clean cloth, wipe away any sanding dust that has accumulated.
When sanding, the primer’s color may fade somewhat, but it should still be visible. If you use too much power with your sandpaper, the priming will be stripped away. In this scenario, you will need to reapply the priming layer that has been removed.
Add two additional coats of primer to the surface.
Continue to prime your MDF in the manner previously instructed until it has received a total of three coats of primer. Swap out the primer and sanding regularly. After sanding, wipe down the MDF with a clean cloth to remove any remaining dust.
Multiple thin coats of primer will result in a more robust, more professional-looking finish than a single thick coat or many thick coats of primer applied in succession.
Putting the Paint on the Walls
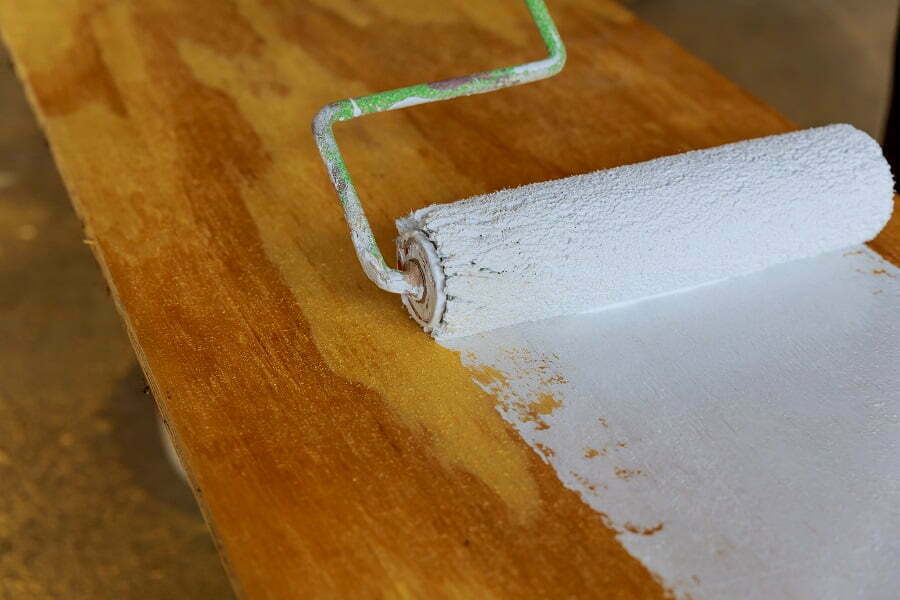
Paint the MDF using water-based paint to give it a smooth finish. Open your color can and follow the manufacturer’s directions to prepare it. The majority of the time, this will include stirring the paint. Once the container is opened, dip your paintbrush into the contents. Excess paint should be wiped away from the inside lip of the container. On apply the paint to the MDF, make lengthy, overlapping strokes with the brush.
Utilize a low nap roller to apply paint to your MDF if you plan on painting it. The term “nap” refers to the fuzziness of the roller surface. Allow the paint to dry thoroughly in between coats, following the manufacturer’s instructions on how to do so.
Alternatively, solvent-based paint may be used
In this situation, it is possible to substitute an oil-based, alcohol-based, or lacquer-based paint for water-based paint. Following the application of a suitable primer, both water and solvent-based bases should adhere to the surface of the primer. Apply the color in the same manner as you would water-based paint, as previously instructed.
The Takeaway
The label directions for your paint should provide a suggested drying time for the color. Perhaps only one coat of paint will be sufficient to cover your MDF adequately. However, two to three thin applications will result in a firmer and more polished finish, even if one coat may be adequate. Allow the paint to dry thoroughly between coats before applying another coat.
Read More Like This
15 Things Every Home Entertainer Should Keep on Hand Spring Decorating Ideas: Refreshing Your Home for the Season
 The Perfect Lighting for Your Home
 Using More Sustainable Materials in Your Diner: 7 Ideas That Still Look Great
 10 Practical Ideas to Beat the Heat: Creating Shade in Your Outdoor Space this Summer
Recap: