Last updated on
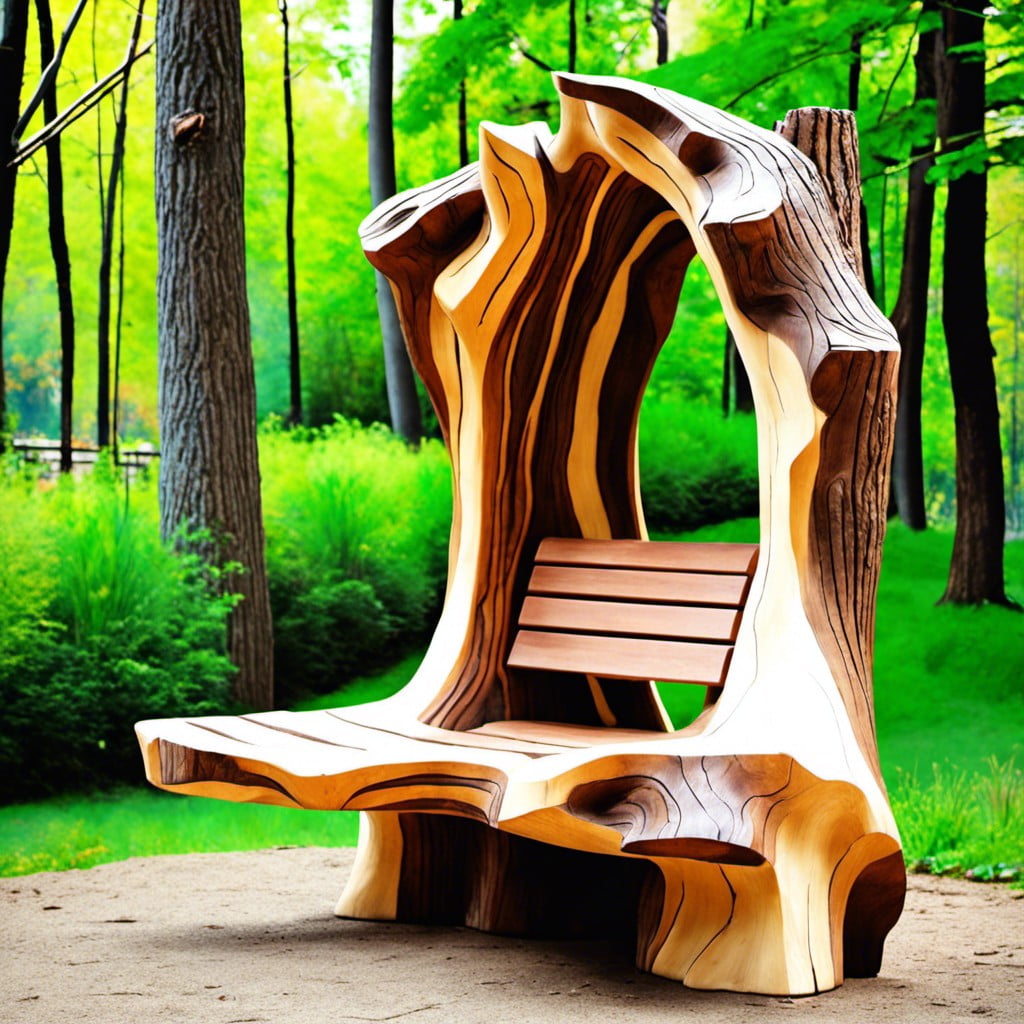
Transforming an old tree stump into a functional and stylish bench can add a unique charm to your outdoor space, because it redefines traditional garden design while showcasing an impressive display of creativity and resourcefulness.

I’ve designed unique illustrations for these ideas. I hope you get inspired!
Tree stump benches exude a charming, rustic appeal, infusing any outdoor living space with the warm essence of nature. Countless conventional ideas exist and they certainly have their place, with resources at the end of this article to the most notable ones.
However, the spotlight illuminates the innovative and unique, offering fresh perspectives on our beloved stump benches. The forthcoming list is tailored with novelty, striving to provide you with valuable inspiration that ventures beyond the familiar.
It’s this exciting blend of the known and the creative new that makes this article a must-read for anyone looking to redefine the meaning of a tree stump bench. So why not venture forth on this journey through uncharted paths of beauteous creativity?
Stump Swing
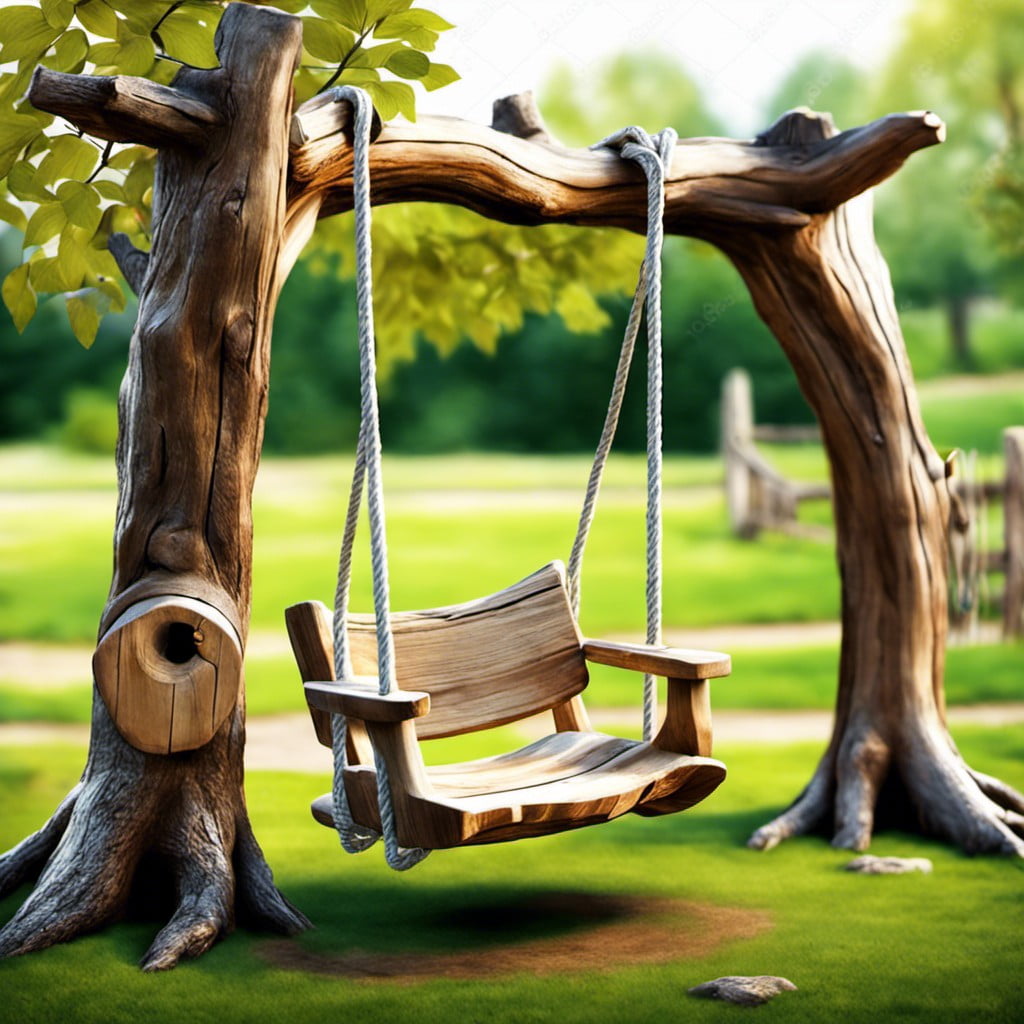
Transforming an old tree stump into a quaint swing draws a unique connection between the charm of childhood memories and the elegance of nature.
1. Choose a sturdy stump: Ensure that it’s solid and safe to bear weight.
2. Position and Height: Determine a suitable height for the swing that complements the stump size without compromising safety.
3. Swing Type: Opt for a traditional wooden seat or a more contemporary design based on personal preference and décor.
4. String Material: Use durable ropes or metal chains for an extra aesthetic touch while also providing longevity.
5. Sealing the Stump: Preserve the stump against weather extremes through stain or sealers to maintain its aesthetic appeal for years.
6. Safety measures: Confirm safe and secure installation of every component to mitigate any risk.
By implementing these steps, the end result is a distinct outdoor feature brimming with nostalgia and natural appeal.
Tree Trunk Bistro
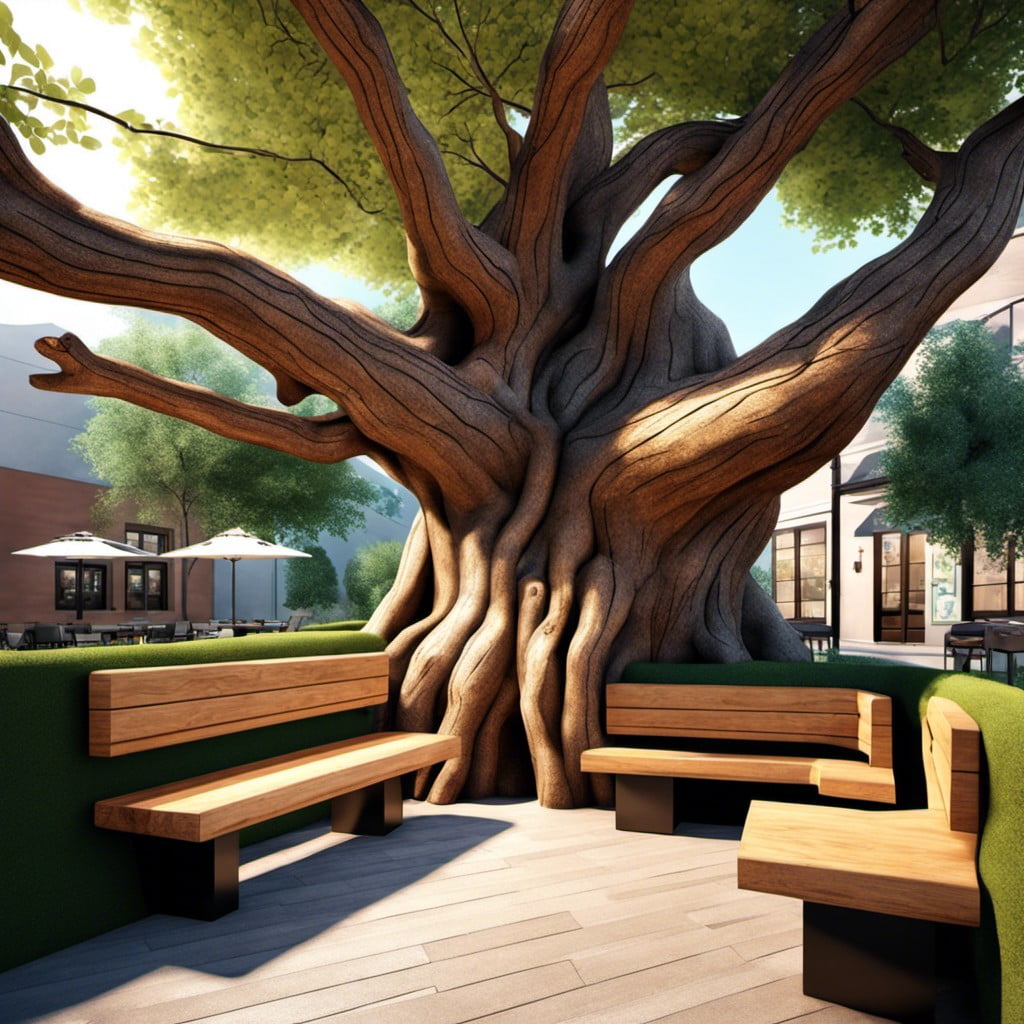
Creating your personalized Tree Trunk Bistro is a fantastic way to repurpose tree stumps and convert them into functional, outdoor dining areas. To begin, you’ll need a sturdy, sizable tree stump which serves as the heart of your bespoke bistro.
First off, flatten the top of the tree stump and seal to create a protected, durable table surface. Opt for a wood sealant that’s weather-resistant to defend against the elements. If you prefer a more polished look, consider adding a custom-made glass or stone table top.
Next, elevate your newly formed table with rustic chairs or benches which can be crafted using smaller tree stumps or logs. Adding cushions, blankets and overhead lighting will create additional ambiance for those evening meals under the stars.
Last but not least, accentuate surrounding greenery or flowers to contribute to the bistro’s aesthetic appeal. Hanging planters or garden lights from surrounding trees can provide an attractive backdrop. Don’t forget to choose outdoor dinnerware that complements the natural beauty of your tree stump table for the finishing touch.
Remember, the charm of the Tree Trunk Bistro comes from its blend of rustic simplicity and unique personal touches. The result is a serene spot that encapsulates the beauty of outdoor dining, one that encourages enjoyment of meals ensconced within nature’s embrace.
Rustic Rest Area
Crafting a cozy corner is achievable with just a few steps. Retain the ruggedness of the stump to stick to the rustic theme.
You might even consider sanding the upper surface for a smoother sitting area but leaving the bark on for a more natural touch.
Consider placement in a secluded part of the garden, maybe under a large tree or even by a picturesque pond.
A few strategically placed outdoor cushions can boost comfort levels, making the spot ideal for a quick rest or a tranquil reading nook.
Position a weather-resistant side table nearby to hold a hot drink or a good book.
Depending on your preferences, you could also install a canopy or umbrella for shade.
Now, individuals can enjoy the simple joys of the outdoors amidst rustic charm.
Always remember, simplicity is key when designing a rustic rest area.
Woodland Bridge
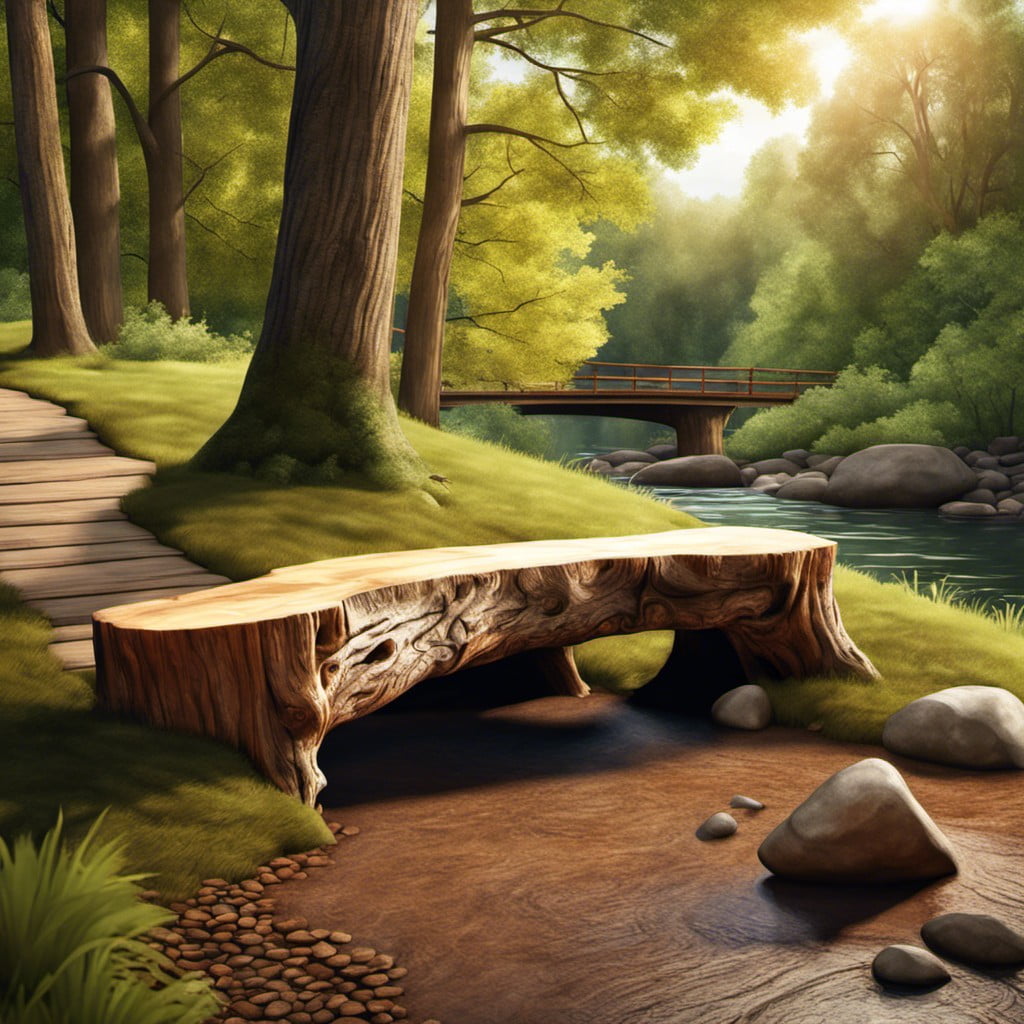
In crafting your very own enchanting escape, look no further than the quiet beauty of a woodland bridge. You’d fashion this cleverly out of two sturdy stump halves to straddle a shallow stream or garden path.
1. Robust Material: Use robust tree stumps that can weather all outdoor elements. Choosing hardwood types like oak or maple could ensure longevity.
2. Correct Positioning: The natural terrain plays a vital role in positioning the stump bridge. Ideally, it should span a drained stream or garden pathway.
3. Safety Measures: It’s crucial to secure the halves firmly into the ground, preventing movement or tilting over time. Tools such as an earth auger might be handy for this process.
4. Surface Treatment: A sanded, smooth surface, possibly coated with a non-slip varnish, enhances not only the wood’s natural beauty but user safety.
5. Charming Additions: Perhaps consider a handrail made of twisted vines or even bright, blooming hanging baskets for an added whimsical touch.
In short, the woodland bridge concept brings a pocket of serene enchantment to even the smallest outdoor spaces, embodying the ethereal magic of fairy-tale forests.
Mini Stump Library
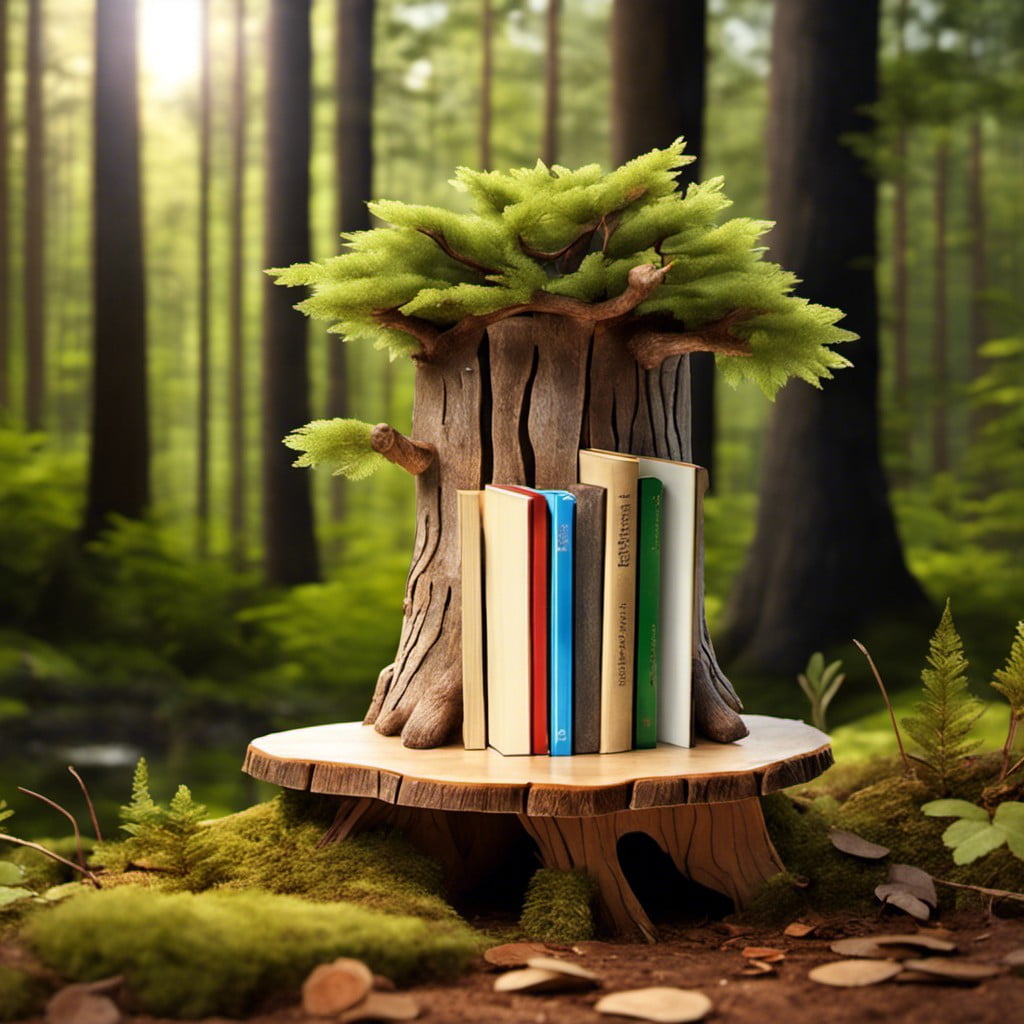
To achieve the charming appeal of a mini stump library, consider these points. Firstly, select a suitable stump height that offers easy access to both adults and children. The stump’s width should accommodate various book sizes. Utilize the existing natural features of the stump to design unique shelving structures that showcase a rustic, outdoor aesthetic.
Rot-resistant wood, like cedar or redwood, is preferable for longevity, supplemented with weather-proof protective stripper for added durability. Not forgetting to feature a protective ledge or door to safeguard books from weather elements. Artificial lighting can be added for night-time reading enthusiasts, lending an enchanting glow to your mini-library.
Imagination and creativity are key in this project, making it a delightful addition for book lovers and an enchanting feature for your garden.
Flower Bed Bloom

Creating a floral paradise within old tree stumps marvellously re-purposes them and adds a splash of color to your garden.
The process is straightforward: hollow out the center of the stump, ensuring it’s wide and deep enough for your chosen plants.
Add a layer of rich compost and potting soil, then place your flowers, arranging them in a visually pleasing way.
Seasonal blooms work well and ensure a year-round splash of color.
For additional charm, consider introducing climbing plants like jasmine ― they will elegantly cascade over the stump, creating a stunning focal point.
The result is an enchanting, ever-changing flower garden worthy of fairy tales!
Carved Critter Homes
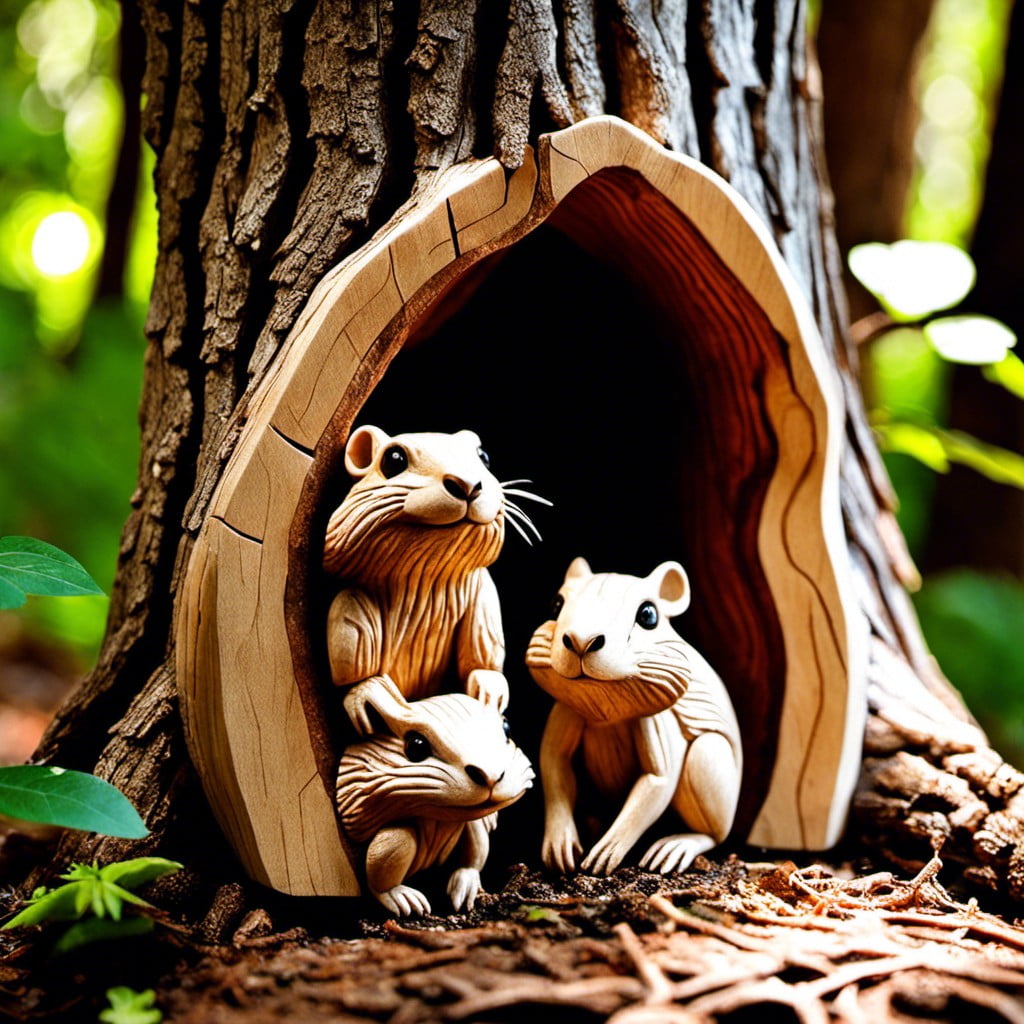
Integrating charm and functionality, these creations serve as striking additions to any outdoor decor. For carving, select stumps with flat tops, ensuring stability throughout the process. Use creativity to make intricate designs of birds, squirrels, or hedgehogs – the options are limitless.
Protection for your creations is crucial, therefore, a sealant like polyurethane is recommended to safeguard against weather elements. Breathable, it not only ensures longevity but also enhances the natural grain of the stump.
For actual critters, hollowing out a portion or adding small doors creates a unique habitat. Adding feeders or bird baths on top provides added utility. Remember, proper placement away from busy paths will promote critter visits.
Lastly, don’t forget to consider seasonal changes. Decorate your Critter Homes to reflect the time of year – add a miniature pumpkin for autumn or frosty icicles in winter, your outdoor space will always look inviting.
Bird Bath Bowl
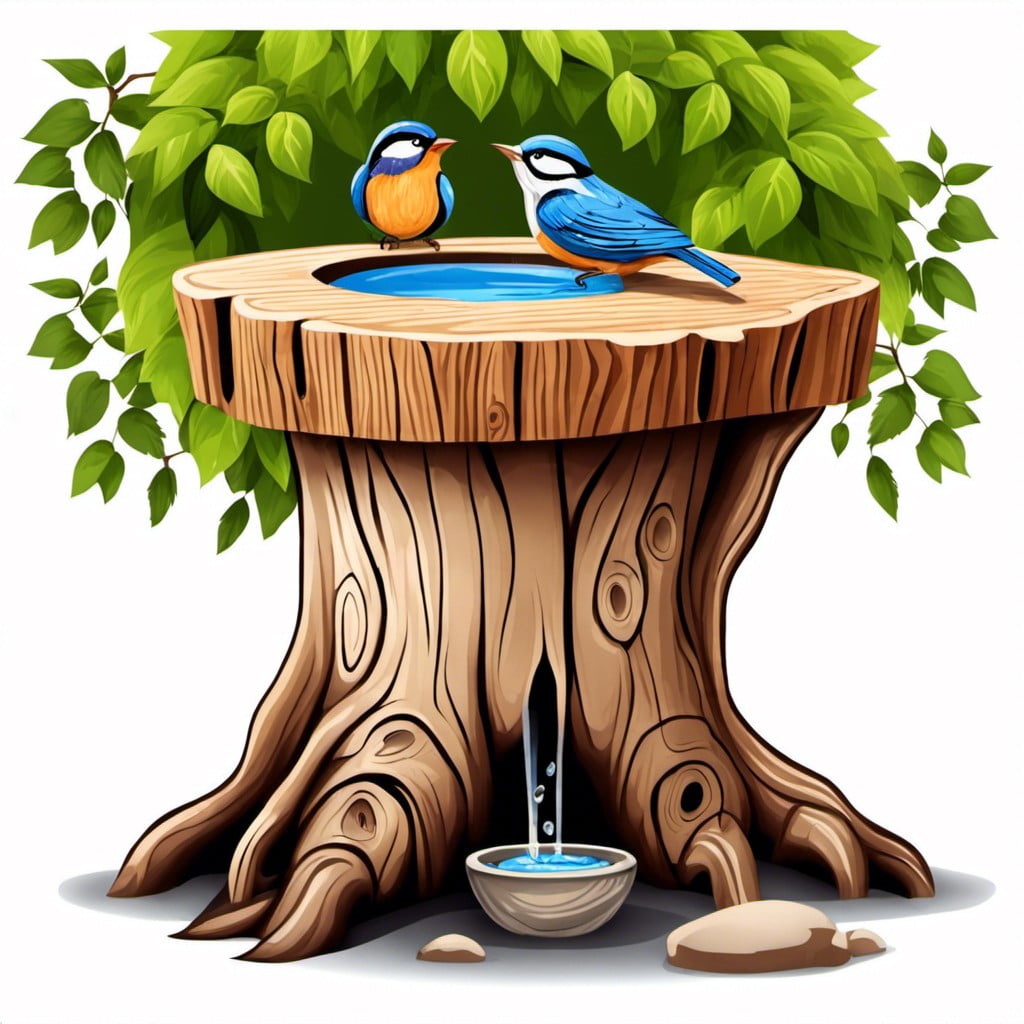
Transforming your old stump into a birdbath is an innovative project that can liven up your yard and attract beautiful native birds. Begin by determining the height at which you’d like your bird bath. Often, this is about waist high- this way you can easily clean or fill the basin. Next, hollow out a shallow basin on top of the stump. It’s essential to make it deep enough to hold water, but not so deep that small birds can’t comfortably use it. Ensure it has gently sloping sides to allow easy access for birds.
For a more polished look, place a shallow, flat rock or a pre-made bird bath basin on top of the stump instead of carving out a basin.
To finish, rub the inside of the basin with beeswax or a waterproof sealer to help it hold water. With little more than some careful carving and few choice touches, you now have a stump-turned-bird bath that adds character to your garden while serving the local wildlife!
Keep up with regular maintenance by replenishing water frequently, especially in hot weather, and cleaning the bath regularly to prevent the spread of disease. This also encourages birds to keep visiting your bird-friendly backyard retreat.
Mini-Forest Terrarium
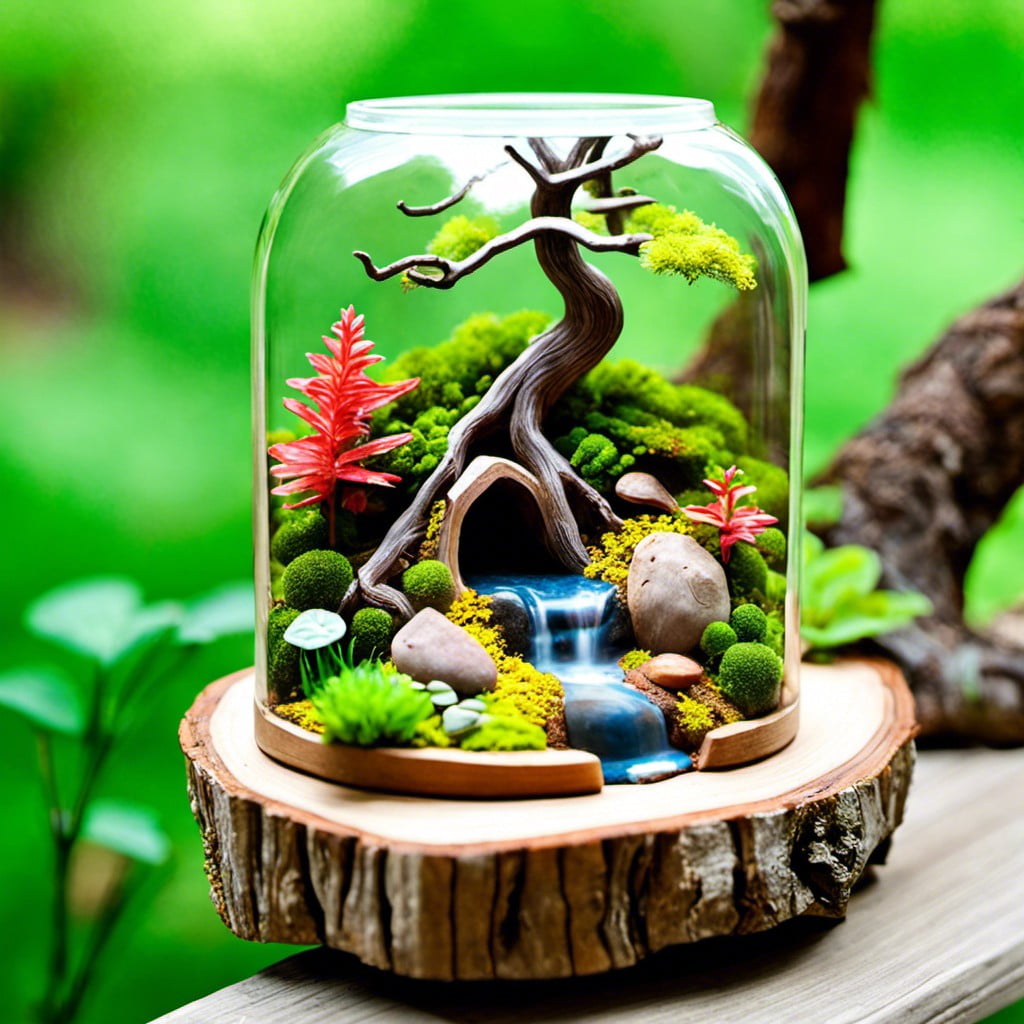
Creating a mini-forest terrarium involves utilizing the hollowed part of the stump, if it has one. Should the stump be solid, carving out a shallow center is an option.
Once the cavity is prepared, a layer of pebbles for drainage is added, followed by activated charcoal to keep water fresh, and then a thin layer of moss to prevent soil from sinking into the rock.
Now comes the fascinating part, arranging small, shade-loving plants and mosses. Ferns, begonias, or ivy are suitable plants due to their love for moist, low light conditions.
Remember to water your mini-garden occasionally to maintain humidity. Embellish the setting further with miniature figures or structures for a true forest feel.
Log Lamp Base
Firstly, find a suitable tree stump with a flat top. Ensure it’s dry and free from woodworm. Consider its height depending on where you want to place your lamp. It should be lower for a bedside lamp and taller for a sitting room setting.
Then, drill a hole through the centre of the stump top. The diameter should be wide enough for a lamp cord to fit through. Feed the cord through this hole and attach the lamp assembly. Remember to secure the fixture with screws to ensure it does not wobble.
Next, attach the lampshade. You may use a pre-made shade or use your creativity to make one using materials like hessian, wood, or metal. This will add a personal touch to your log lamp base.
To keep the natural look, use a sealant rather than paint. This will also protect the wood and prolong its lifespan.
Lastly, for a unique touch, carve a small groove on the side of your stump to tuck away the cord. Not only does it keep it hidden, but also reduces the trip hazard.
Remember, the essence of this project is creativity. The end product will be a unique piece of home decor illuminating your space with charm and a touch of nature.
Artistic Sculpture Stump
Breathing new life into old tree stumps is all about creativity, and transforming them into sculptures takes this idea to a different level. There are primarily two ways to approach stump sculpture: carving and assembling.
1. Carving: If you’re handy with a chainsaw or chisels, consider carving a unique design directly into the stump. This could be as simple as a geometric pattern, or as complex as an entire wildlife scene.
2. Assembling: If carving isn’t your strong suit, try assembling a sculpture on and around the stump using other materials. Pebbles, broken ceramics, or even scrap metal can be combined to create an eclectic masterpiece.
Remember, this is an opportunity to let your personality shine right in your garden. Artistic sculpture stumps not only provide a distinctive aesthetic appeal but also create conversation pieces that passersby won’t help but notice. Protect your creation with a coat of weather-resistant sealant to ensure it withstands the elements.
Majestic Mushroom Stools
Creating these enchanting seats begins with choosing a suitable tree stump. Opt for one robust and solid, and remember, the height should be comfortable for sitting. To achieve the mushroom look, source large wooden bowls or thick wooden plaques for the seat area.
Next, it’s time for provision of the ‘mushroom cap’. Paint the tops in vibrant colors, think reds, blues or purples, even a combination if you’d like a magical touch. Don’t forget to add white spots for the classic mushroom look.
To secure the ‘cap’ to the stump, you’ll need screws and adhesive. Drill the screws from underneath for a seamless look. Also, think about applying weather-resistant coating to ensure durability amidst changing weather conditions.
Remember to center the cap properly for balance, safety, and aesthetics before you invite someone to take a magical seat on your new creation. Safety first, enchantment second. Maintenance is minimal but regular checks on the stability are recommended.
Ultimately, these funky additions add a touch of whimsy to your garden. They serve a functional purpose while acting as wonderful conversation starters! Enjoy the process of creation, every detail adds to the charm. And why limit to one? Get creative, build a cluster of mushroom stools that vary in size and color for your own magical mushroom grove. Make memories around your new garden feature that is as useful as it is artistic.
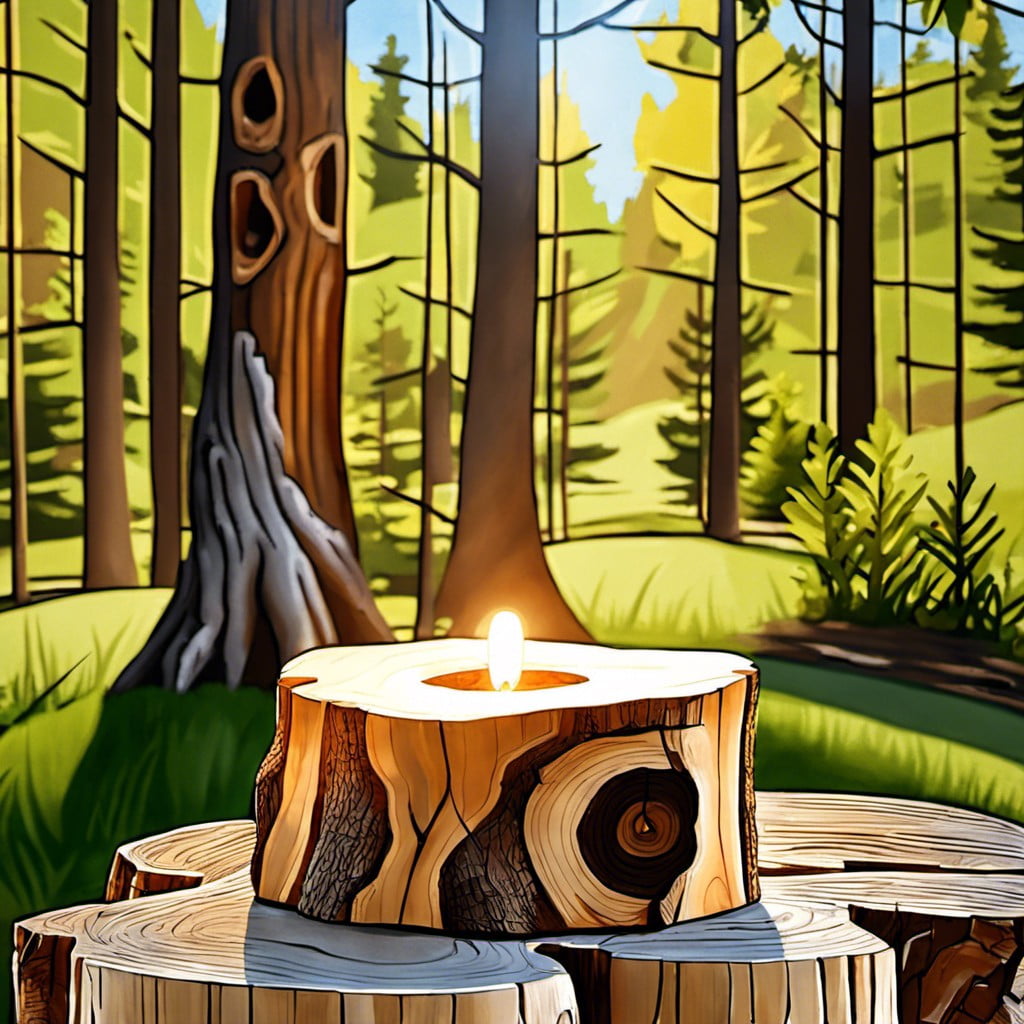
Natural Candle Holders
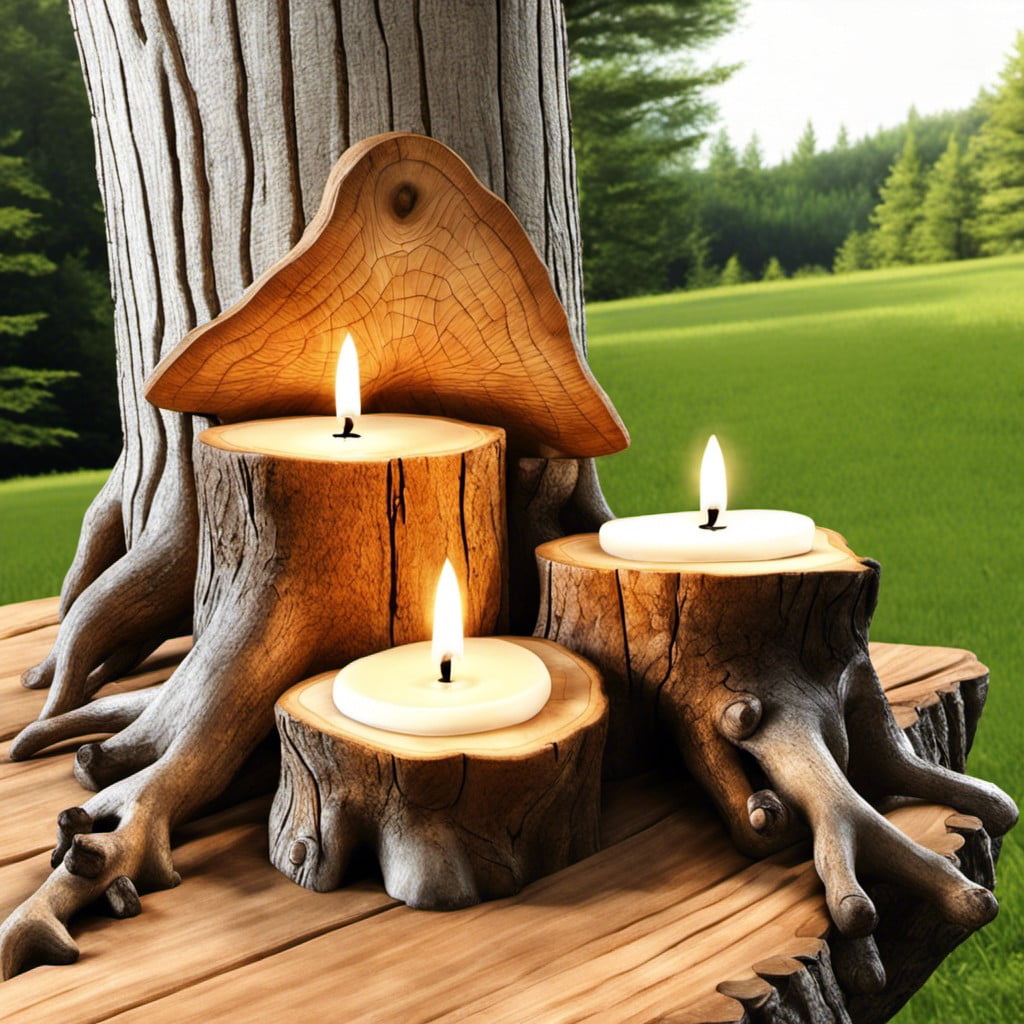
In the process of crafting breathtaking, yet easy-to-make decorations, nothing beats the raw allure of nature’s own creations. With a bit of thoughtful hollowing and some dainty tealight candles, your stump can transform into a literal light in the darkness! These holders bring a soft, warm glow that can make any evening a touch more enchanting.
Upon selecting the ideal stump, it’s crucial to ensure the top is smooth to create an even surface. Afterwards, identify where you’d want your candles to be. Using a drill, hollow out the chosen zones to fit your candles snugly. Don’t forget to keep an eye on the depth – too shallow and the wind will blow out your light, too deep and the glow could be hidden.
When you’re ready, nestle the candles in place and light them up. The result? A striking piece of natural-lit art that truly captures the forest’s magical ambiance. Please remember, safety is key. Always extinguish your candles when not in use or when leaving your secure space.
Outdoor Chess Set

Taking your garden game to a whole new level, this idea incorporates a vintage touch with strategic thinking. Large, rugged stone or ceramic pieces, clearly differentiated between the two teams, will fill your garden with a sprinkling of elegance and mysterious charm. Ensuring the pieces are weatherproof, for those surprise rain showers, is crucial. Consider enlisting a local artisan to custom make these for you.
The playing surface can be painted directly onto the stump’s flat top with the standard 8×8 grid, incorporating preferred design elements. Alternatively, fashion a removable chess board that can be stored when not in use. Importantly, ensure the stump is sanded adequately to avoid nasty splinters during the game.
This captivating feature not only promotes outdoor activity and strategic thinking but it greatly enhances your garden, leaving visitors with both a stunning visual and a mental challenge awaiting their next move.
Wine Barrel Replica

Emulating a classic wine barrel can lend an elegant and vintage charm to your garden. Here’s how to transform a tree stump into a miniature version of a wine barrel:
1. Shape: Begin by shaping the stump. It should have a slightly bulging middle and vertical lines resembling the steel hoops on a barrel.
2. Charring: Next, use a blowtorch lightly over the surface to give it the signature toasted look of a wine barrel, but remember, safety is paramount.
3. Sealing: Finalize your creation with a few coats of wood sealer. This will preserve the charred look and protect your stump from the elements.
4. Accessories: Consider adding accessories. Maybe a small wine rack on top, or use it as a holder for your wine glass during those outdoor gatherings.
Garden Gnome Village
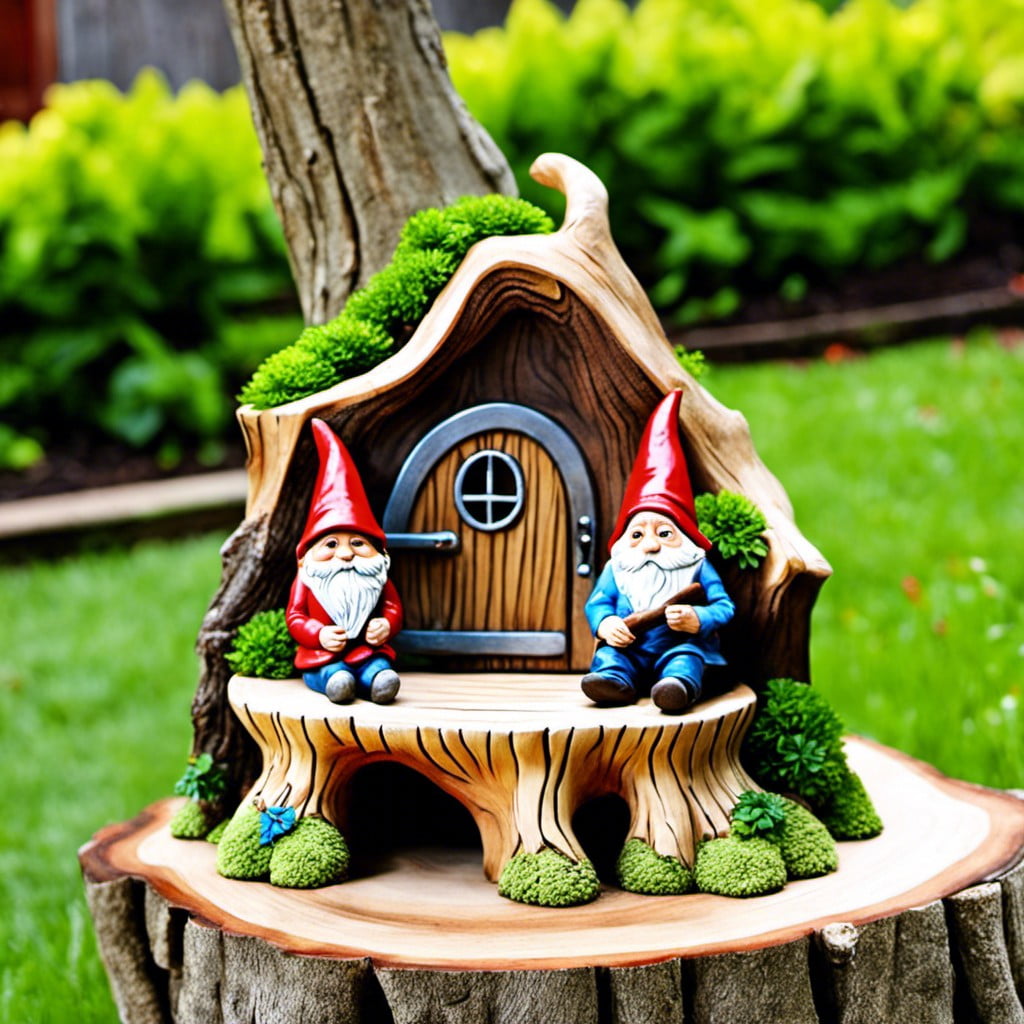
The quaint charm of a gnome village is a delightful way to transform an old tree stump. This creative design can become a whimsical focal point in your outdoor space.
1. Depth: Add layers and divisions, creating an almost multi-storied effect. First, hollow out sections of the tree stump to accommodate miniature houses.
2. Decor: Embellish using miniature garden gnome figures, houses, and landscaping to create an entire scene. Paint the houses and add small windows and doors to enhance the effect.
3. Landscape: Moss, small succulents, or even tiny artificial trees can add greenery. Gravel interspersed with the greenery can mimic walking paths.
4. Lighting: Consider installing fairy lights for a magical glow after sundown, enhancing the enchanting appeal of the gnome village.
5. Keep it Safe: Apply a coat of weather-resistant sealant to your creation to protect it from the elements.
Remember, the gnome village should reflect your personal taste and imagination, making your garden an enchanting escape.
Bee Bungalow
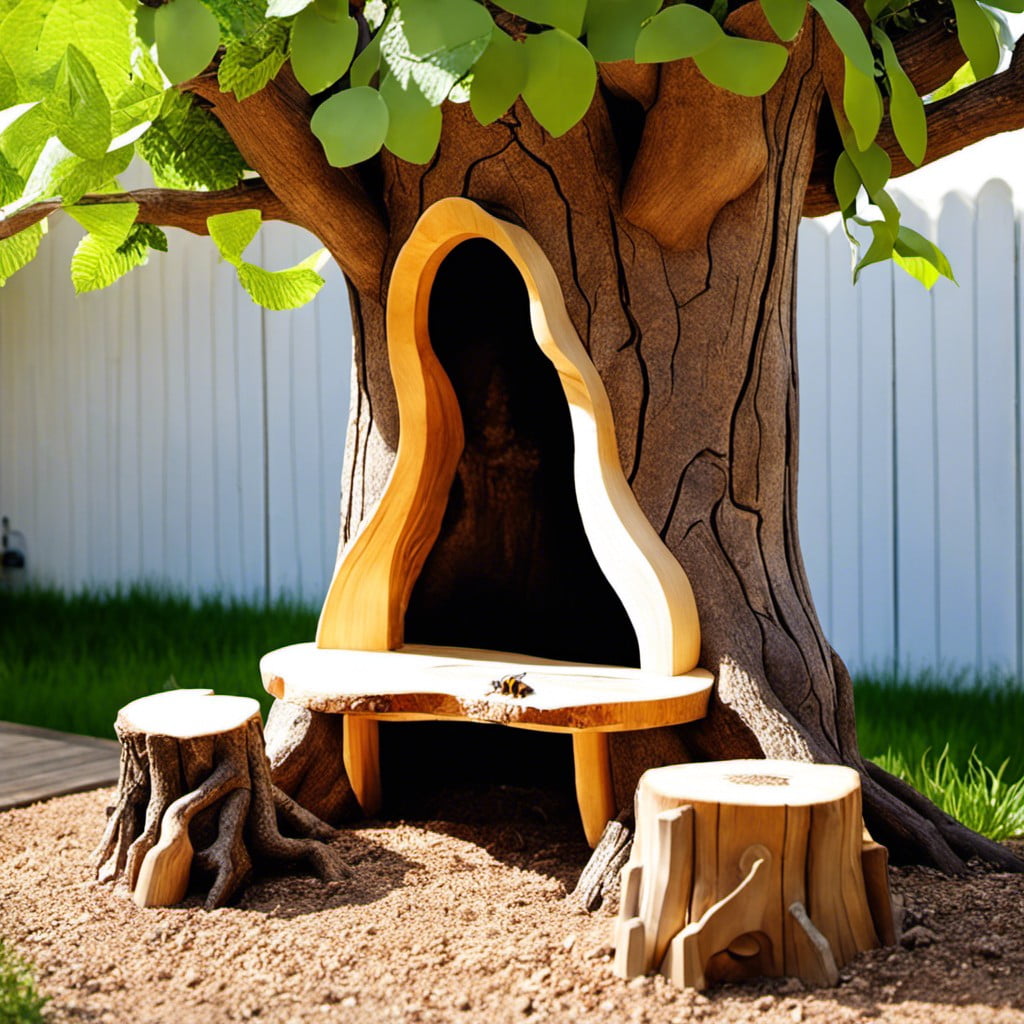
Delving into a more adventurous spin for your stump project, consider the idea of a bee bungalow. Beneficial for your garden, it serves as an inviting habitat for solitary bees, which are non-aggressive pollinators.
1. Location is essential; choose a stump with good sun exposure, ideally facing southeast or south.
2. Ensure the stump has enough depth to create cavities for bee nests. About 5 inches is suitable.
3. Drill holes of different diameters (1/8 to 1/2 inch) and varying depths into the top and sides of the stump, mimicking the natural nesting sites of solitary bees.
4. Aesthetics are valuable too! Consider adding a small roof for protection from the rain or adorning with flowers that attract bees.
5. Regularly monitor your bee bungalow for resident bees and plug old holes to encourage new nesting if necessary.
With this creative use, not only do you have an innovative addition to your garden decor, but you’re also aiding in the conservation of these crucial pollinators.
BBQ Stand
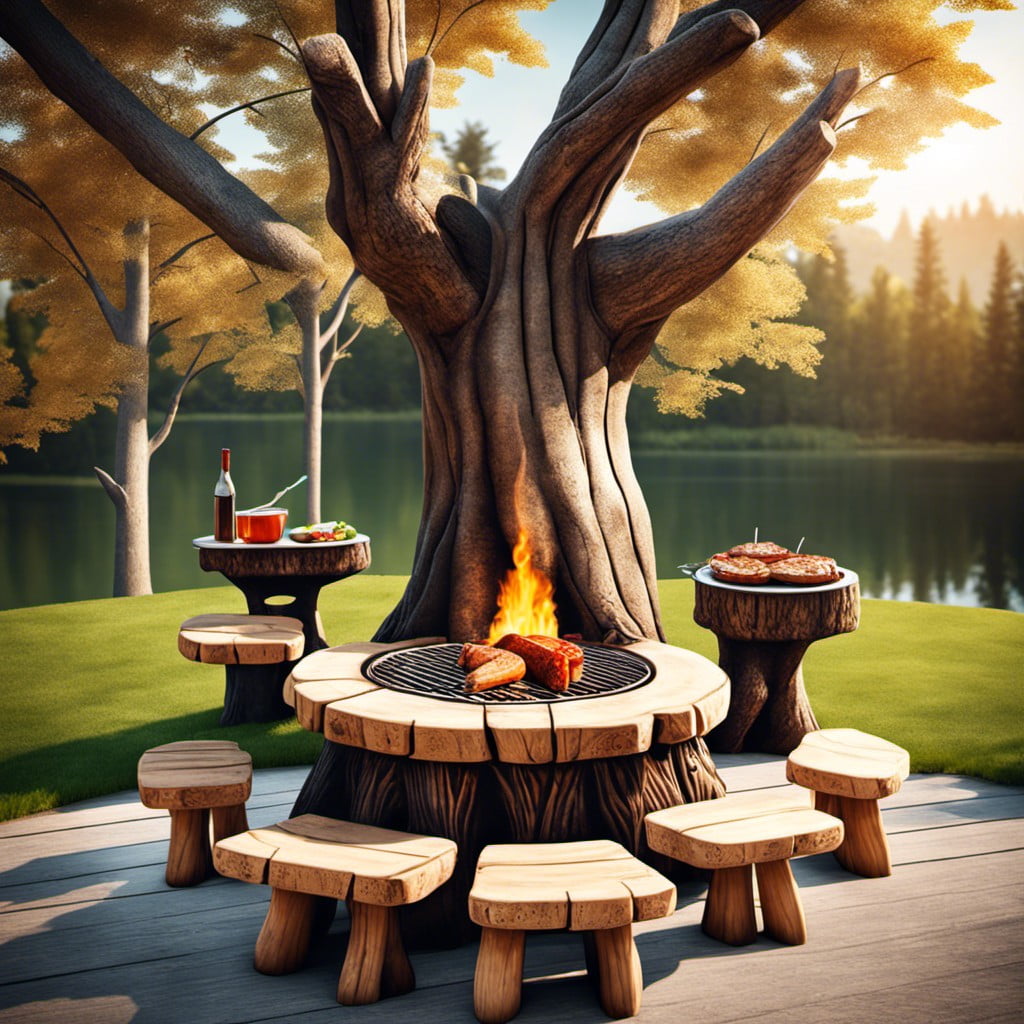
Using a sturdy tree stump as a base, your barbeque area can be instantly transformed. Here are some essential points to consider:
1. Size: The stump should be flat and wide enough to stably hold your grill or a tray for food preparation, setting it approximately waist-high for easy access.
2. Fire Safety: Ensure the stump isn’t too close to the grill, maintaining a safe distance to prevent accidental fires.
3. Maintenance: Regularly seal the stump surface to protect against harsh weather conditions and prolong its life. An outdoor varnish or sealer works well.
4. Extra Features: Consider adding hooks around the stump for hanging grilling tools, keeping everything tidy and within reach.
5. Mobility: If possible, choose a portable BBQ unit; you can place it on the stump when you’re ready to grill, and store it away when not in use. This helps ensure the longevity of both your stump and BBQ unit.
Remember, creativity’s the limit when it comes to utilizing stump spaces effectively. The right touch can turn an ordinary tree stump into a perfect BBQ stand, combining functionality with rustic charm.
Stump Sundial
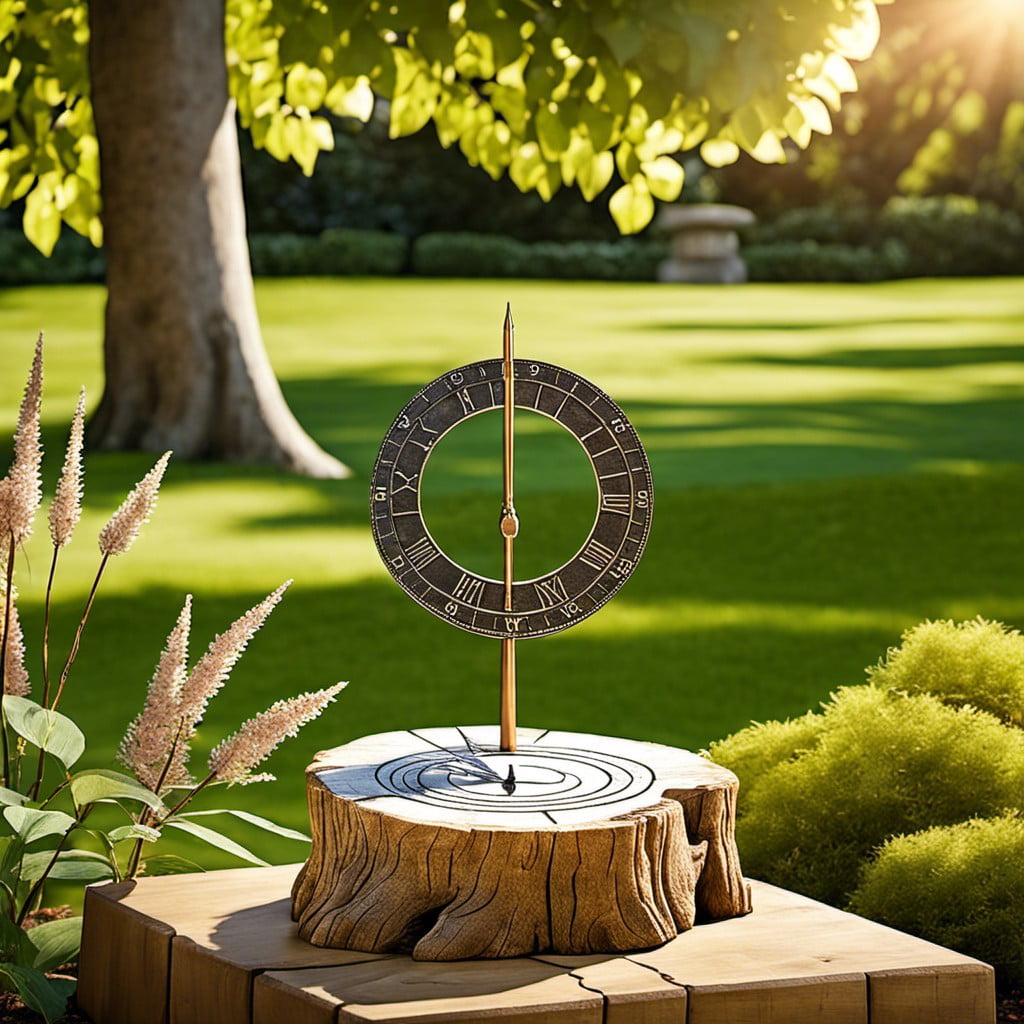
Transforming a tree stump into a sundial adds a touch of prehistoric charm and practical function to your backyard.
1. Sizing: Ensure your stump is wide enough to house sundial components – typically, 12 to 14 inches in diameter.
2. Sundial Kit: Purchase a sundial kit from a gardening store or online. These kits usually include a brass disc marked with the hours and a triangular piece known as the gnomon.
3. Installation: Screw the brass disc onto the top of the stump. Ensure the gnomon, which casts the shadow, points towards true North.
4. Sunlight: It should be positioned in a spot with full sun from morning until afternoon.
This creation not only adds character to your outdoor space but also brings the fascination of telling time using the sun’s shadow, just like ancient civilizations.
Outdoor Study Table
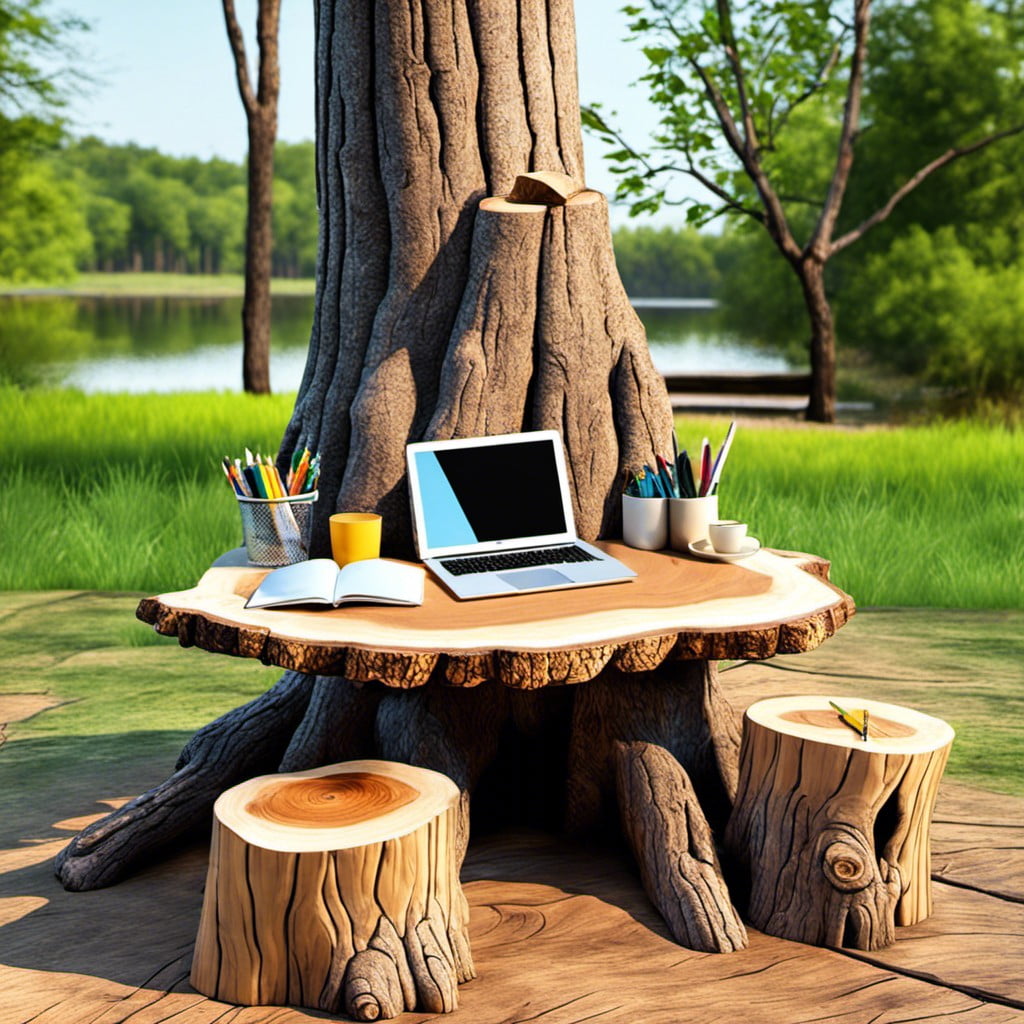
Incorporating natural elements into your backyard office can create a zen environment conducive to focus and productivity. A tree stump comes in handy as an outdoor study table. Preserved skillfully, it offers distinct high-level authenticity that goes beyond ordinary desk designs.
Three key aspects stand out:
- Size and Height: Ensure your stump is at an appropriate height for sitting down and working. You might need to adjust the chair’s height or add customized extensions on the stump.
- Surface Treatment: You want a smooth, even surface. It’s important to thoroughly sand the top and finish with a waterproof treatment for durability and weather resistance.
- Location: Place your stump desk in a quiet, shady area to avoid direct sunlight on your laptop and to make it a comfortable setting. Pair up your newly made study table with a wooden chair, a comfy cushion, and get ready for a unique learning experience in the heart of nature!
Ideas Elsewhere
- https://www.gardeningcharlotte.com/spring/tag/tree+stump+bench
- https://www.bobvila.com/slideshow/the-best-and-weirdest-things-you-can-do-with-a-tree-stump-51341
- https://www.hobbyfarms.com/how-to-build-a-tree-trunk-bench/
Read More Like This
 15 Homecoming Decoration Ideas to Elevate Your Celebration
 15 Christmas Cake Decorating Ideas to Sweeten Your Holidays
 15 Outdoor Party Tent Decorating Ideas for a Magical Celebration
 15 Ideas for Welcome Home Decorations
 15 Cheap Table Decoration Ideas to Elevate Any Gathering
Recap: