Last updated on
Discover the charming potential of magnetic tins from the famous Dollar tree, because these budget-friendly containers can be transformed into piece of art and functional elements of decor with just a bit of creativity.
I’ve designed unique illustrations for these ideas. I hope you get inspired!
“Dollar Tree magnetic tins, a bargain shopper’s dream with unfathomable potential. Chances are, you bumped into some common decor ideas already circulating on the internet. But fret not, the goal here is to jazz things up a bit!
This article focuses on bringing some unique, fresh perspectives to the table, sprinkled with new angles on illuminating the raw beauty of these magnetic tins. And not to worry, links to the cream of the crop of existing ideas will be added at the end for your convenience.
Ready to uncover a trove of unique decor ideas with these nifty Dollar Tree magnetic tins? Let’s dive in!”
“DIY Magnetic Tin Candle Holders.”

Taking inspiration from an eclectic, romantic aesthetic, a DIY candle holder project using Dollar Tree magnetic tins will add a unique charm to any space. Here’s how to go about it:
1. Empty and clean the tins; a quick rinse will mostly suffice.
2. Place a small, circular candle at the bottom of each tin. Ensure the candles fit snugly, opt for scented ones for added ambience.
3. Using a hot glue gun, attach decorations of choice around the tin’s base. Consider elements like artificial flowers, beads, or rustic twine for a customized look.
4. Allow the glue to dry and the decorations to set.
5. As the tins are magnetic, one can affix them on metal surfaces. However, due to the heat candles can emit, do not attach them to painted or flammable surfaces. Ideal mounting surfaces include metal candle trays or metal racks.
6. Always ensure safety; never leave burning candles unattended.
This project lets you create a personalized, stylish space, demonstrating the versatility of magnetic tins. Plus, it’s a cost-effective decor option. The result: a warm glow that infuses your living area with a sense of tranquility and soft, beautiful light.
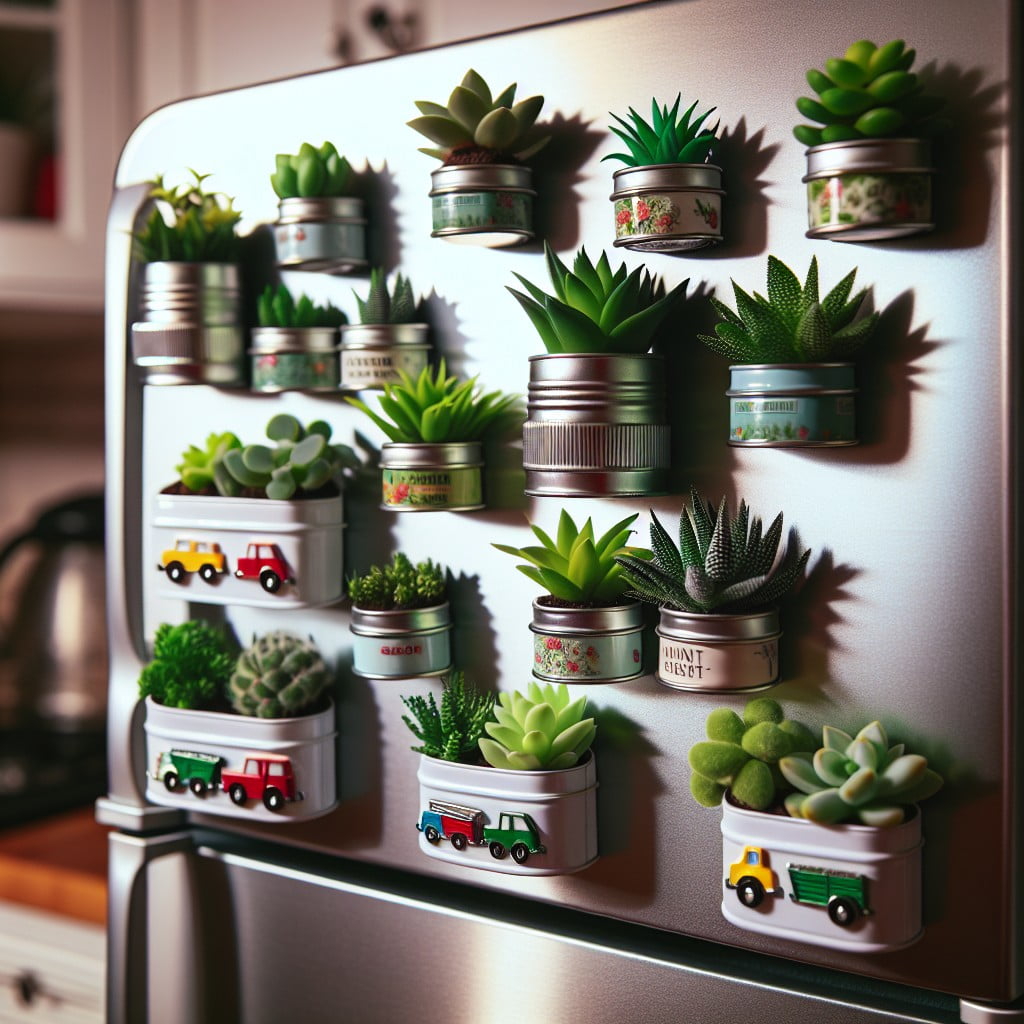
“Dollar Tree Magnetic Tin Plant Holders.”

To start, select an assortment of small plants or succulents that can comfortably grow in the confines of the magnetic tins. Herbs serve as perfect candidates, delivering aesthetics with a practical twist. Add a pinch of potting soil, then carefully plant your selected flora.
For a seamless look, remove the stickers on the tin lids. Relocate the lids to the back of the tins if you want them to protrude from the wall. You can also attach the lids to the bottom of the tins for a flat appearance.
Next, arrange the plant-filled tins on your chosen metallic surface. This could be a dedicated metal board, your refrigerator, or a magnetic chalkboard. The beauty lies in the flexibility to reposition and rearrange the tins to suit your preference.
Ensure you provide enough sunlight and water. When watering, remove the tin from the surface to prevent water damage, then return when drained. With a bit of tender loving care, you’ll have a lively burst of greenery to brighten up your space.
In this minimalistic and affordable manner, your magnetic tins transform into versatile plant holders, adding to your home’s fresh and natural vibe.
“Customizable Fridge Magnet Containers Using Dollar Tree Tins.”
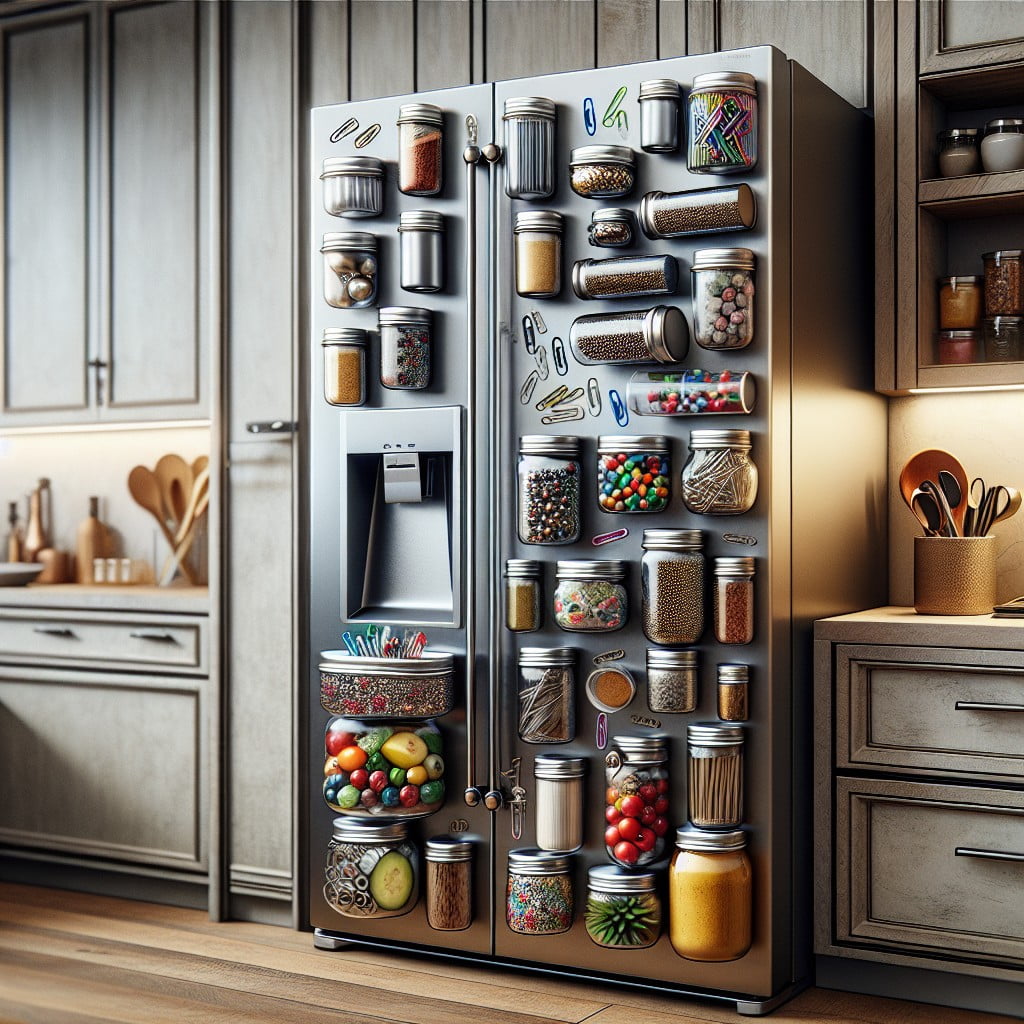
Stocking up on magnetic tins from the Dollar Tree can turn a drab refrigerator into a functional, stylish, and organized canvas. With a touch of creativity, these tins can serve as mini storage units for your fridge.
1. Sizes and Styles: Pick various sizes and styles. The assortment adds visual interest and accommodates different storage needs.
2. Personalize: Consider painting or adding decorative washi tape to the tins to match your kitchen color scheme.
3. Application: They can hold items like grocery lists, bills, photos, or even small food packets.
4. Labels: Add labels for easy access and to stay organized. Chalkboard paint or sticker labels are both great options.
5. Clean: Ensure your fridge surface is clean before applying the tins. This allows for a stronger hold.
6. Plan: Plan out the layout before attaching to ensure a balanced look.
In just a few easy steps, your fridge can become an organized, trendy, and efficient space.
“Dollar Tree Magnetic Tins As Cosmetic Organizers.”
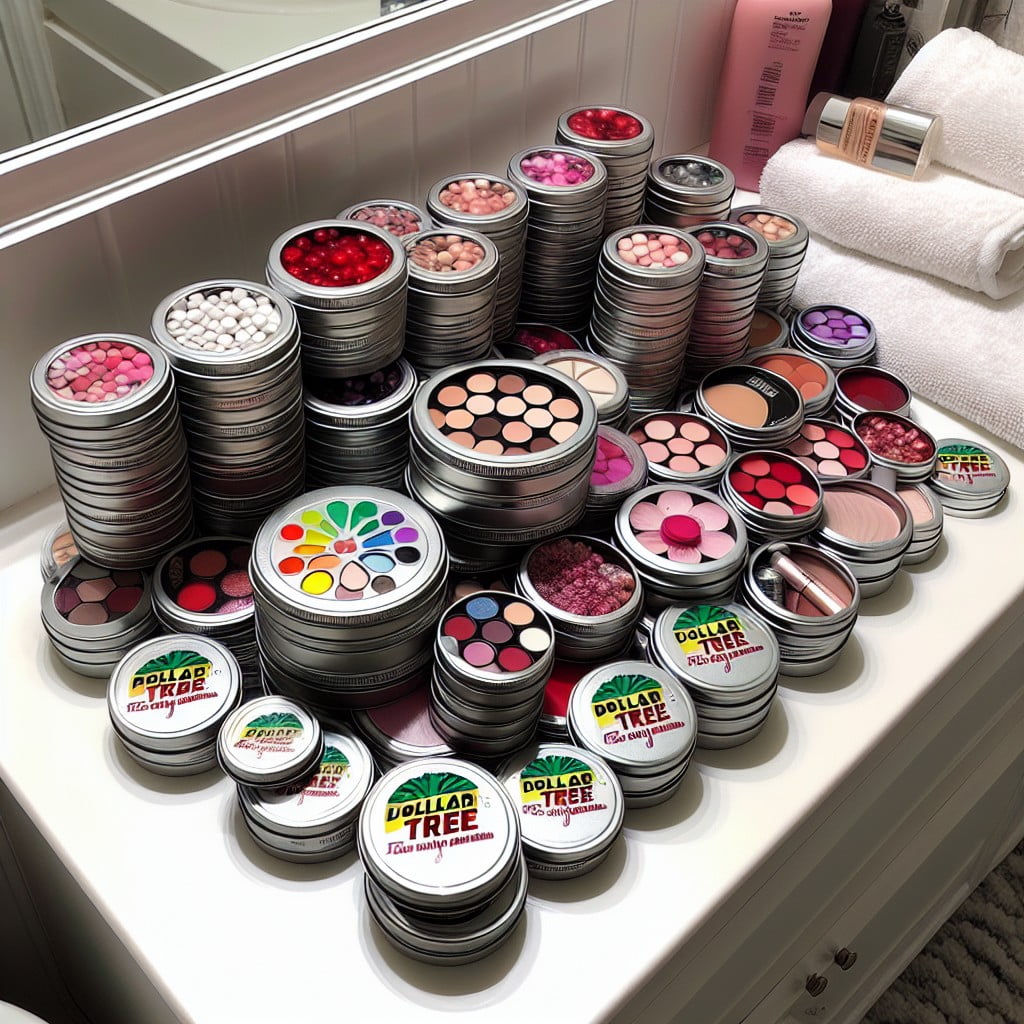
These versatile containers, thanks to their magnetic backing, can seamlessly adhere to any metallic surface; for instance, a mirror’s frame or a steel shelving unit. This can create a stylish and practical way to store and display your cosmetics.
Here are several ways to maximize the utility and appeal of this unique organizing tool:
- Size Variety: As cosmetic products often come in varying shapes and sizes, the different dimensions of Dollar Tree magnetic tins can cater to almost anything from chunky eyeshadow palettes to slim lip liners.
- Labeling: To easily locate your desired cosmetic tool, consider labeling your containers. This could be as simple as a handwritten note on a sticker or as creative as embossing letters on the tin lids.
- Multiple Surfaces: Don’t limit yourself to just one metallic section in your room. Spread your containers across different surfaces to organize and categorize your cosmetics.
- Vertical Storage: Leverage your room’s vertical real estate. This helps to clear horizontal space while ensuring your cosmetics are right at eye level for easy access.
- Color-Coding: Color-code your tins for different categories of cosmetics. This not only aids in distinguishing your items but also adds a visually pleasing aesthetic.
Remember, the effectiveness of this organization method will always hinge on your creativity. The most basic tin can become the most glamourous cosmetic holder with the right approach.
“Crafting Attractive Wall Displays Using Magnetic Tins.”
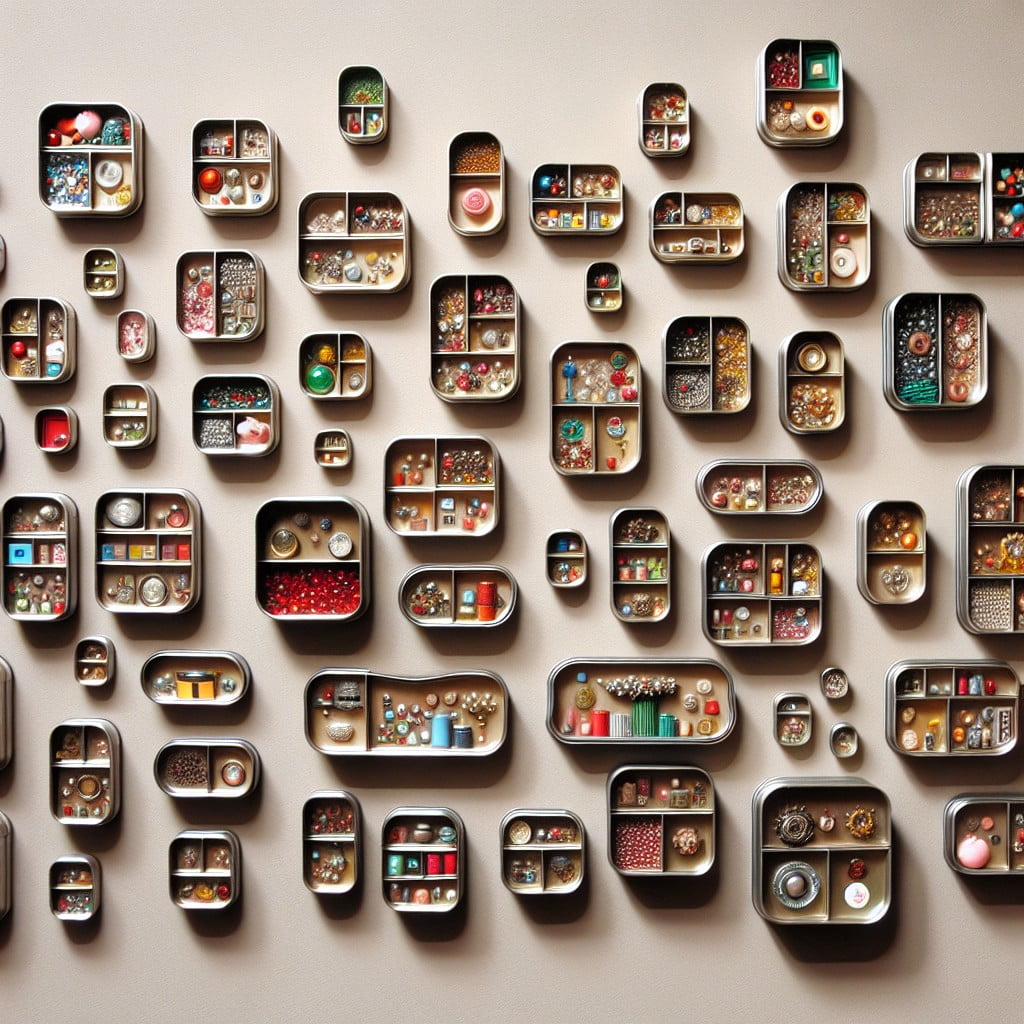
For an attractive wall display, gather varying sizes of magnetic tins. Begin by arranging them in an appealing pattern on the floor. With a pencil, trace the arrangement on your chosen wall. Next, attach either magnetic strips or magnetic paint to the traced areas. Once this base is secure, place your tins in the prearranged positions.
The magnetic tins can be filled with decor to further enhance the display. Inside can go anything from small plants to decorative stones, or even tea lights for a twinkling wall feature. To switch it up occasionally, consider painting or decorating the exterior of the tins or alternating what is held inside them.
Remember, your wall, your rules: have fun and get creative with it! Whether opting for a minimalist approach or a fully adorned display, the magnetic tins offer limitless possibilities. Approach this as a fun DIY project that can be consistently updated and refreshed, keeping your decor vibrant and appealing.
“Creating Photo Frames With Dollar Tree Magnetic Tins.”

Gather around, craft enthusiasts! This creative endeavor entails taking those versatile magnetic tins and transforming them into bespoke photo frames. Ideal for keeping those cherished memories at the forefront, this project is accessible, easy, and fun.
1. Materials: You’ll need Dollar Tree magnetic tins, photos, scissors, a pencil, and clear adhesive.
2. Measure and Cut: Start by tracing the outline of the tin on your selected picture. Afterwards, use your scissors to cut along the lines.
3. Adhesive Application: Apply a bit of clear adhesive on the rim of the tin.
4. Position the Photo: Position and press your cutout photo onto the tin, making sure it fits well within the frame.
5. Drying Time: Give ample time for the adhesive to dry. Once complete, these magnetic picture frames can be attached to metallic surfaces like refrigerators or lockers.
In this way, one person’s simple Dollar Tree magnetic tin is another’s delightful photo frame, filled with personality and flair. Budget-friendly, customizable, and aesthetically pleasing, these DIY photo frames make perfect gifts or decorations.
“Using Magnetic Tins for Storing Small Office Supplies.”
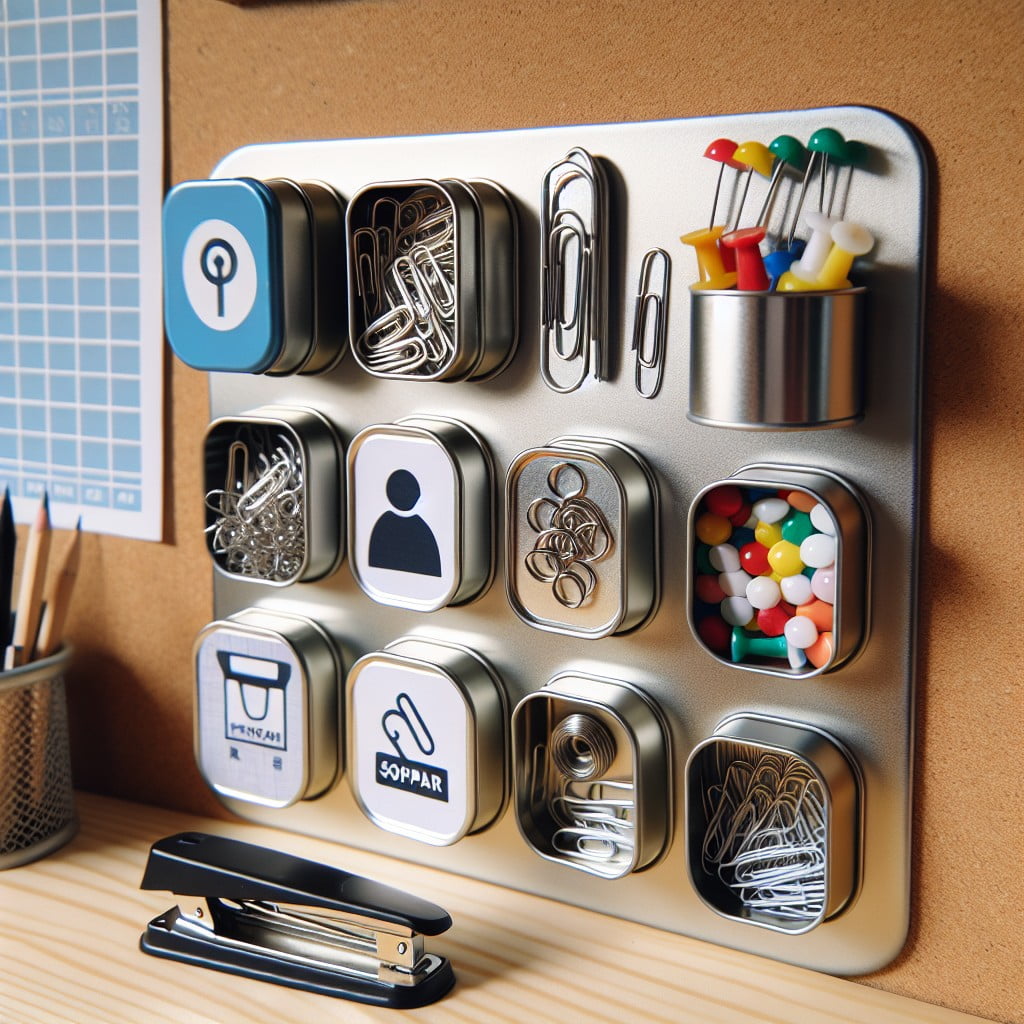
Start by gathering your small office supplies such as paper clips, thumbtacks, or staples, usually found cluttered in desk drawers. Get dollar tree magnetic tins for each category of items. Remember to utilize transparent lids for easy identification.
Place objects in respective tins and secure each lid. Thanks to the iron material, you can stick these tins on any metallic surface such as a desk side, file cabinet, or even a metal board on the wall. This method not only declutters your workspace but also adds a touch of creativity and convenience.
Most importantly, the essential supplies are within an arm’s reach while you work. Plus, you have the liberty to rearrange these magnet tins according to your preference whenever you desire.
“Decorative Magnet Tin Terrariums On a Budget.”
Now that you’re familiar with the concept, here’s how you take it a notch higher. Decorative tin terrariums, made from dollar tree magnetic tins, bring a touch of green to your space without demanding too much space or maintenance.
1. Clean your tins: Ensure they are dry and free from any residue that could affect plant health.
2. Choose Right Plants: Opt for small, low-maintenance plants that thrive in terrarium environments. Succulents, moss, and air plants are great picks.
3. Add Layers: Start with a layer of pebbles for drainage, followed by activated charcoal to prevent bacterial growth, and finish with potting soil.
4. Plant Carefully: Position your plants with a spoon or a small brush. Arrange them as you desire, but leave enough space for growth.
5. Place Them Right: Ensure you place your terrarium in a location with ample indirect sunlight and ventilation.
With these steps, creating a magnetic tin terrarium would be a fun, easy, and rewarding project. It beautifies your space and adds a sense of calm, giving you a mini indoor garden that fits perfectly even in small spaces.
“Dollar Tree Magnetic Tin Spice Racks.”

Dollar Tree’s magnetic tins are not just versatile but offer a creative way to organize kitchen spices. Here are a few ideas to transform them into a spice rack:
1. Vertical Spice Rack: Use a magnetic board on the wall next to your stove. Label the tins for easy spice identification and arrange them on the board.
2. Inside Cabinet Doors: If you don’t want your spices in plain view, stick them on the inside of your kitchen cabinet doors. It saves space and keeps the spices hidden.
3. On the Fridge: Your refrigerator’s side is an ideal place! It becomes more than an appliance, serving as an easily accessible spice rack while cooking.
4. Arrangement: Arrange the tins alphabetically or by the frequency of use. This simple system helps locate the right spice quickly during those busy cooking times.
5. Decorate: Customize the tins with paint, stickers or draw on them with markers. Adding a personal touch makes your spice rack stand out, adding vibrancy to your kitchen.
Remember to ensure your spices are thoroughly dry before storing them in the tins as moisture may cause rusting. Happy organizing!
“DIY Dollar Tree Holiday Ornaments Using Magnetic Tins.”

Enjoy the festive season by utilizing Dollar Tree magnetic tins for a unique holiday decoration. Here’s how:
- Select medium or small-sized tins and clean them thoroughly.
- Paint the outside with chalk paint or spray paint in holiday colors like red, green, white, or metallic gold and silver.
- For a frosty effect, add a layer of sparkle or glitter paint.
- Inside the lid place festive images or holiday messages. For a personal touch, you could use family photos cut into circular shapes to fit the tins.
- Use decorative ribbon to tie around the ridge of the tin. Then attach a loop for hanging on the Christmas tree.
- Leave the magnets in place to attach the ornaments to any magnetic surface, adding holiday cheer around the house.
Remember, the variety at Dollar Tree means you can use different sizes and even stack them for a layered ornament. Get creative with it!
“Homemade Magnetic Tin Locker Decorations.”

Creating these locker decorations is a fun, simple process. Firstly, gather various sized magnetic tins from your local Dollar Tree. Choose your favorite colors, designs or patterns to match your locker theme.
Secondly, look at personalizing the tins. Consider using acrylic paint or adhesive vinyl to add a unique touch. Whether it be your monogram, a favorite quote, or a simple geometric pattern, let your creativity shine.
Thirdly, ponder what you’ll store in the tins. If you’re perpetually searching for a pencil, opting for small tins to store stationary is a smart move. However, bigger tins can hold items such as sunglasses, hand sanitizer, or even snacks.
Finally, think about how you’ll display your tins. You can create a visually appealing arrangement by varying the tin sizes and colors. Form a horizontal line for a sleek look, or cluster them together for a more eclectic feel.
Remember, the key is making your locker functional yet expressive of your personal style. So go ahead and transform those bland metal lockers into your personal organized oasis with Dollar Tree magnetic tins.
“Dollar Tree Magnetic Tins As Mini Dessert Holders.”

Taking any gathering to an exceptional level, this simple craft repurposes magnetic tins into delightful mini dessert holders. Perfect size for bite-sized treats, they add fun, functionality, and style to any table setting.
Here’s how to achieve it:
- 1. Carefully clean tins with warm water and soap to ensure they’re food-grade ready.
- 2. Choose desserts that fit into the tins like miniature cupcakes, cookies, or chocolate truffles.
- 3. Use decorative cupcake liners in the tins for an extra pop of color and style.
- 4. Arrange tins on a magnetic board or tray, making it easy for guests to choose their favorite treats.
- 5. For parties, customize using ribbons, stickers, or tags to suit the theme.
- 6. Post-event, the tins are quick to clean, reusable, and stackable for easy storage.
This little transformation not only displays desserts in an unusual, eye-catching way but also leverages the power of DIY for affordable party planning. This fun and functional repurposing truly emphasizes the versatility of Dollar Tree magnetic tins.
“Creating Bespoke Fridge Art Using Dollar Tree Magnetic Tins.”
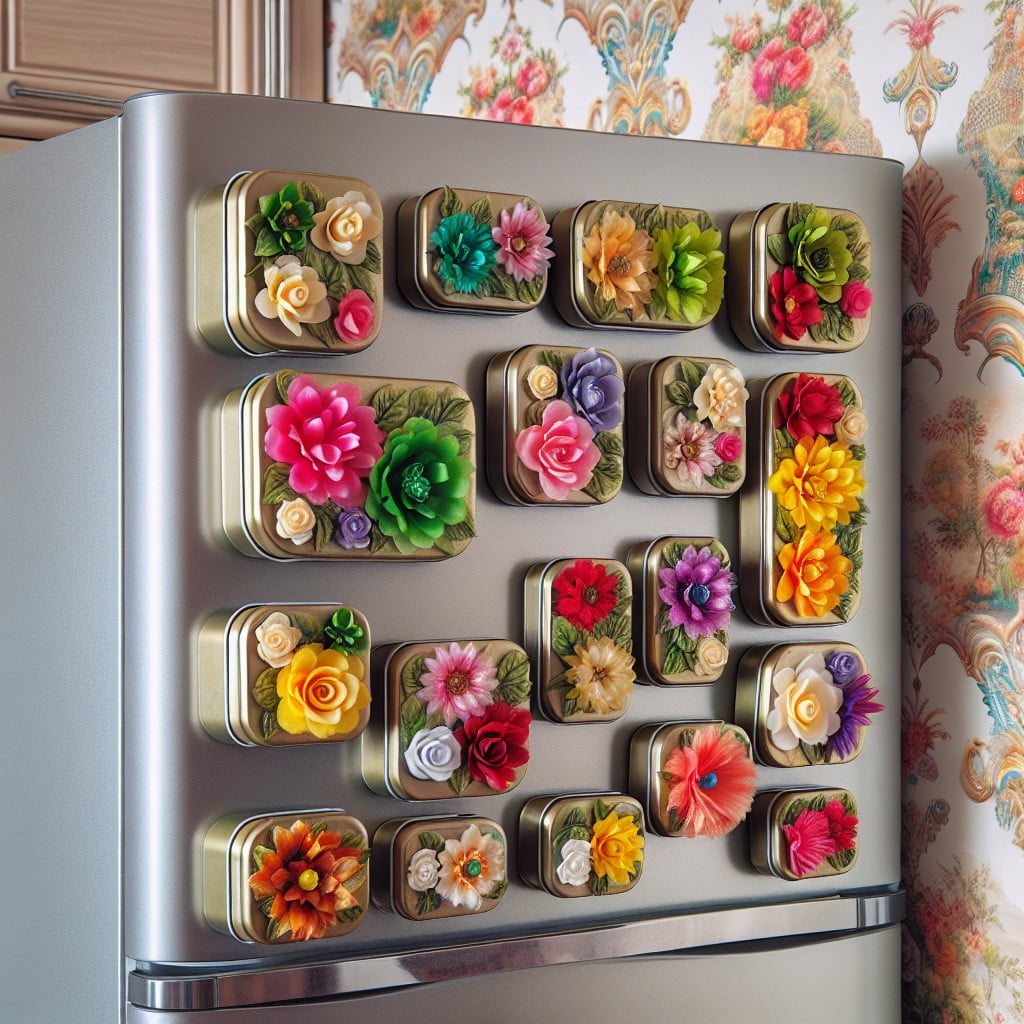
To embark on this creative journey, you’ll need a selection of Dollar Tree magnetic tins, coloured vinyl, or paper, and a sharp crafting knife.
1. First, measure the tops of your magnetic tins and cut out circles of your chosen vinyl or paper of the same size.
2. Next, let your creativity flow. Draw or trace designs onto the circles. Simple shapes and patterns are an excellent place to start, especially if working with children. Abstract designs, geometric patterns, personal initials or even family names are other interesting options.
3. Once your designs are ready, use the craft knife to cut them out.
4. Finally, attach your cut-out designs to the tops of the tins. If working with vinyl, simply peel and stick. If using paper, a little bit of glue or mod podge will ensure the circles stay in place. Let them dry completely before adhering to your fridge.
These bespoke, stylish magnet tins will not only be functional, storing small items, but they can also showcase your personal artistic flair. Plus, they make brilliant conversation starters when guests pop over too.
“Storage Hacks for Sewing Needs With Magnetic Tins.”

With their ideal size, magnetic tins act as an excellent storage tool for your sewing essentials. Here are some simple steps to transform them into organized, easily accessible containers:
1. Clean tin: Before use, ensure the magnetic tin is clean and dry.
2. Sort supplies: Arrange your sewing supplies – thread spools, needles, buttons, safety pins, and other small items – separately for easy identification.
3. Fill tins: Place your supplies into the separate tins. Remember not to overfill. It’s better to have more tins than one too full to close.
4. Label: Label each tin with its contents for easy access later.
5. Attach: Attach the tins to a magnetic board or a space on your wall lined with a magnetic strip.
This method results in a clean, easy-to-navigate sewing area. Magnetic tins not only help to declutter but they also add an artistic touch to the workspace.
“Crafting Children’s Educational Games Using Dollar Tree Magnetic Tins.”

Gather a selection of magnetic tins and some colorful marker pens. First, you can design a simple word-building game. Write a unique letter on each tin. You can play with your children to create words by aligning the tins.
For math fun, write numbers on the tins to add an engaging element to addition or subtraction exercises. Simply arrange the correct numbers and mathematical symbols to form the equation and then work out the answer together.
For slightly older children, try a quick memory game. Place a certain pattern of colored, numbered, or lettered tins and give them a certain amount of time to memorize it. Rearrange or remove some tins, and challenge them to return it to the original layout.
Lastly, you might fill the tins with various materials, such as rice, beans, or small metal items to create a sound game. The goal is to match the tins based on the sound they make when shaken.
Endless educational fun awaits with these simple games conceived from Dollar Tree magnetic tins.
“Creating a DIY Magnetic Tin Chess Set.”
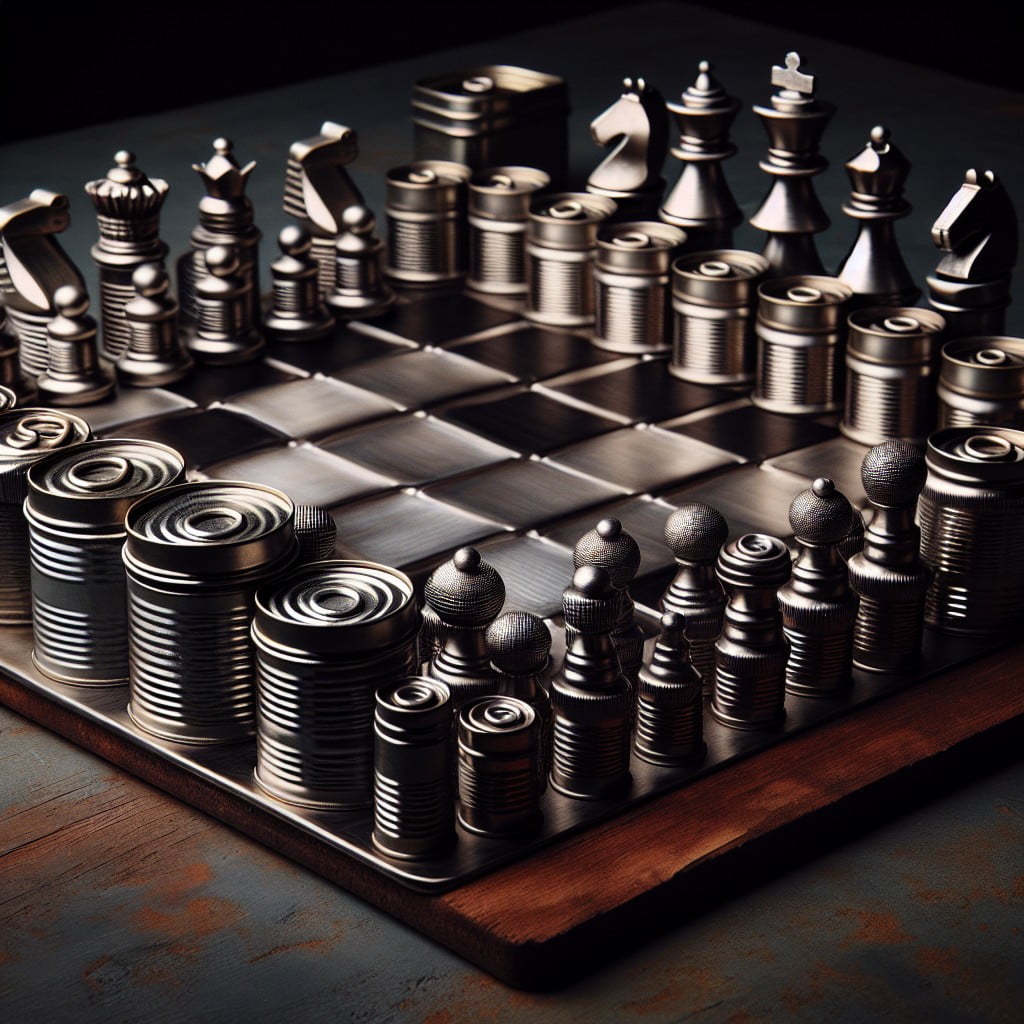
Making your own chess set can be a fun and rewarding DIY project. By utilizing Dollar Tree magnetic tins, you’ll breathe new life into this classic game while simultaneously creating a functional decor piece.
1. First, gather 32 magnetic tins. You’ll need 16 for each side of the chess board.
2. Use permanent markers or paint to designate one set as black and the other as white.
3. After your pieces have dried, use stickers or a fine-point marker to label each one according to traditional chess piece designations – King, Queen, Bishop, Knight, Rook, and Pawn.
4. Once all pieces have been labeled, you can arrange them on a matching steel or magnetic surface.
Remember, the beauty of this project lies in its customizability. Don’t be afraid to get creative with your design – perhaps you could use different colors, or even embellish your pieces with small decorative items.
“Dollar Tree Magnetic Tins for Bathroom Organization.”
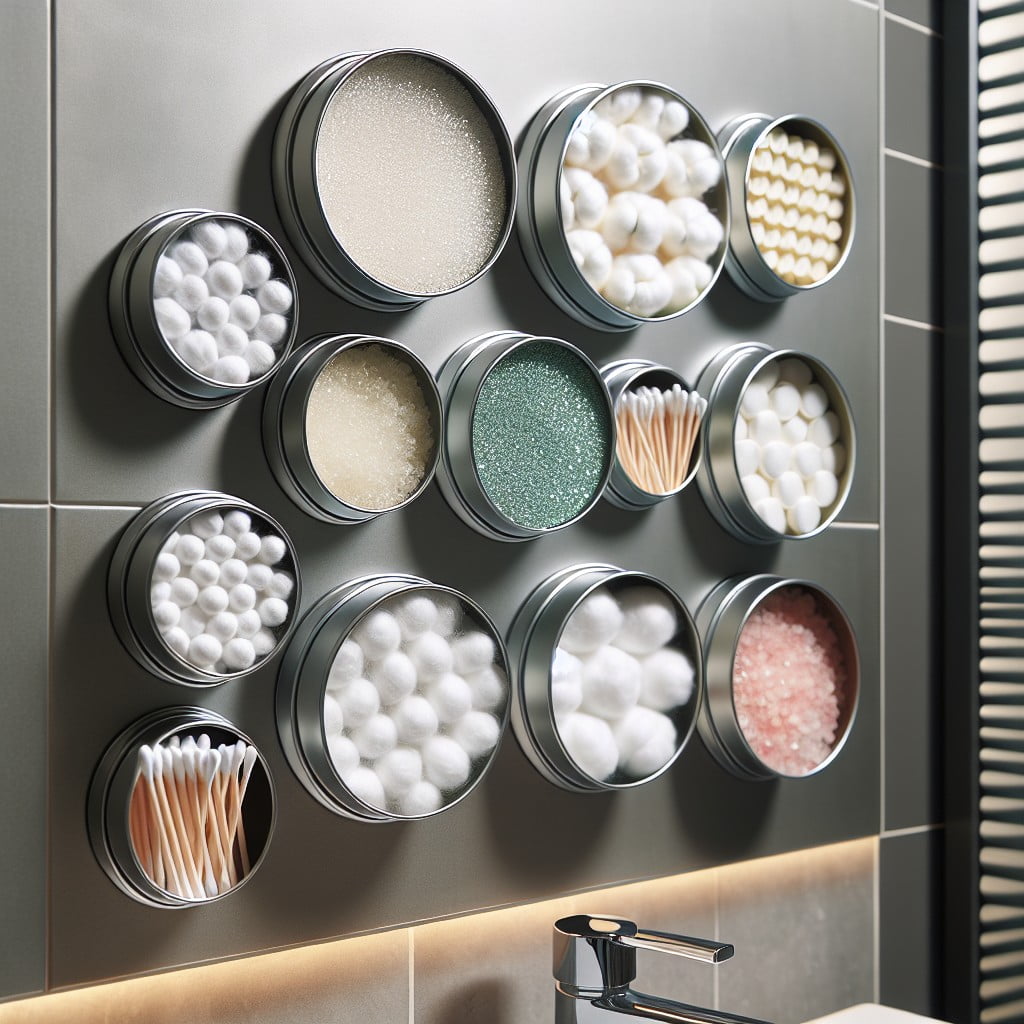
Storing your everyday bathroom objects has never been easier. With these rust-proof tins, you can effortlessly arrange toothbrushes, floss, makeup brushes, cotton balls, and even soap bars.
1. Affix a magnetic strip on the inside of your medicine cabinet. Then, simply place your tins onto the strip, you can put smaller items, like hair bands and clips, into them.
2. If you want to keep your countertop neat, attach a few tins to a metallic tray. Use each to hold toothpaste, toothbrushes, and facial cleansers.
3. For makeup storage, label each tin and use them to compartmentalize brushes, tubes, eyeliner pencils, and sponges.
4. Cotton balls and swabs fit nicely in these tins. Mount a magnetic strip inside a cupboard door to keep them out of sight yet within reach.
Remember, while organization is key, it doesn’t have to be dull. Customize your tins with some paint, or use adhesive gems for a splash of personality. After all, it’s not just about decluttering – let your style have a say, too!
“Making a Unique Jewelry Display With Magnetic Tins.”
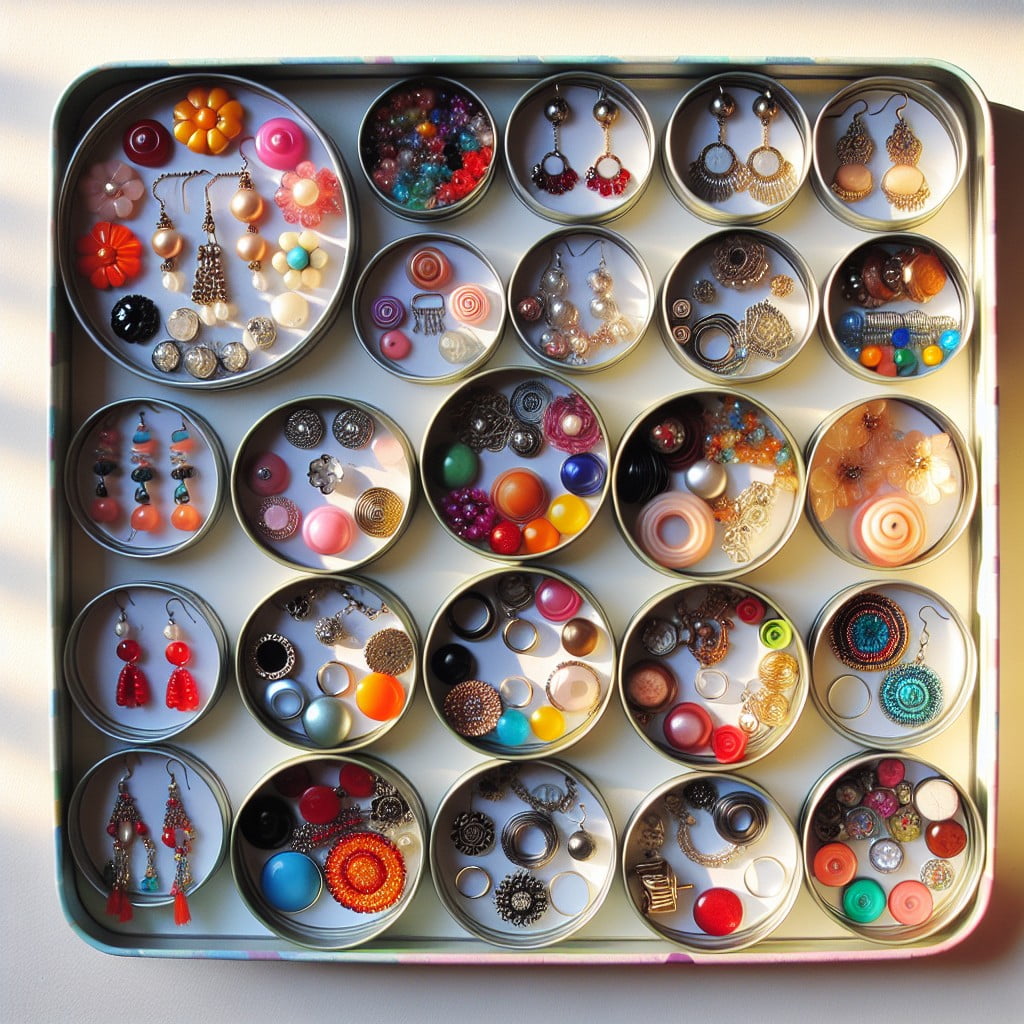
First, gather Dollar Tree magnetic tins and a thin metal plate or tray that can hold their weight. Make sure that the texture and color of the metal tray align with your home decor style.
Begin by arranging the tins on the metal plate in a pattern that best suits your needs and aesthetic. This arrangement could involve a symmetrical grid or a more organic, scattered placement based on size.
To hold earrings, glue some cork board cut to size into the base of the tin. The hooks of the earrings can then push into the cork, keeping them secure. For necklaces, bracelets, and rings, adhesive hooks or loops can be placed within the tins, turning them into tiny hanging racks.
Further, incorporate elements of personal style. Adding a touch of paint on the exterior or using small decals can transform each tin into a work of art. It adds to your decor while efficiently holding your jewelry.
For better organization, sort jewelry by types or colors within different tins. It makes the retrieval process easier and doubles as a color-coded display.
This DIY project is not just functional and cost-effective, but is also a fun way to reflect creativity and character in your space.
“Homemade Magnetic Tin Fish Tank Decor.”

Crafting with magnetic tins can be a fun and unique way to enhance your aquatic friend’s environment. Transforming plain tins into fish tank decorations demand few basic steps:
1. Choose Your Design: Use a non-toxic, waterproof paint to recreate underwater landscapes, or develop a uniform color scheme.
2. Prepare The Tin: Apply a base coat and let it dry before adding decorative details.
3. Seal It: After your design is dry, a waterproof sealant is vital to ensure longevity and safety for fish tank inhabitants.
4. Secure It: Attach the tins to the sides of your tank using heavy-duty, non-toxic aquarium magnets.
5. Supervise: Keep an eye to ensure the new addition doesn’t harm the aquatic life or disrupt the ecosystem.
So, whether you’re an aquarist or a DIY decorating enthusiast, magnetic tin fish tank decor could be an intriguing addition, merging creativity and functionality.
“Inexpensive Floating Wall Shelves Using Magnetic Tins.”

Floating wall shelves can easily be put together using your Dollar Tree magnetic tins. Here’s how you can create this unconventional but versatile storage solution:
1. Select Your Tins: Start off by deciding the number of tins you require and the arrangement you plan to have them in. A mix of different sizes can add a dynamic element to your wall.
2. Prepare Your Wall: Clean the wall surface and mark positions for shelves. Check with a level tool for alignment.
3. Install Metal Strips: Attach metal strips, or iron bars to the wall. These will act as your shelf while the magnetic tins will stick to them. Ensure the weight limit of the strips is considered.
4. Design Your Tins: Before attaching your tins, add a personal touch. Whether it’s some paint, or sticking decorative pieces, the options are limitless.
5. Ready to Use: Attach your Dollar Tree magnetic tins to the metal strips and voila! You now have a unique floating wall storage area. Fill them with your favorite knick-knacks, small plant pots, or even as a spot to keep keys.
Remember, the possibilities are only limited to your creativity!
Ideas Elsewhere
Read More Like This
 15 Funny Graduation Cap Ideas to Make Your Big Day Unforgettable
 15 Unique DIY Christmas Decorations Ideas for a Festive Home
 15 Creative Science Fair Board Ideas to Amaze Your Audience
 15 Handmade Envelope Decoration Ideas for Creative Gifting
 10 DIY Gifts for the Whiskey Lover in Your Life
Recap: