Last updated on
Dial up the spookiness this season by opting for skeleton decorations because they effortlessly exude a chilling vibe whilst still remaining tastefully playful, bound to make your home the talk of the town.
“I trust you’ll find inspiration in these 20 unique skeleton decoration ideas that I’ve personally crafted and illustrated, and I hope you enjoy exploring them as much as I enjoyed creating them.”
Skeleton decorations can add a delightfully spooky touch to your home, whether for Halloween or for a themed party. From hanging skeletons to table centerpieces, there’s a wide range of creative options to explore.
This article will guide you through a variety of skeleton decoration ideas, each with a unique twist to suit different styles and preferences. Detailed instructions, along with helpful tips and tricks, are provided to ensure you achieve the desired effect.
Whether you’re a seasoned decorator or a beginner, you’ll find these ideas easy to implement and highly effective in creating a chilling ambiance.
Skeleton Hanging Wreath
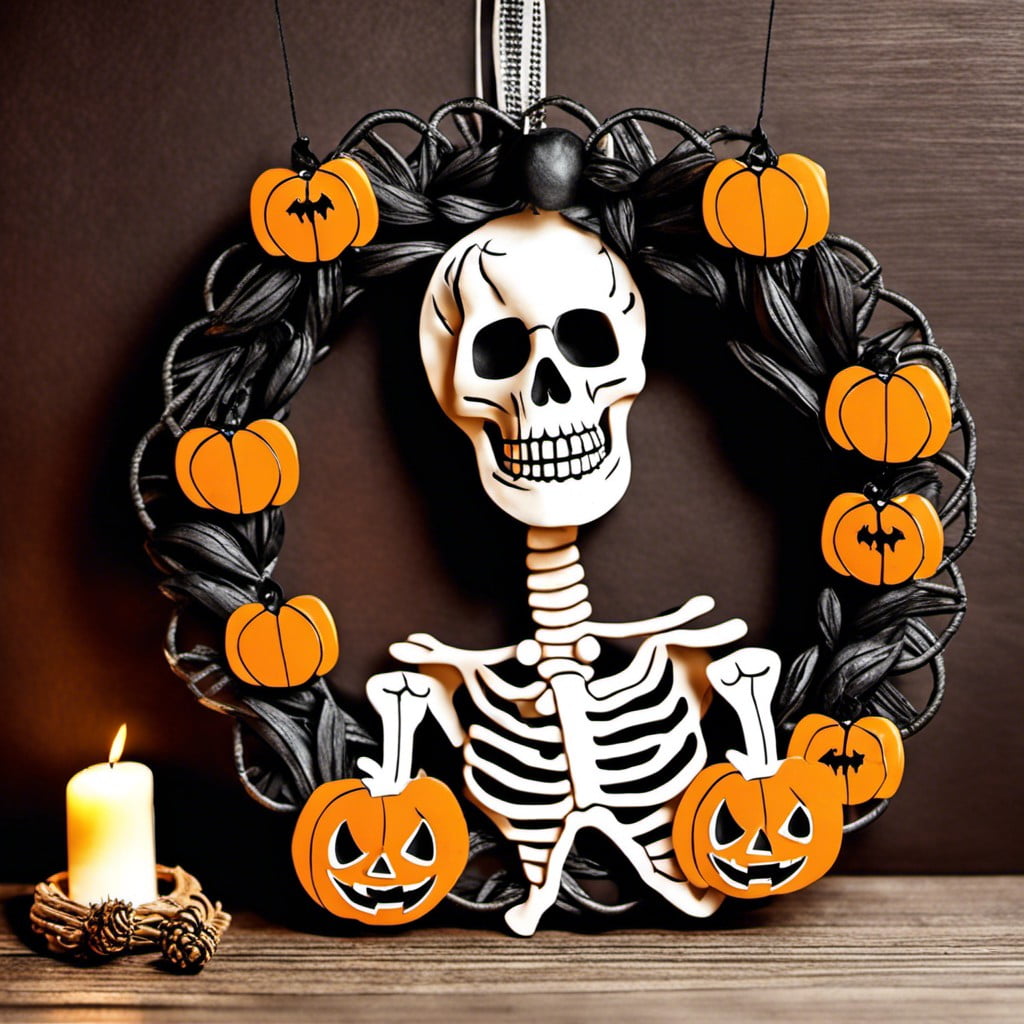
Creating a skeleton hanging wreath makes a huge impact with minimal effort. With a wreath form, some mini plastic skeletons, and a glue gun, you’re all set!
Keep it simple, paint everything in a uniform color, using a bit of metallic spray paint for a dash of spark. Leave some skeletons whole, while others can be disassembled, creating a scattered bone effect around the wreath.
Don’t forget to secure the hanging loop to properly suspend it on the door. For versatility, use a neutral color like bronze or silver, and your eerie decoration can last all fall season, not just for Halloween!
Skull Candle Holder
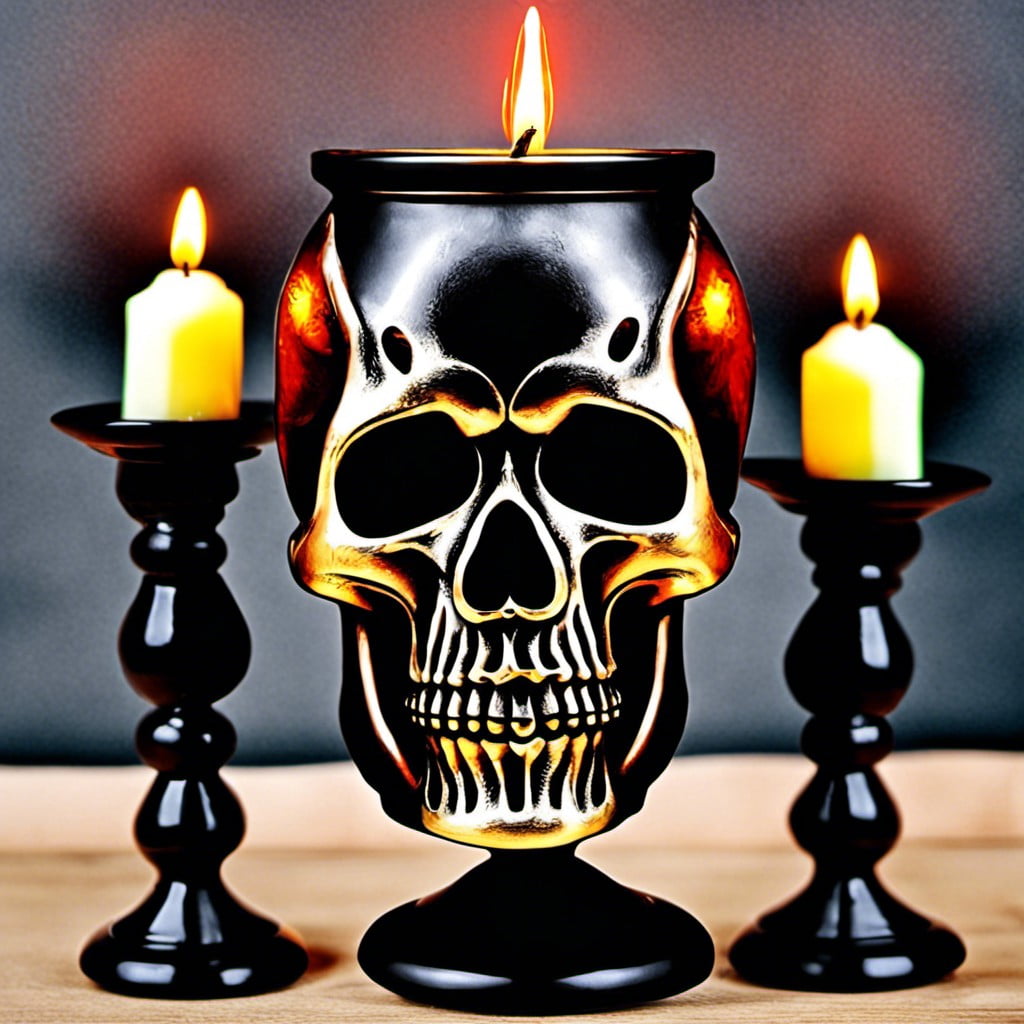
Offering a slightly eerie ambiance, this unique decoration requires minimal effort. Purchase a skull-shaped holder from a craft store or create one at home using safe materials! It combines gothic appeal with the warm, inviting glow of candles.
Few points to consider:
- Material: Opt for ceramic or heat-resistant plastic holders.
- Candle Type: Use tealights, votives, or even LED candles for a fire-safe option.
- Placement: These holders can be strategically placed on mantels, dining tables, or window sills for maximized effect.
- Customization: Consider painting the skull or adding glitter for a personalized touch.
- Multiples: A collection of skull candle holders can make for an impactful display!
Neon Skeleton Scarecrows
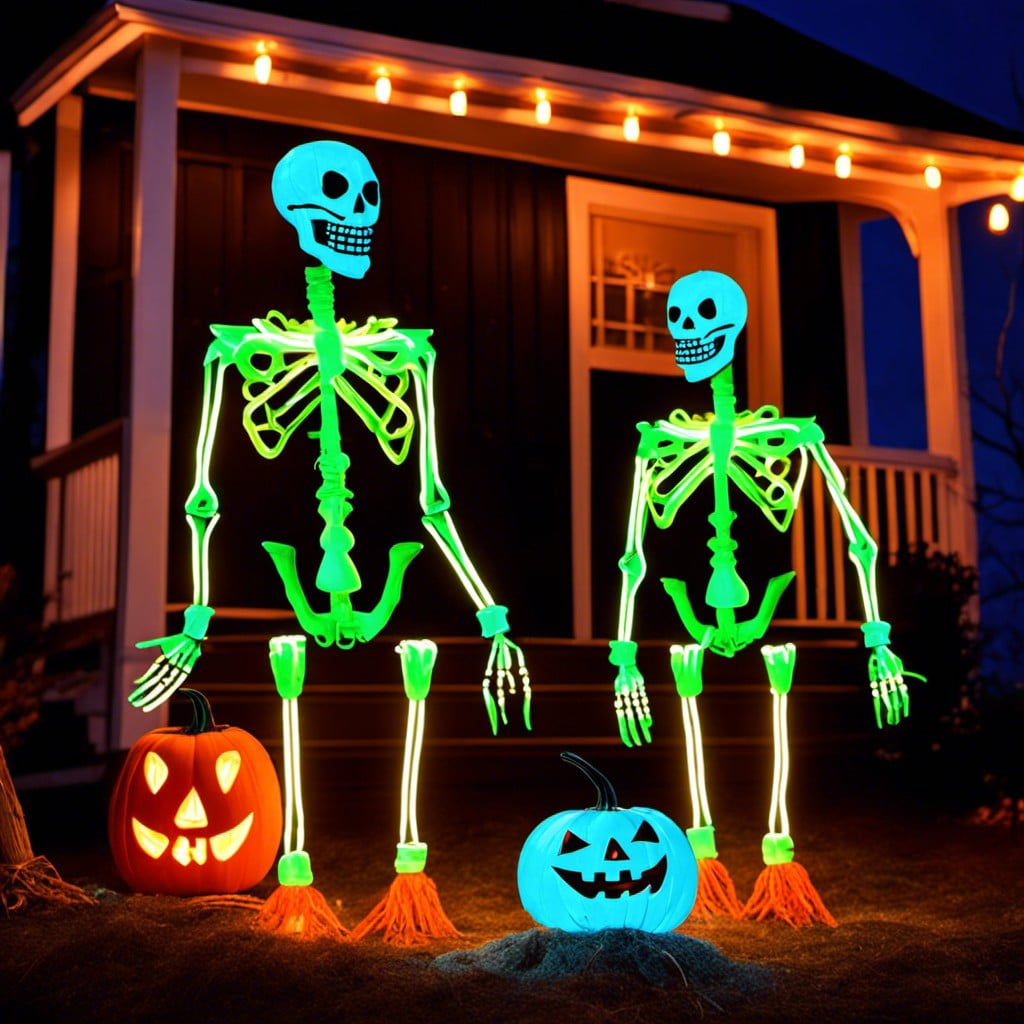
Delightfully quirky, these scarecrows provide both scare and flare to your space. Here’s how to let your creativity run wild:
1. Lights: Opt for illuminating neon lights to outline your scarecrow’s skeleton. This not only adds a dash of vibrant color but also enhances visibility during the night.
2. Structure: A simple frame of wood or metal rods works perfectly. Use wires to attach the neon lights in the shape of a skeleton.
3. Clothing: Vintage or ragged clothes will give your scarecrow an authentic look. Just ensure the neon skeleton is clearly visible beneath.
4. Positioning: Place your neon skeleton scarecrow in an open area where it’s clearly visible. Perhaps atop a hay bale for a rustic touch?
5. Hair & Hat: Consider adding straw hair, a hat or even a broom for the complete scarecrow experience.
Voilà! Now you have your very own radiant neon skeleton scarecrow glowing in the dark, ready to ward off any feared Halloween spirits.
Bone Chandelier
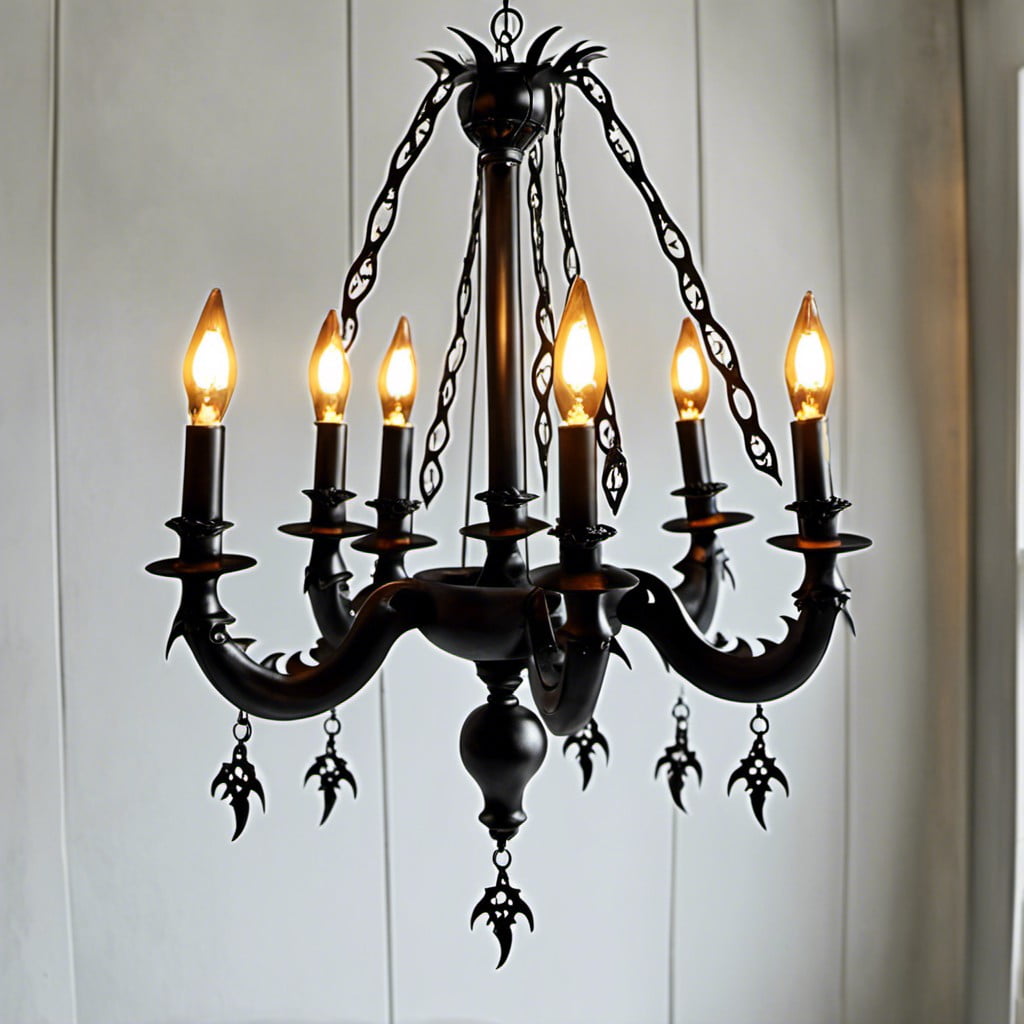
A bone chandelier is a real head-turner and adds an eerie touch to a room. It is typically crafted using faux bones, lending an ominous and haunted aura.
Some key points to consider when deciding on a bone chandelier include:
- 1. Bone Material: Plastic and resin are commonly used materials. They effectively mimic the appearance of real bones while remaining lightweight, durable, and affordable.
- 2. Size and Shape: Consider the size and shape of the chandelier based on your room’s layout. Smaller, simple designs may suit low ceilings, while larger, ornate ones can be a centrepiece in a grand, high-ceiling room.
- 3. Bone Configuration: The bones could be arranged in a circular pattern resembling a classical chandelier or can hang in a random, chaotic fashion to further enhance the scary vibe.
- 4. Lighting: Opt for dimmable bulbs for a subtle, spooky glow, or go for bright lights for a more dramatic impact. However, remember that the light color you choose could also affect the atmosphere.
- 5. Installation: Although lightweight, the bone chandelier should be securely fastened to the ceiling using strong hooks or chains. Hiring a professional for installation is a safer bet to handle the wiring and ensure its stability.
Despite its scary nature, the bone chandelier is a unique piece of decor that can create an unforgettable atmosphere for your Halloween party or haunted house event.
Skeleton Wall Decals
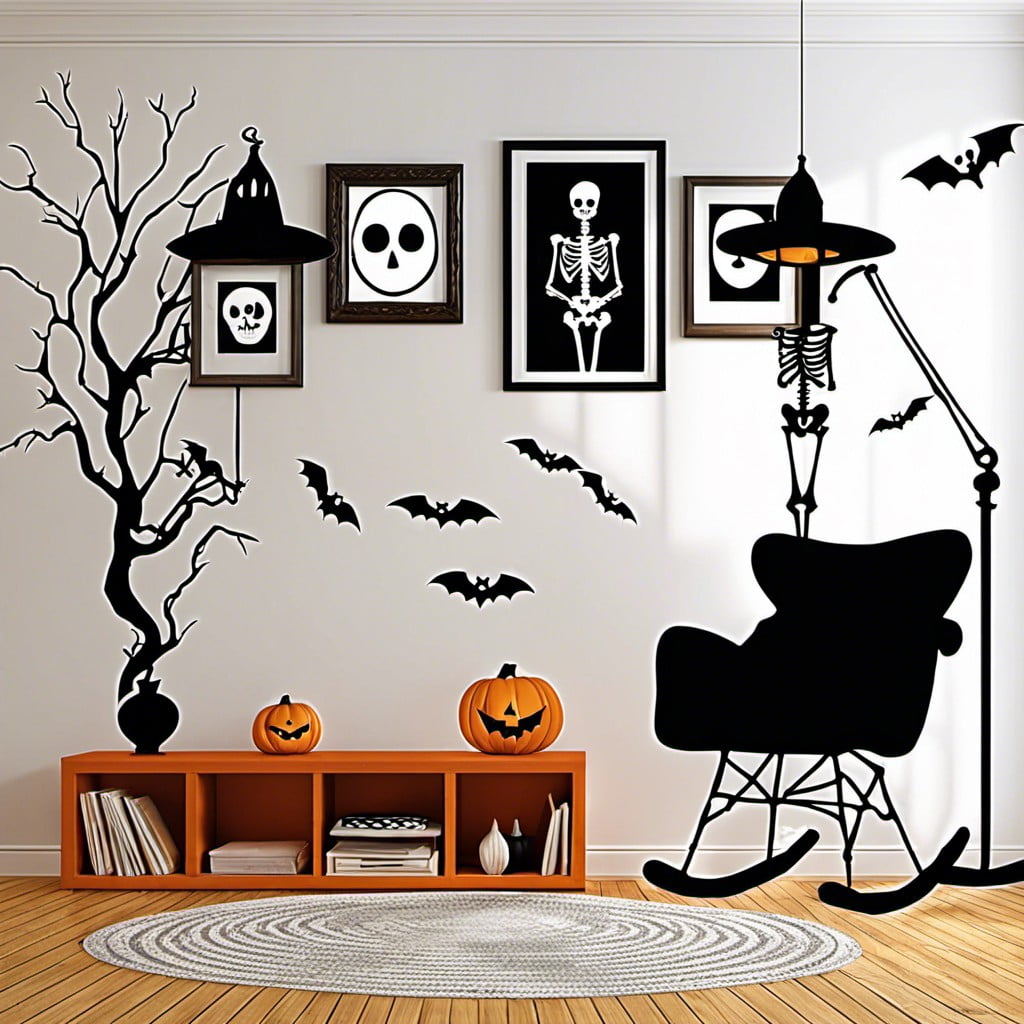
Peel-and-stick decals are a convenient, damage-free method to bring a touch of the macabre to your walls. Typically made from vinyl, these decals can stick to various surfaces — not just walls. Doors or mirrors can also serve as perfect hosts.
1. Selection: Opt for designs in various sizes, not just life-size. Smaller bone decals can fill in spaces between the larger ones for a comprehensive look.
2. Arrangement: Experiment with patterns. A haphazard placement might evoke a falling bones effect, while uniform lines can mimic a fossil grid.
3. Lighting: Strategize around a light source. You might want your skeletal figures illuminated for that chilling night-time spectacle.
4. Removal: Post-Halloween, decals should peel off smoothly without residue. However, test a hidden section first, just to be on the safe side!
Remember, the ideal skeleton wall decal is one that showcases your creative bone (pun intended) and effortlessly blends with your larger decorative theme.
Glowing Skull Centerpieces
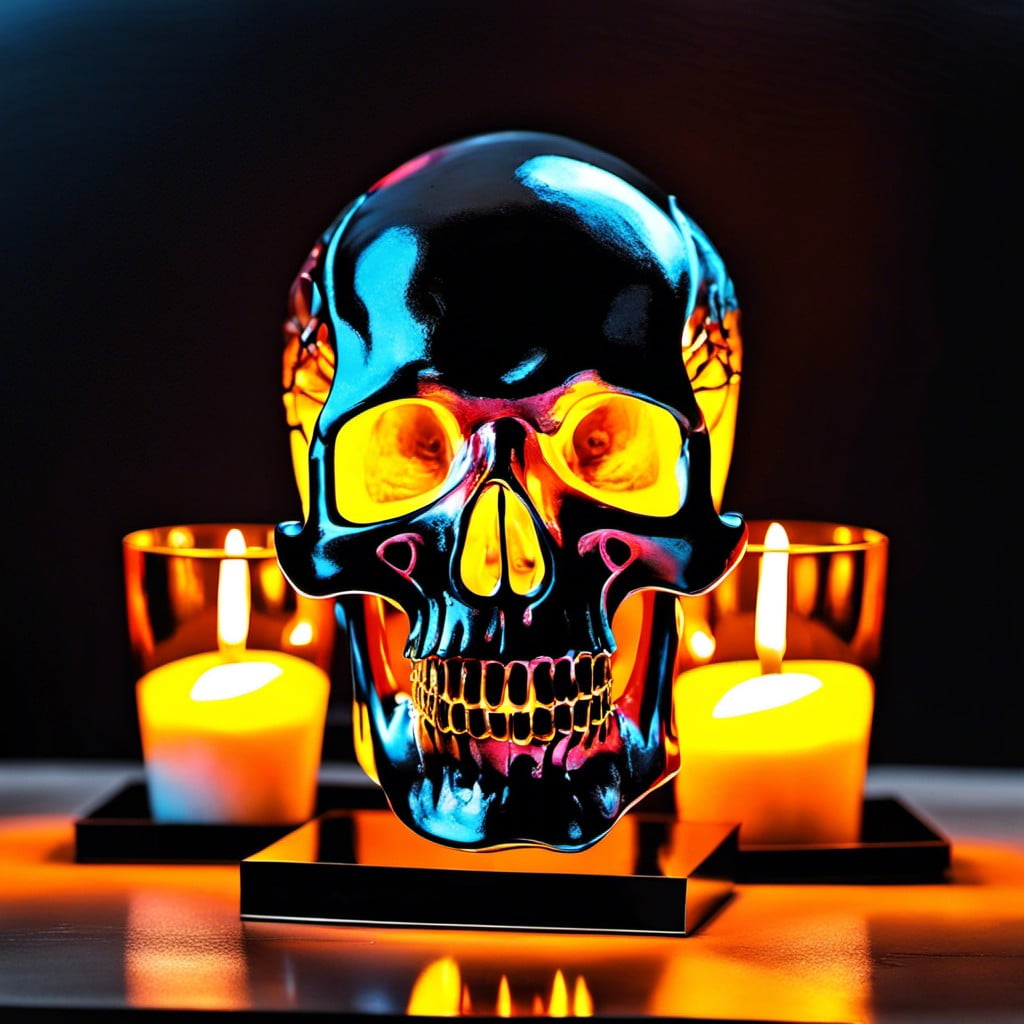
Harnessing the allure of transfixing luminescence, this unique centerpiece takes a centerpiece’s traditional purpose of capturing attention and dials it up significantly. Primarily, a skull, preferably of a realistic design and size, is chosen as the focus item. To create the glow, a variety of options are available.
• LED candles: Available in numerous colors, these provide a safe and reusable lighting solution. They can be placed inside the skull, given it has an opening, or arranged artistically around it.
• Glow sticks: For a more temporary but strikingly bright option, glow sticks can be placed inside a transparent or translucent skull. The radiating colors effortlessly become the party’s talking point.
• Fairy lights: Tiny LED lights on a string can be wrapped around the skull or positioned inside it for a starry, festive look. Strings with battery power supply are highly recommended.
• Glowing paint: Brushing the skull with phosphorescent paint provides a subtly glowing effect. Remember to charge it under a light source before showing it off in the dark.
Regardless of the chosen method, the glowing skull centerpiece is a fantastic and creative way to promote an eerie yet festive atmosphere.
Skeleton in a Coffin Scene
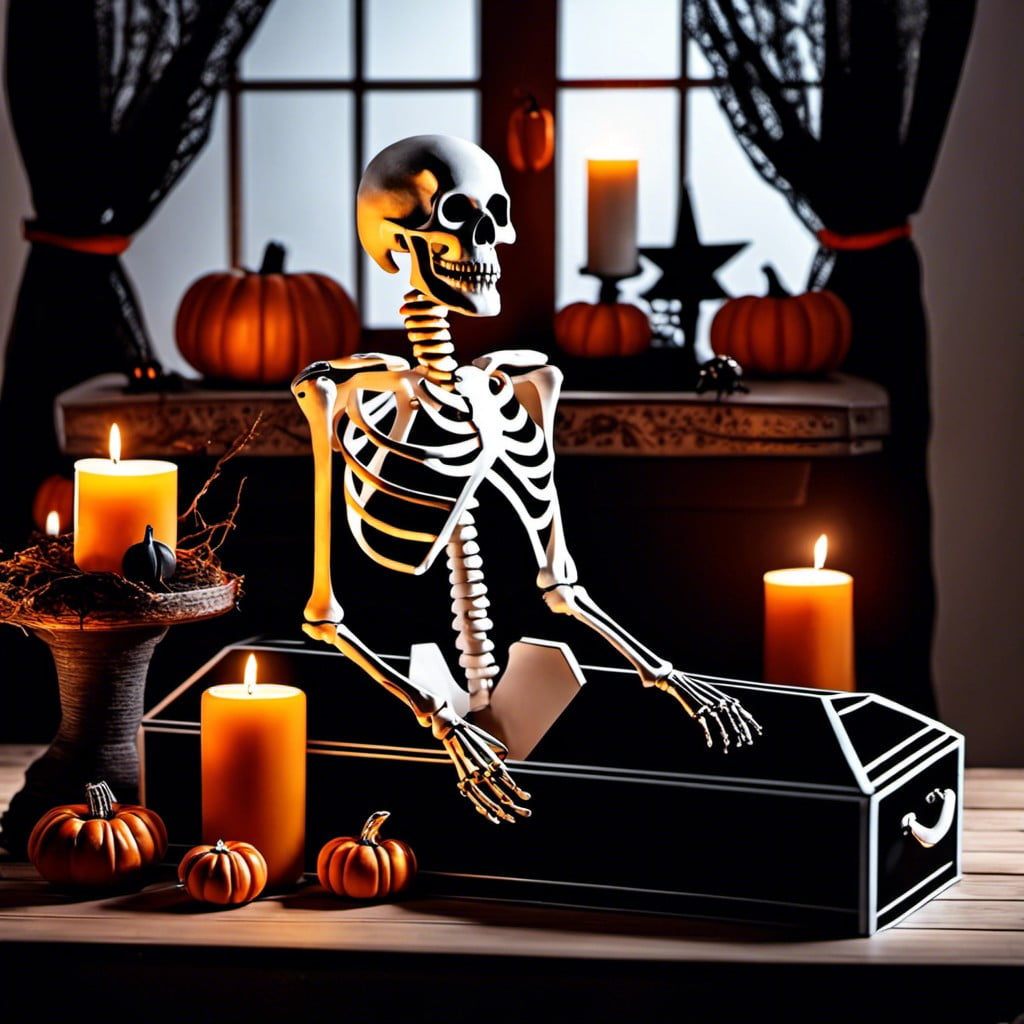
The dramatic flair of a coffin scene can intensify the spooky effect of Halloween decorations. A skeletal inhabitant adds a classic touch.
Here’s how to create this spine-chilling scene:
1. Pick a Coffin: You can opt for a store-bought coffin or a DIY version crafted from cardboard or wood. The size and design depend on your preference, but it should be large enough to accommodate your ghostly resident.
2. Skeleton Setup: Settle a full-size skeleton snugly in the coffin. Ensure that it’s relatively proportional to the coffin size. You may choose to have it rest peacefully or pose in a slightly sat up position for a more startling effect.
3. Atmosphere: Sprinkle the coffin with pseudo spiderwebs and dimly lit LED candles around it. These elements work wonderfully to create an eerie atmosphere.
4. Location: Position this scene on a patio, in a hallway, or a corner of your living room. The trick is to place it somewhere unexpected to catch your guests off guard.
Remember, the idea is to shock, surprise, or amuse your guests. Make it as realistic or as whimsical as you like. After all, there’s no limit to creativity when it’s Halloween!
Yard Skeleton Surprise
For an outdoor spectacle that will thrill visitors and passersby, this is your go-to option. Begin by positioning your life-size skeleton model in an unexpected way—think along the lines of it climbing a tree or peeking out from behind a shrub.
Nighttime visibility is crucial so illuminate the scene with strategically placed garden lights. Play around with a motion-sensor that triggers spooky sounds when someone approaches for an extra touch of macabre magic.
Pair with tombstones or other Halloween yard decor for a comprehensive, frightful ambience. Remember, a key element here is surprise, so keep the scene slightly hidden or unexpectedly located. This will ensure a sudden, delightful fright for those courageous enough to step on your property.
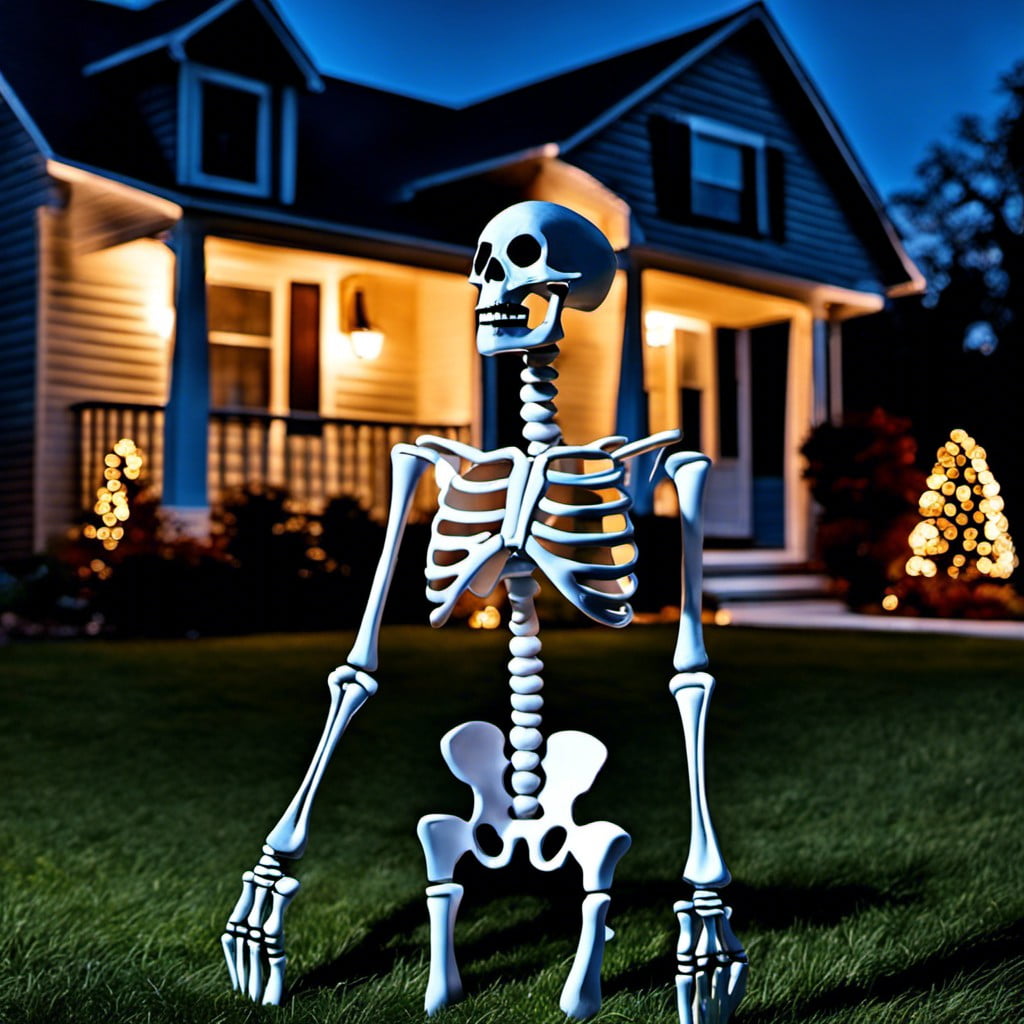
Full-size Skeleton Porch Greeter
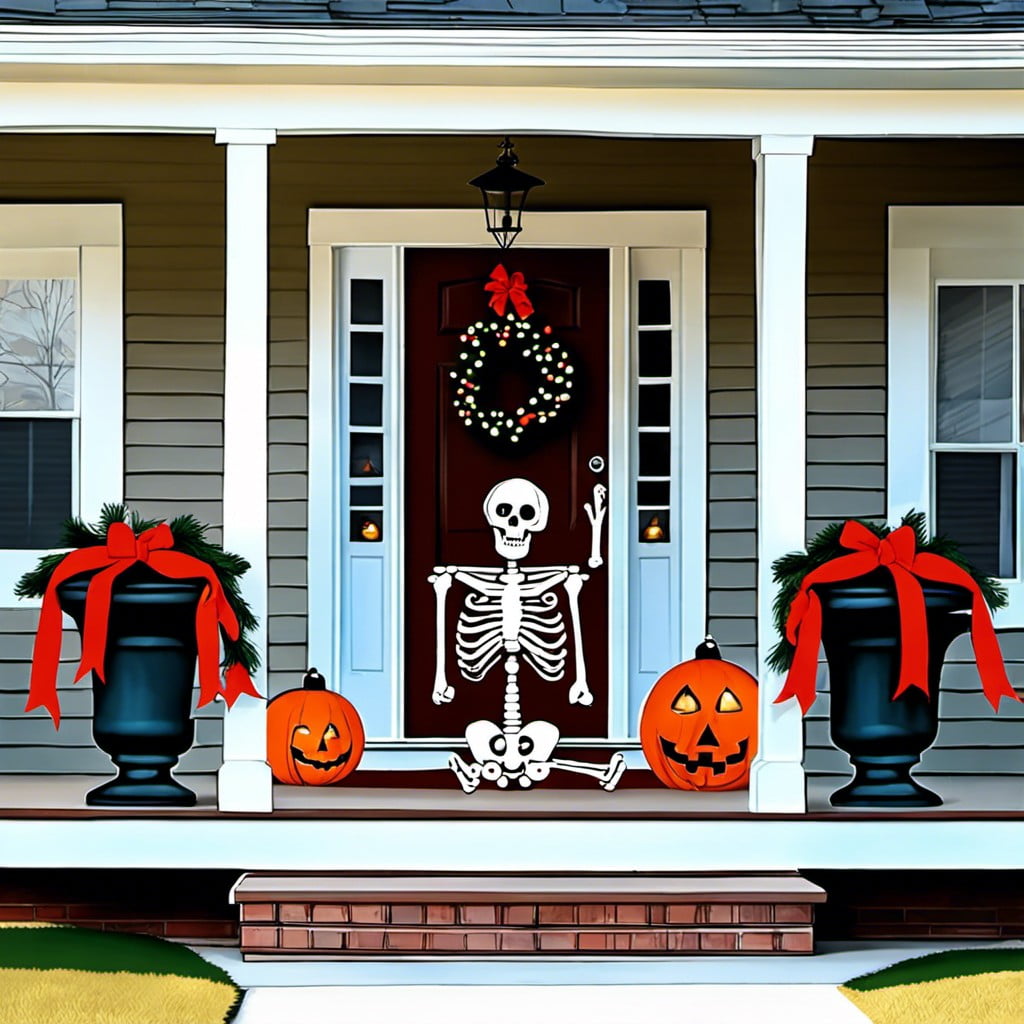
Starting from the front door, first impressions matter. Consider investing in an authentic, full-size prop to truly capture the eerie essence of Halloween. Make sure your skeletal greeter is strong enough to stand weather conditions, while appearing eerily lifelike.
1. Use a sturdy steel stand to ensure stability in wind.
2. Pose the skeleton whimsically or menacingly, depending on the desired atmosphere.
3. Get creative with outfitting to add another layer of intrigue. Maybe a hat, a cape, or marking the skeleton with glow in the dark paint.
4. Consider implementing a motion sensor or sound trigger for a sudden surprise.
5. Remember, to maintain seasonal relevance by incorporating elements such as a harvest basket or crow perched on the shoulder.
Take advantage of this show-stopping piece to get your neighbors talking and, more importantly, getting into the Halloween spirit.
Skeleton Key Holder
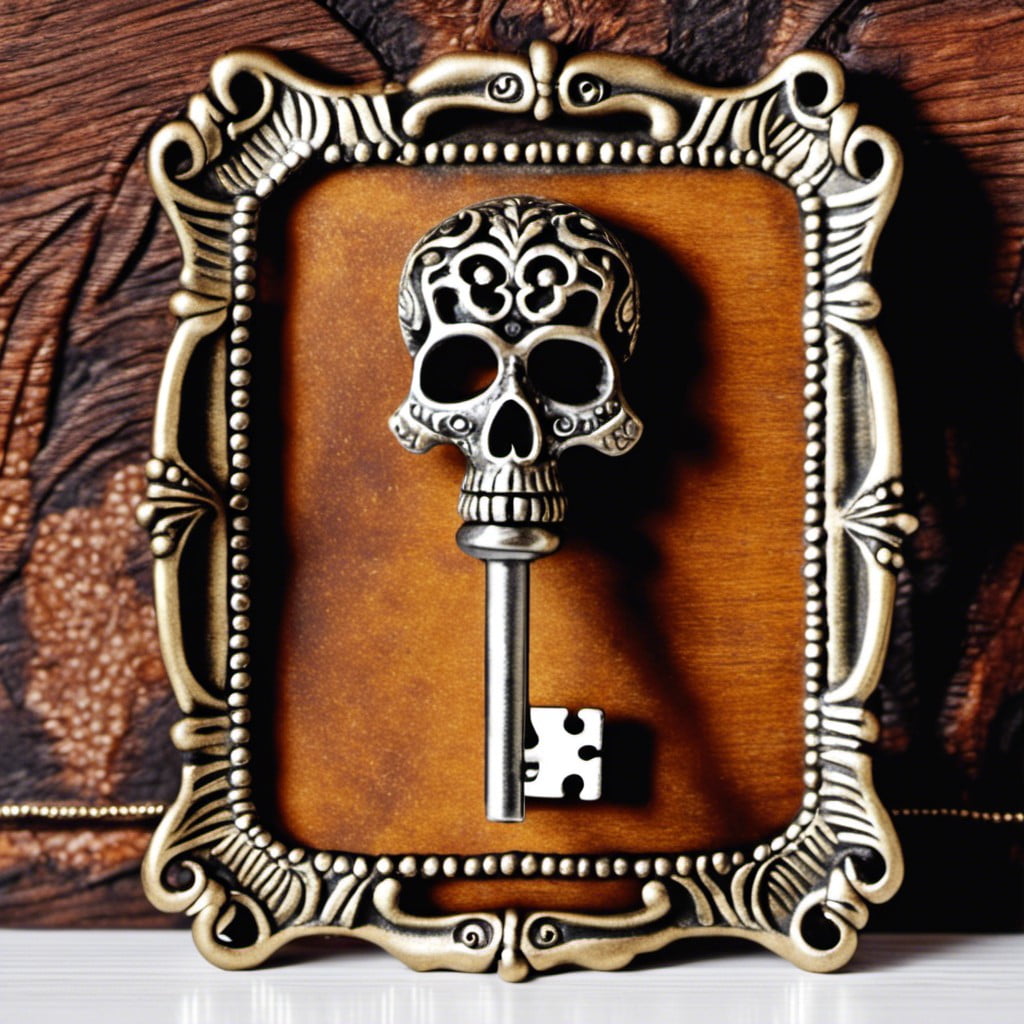
Elevate your decorative themes with practicality by introducing functional artistry into your home. This decorative showstopper is an accent piece with a dual purpose – adorning your walls and safeguarding your keys.
1. Select a medium-sized skeletal figure, preferably one with clearly defined, sturdy fingers that can easily hold keys.
2. Consider mounting it onto a decorative plaque or directly onto a wall, perhaps near your entrance for easy access. Ensure it is affixed securely.
3. Discerningly choose the keys to place on the skeleton – perhaps ones frequently used like the garage or porch. This also yields an intuitive organization system.
4. For added impact, consider using the skeleton to hold not just keys but other essential items like your dog’s leash or an umbrella.
5. Experiment with lighting. A spotlight or strategic ambient light can transform this functional feature into a spine-chilling focal point, especially after sundown.
This decorative key holder is a versatile home element that plays into the Halloween theme, while subtly enhancing the practical quotient.
Fireplace Skull Display
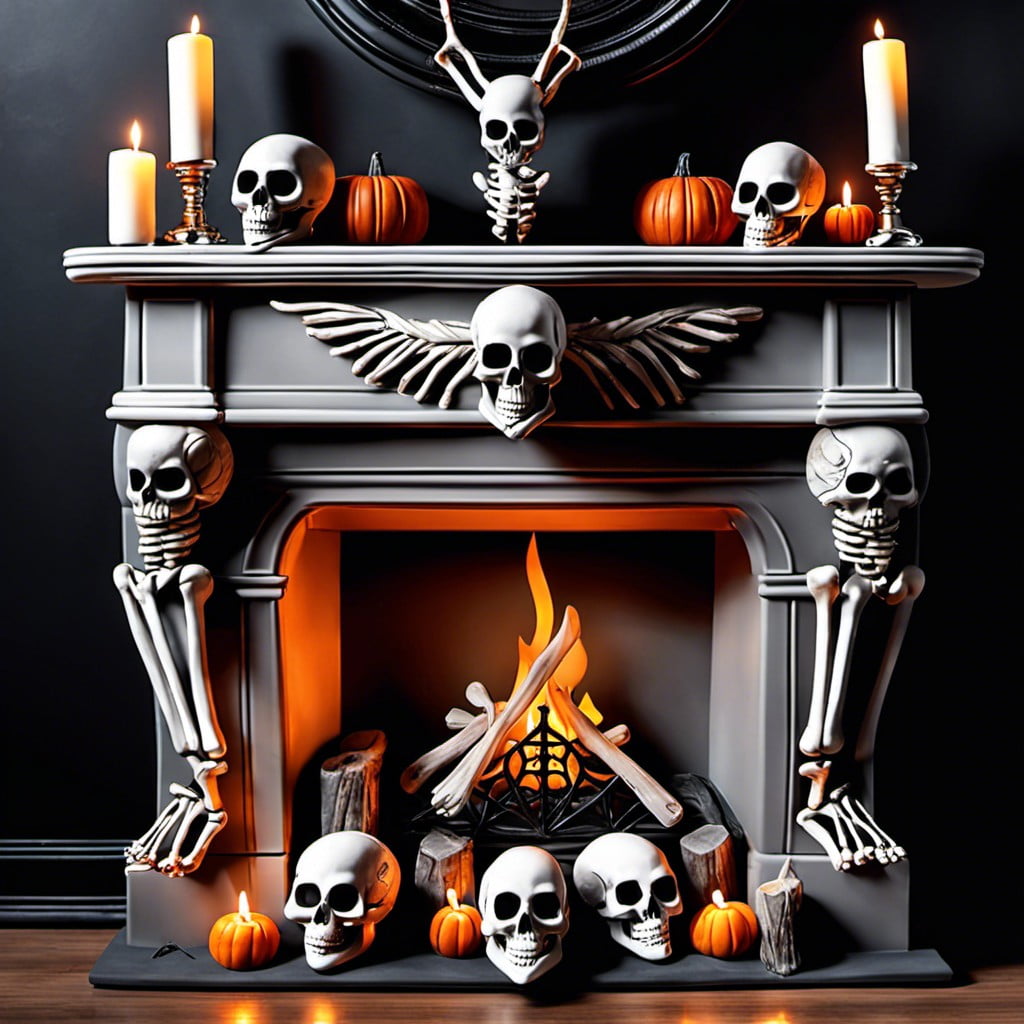
Turning the fireplace into a focal point of the Halloween decor is a novel yet striking idea. Start by clearing the fireplace and hearth, ensuring they’re clean and free from any ash or debris.
Position resilient, faux skulls of various sizes – selecting those made from materials like resin or ceramic, which won’t be damaged by the warmth from fireplace use. Stack them in a manner that appears haphazard, yet is sturdy and secure, to create an imposing pile of grinning skulls.
Play around with the use of light to enhance the spookiness of the display. Introduce a few candlelit lanterns on the hearth, flanking the pile of skulls, or even utilize string lights nestled amongst the skulls for a subtly eerie glow that’ll really round out the atmosphere.
If the fireplace will remain in use, it’s important to keep safety in mind. Ensure all decorations are placed a safe distance from any flames and heat sources. With attention to detail, a fireplace skull display can become quite the bone-chilling addition to the Halloween home decor.
Poseable Skeleton Paperweight
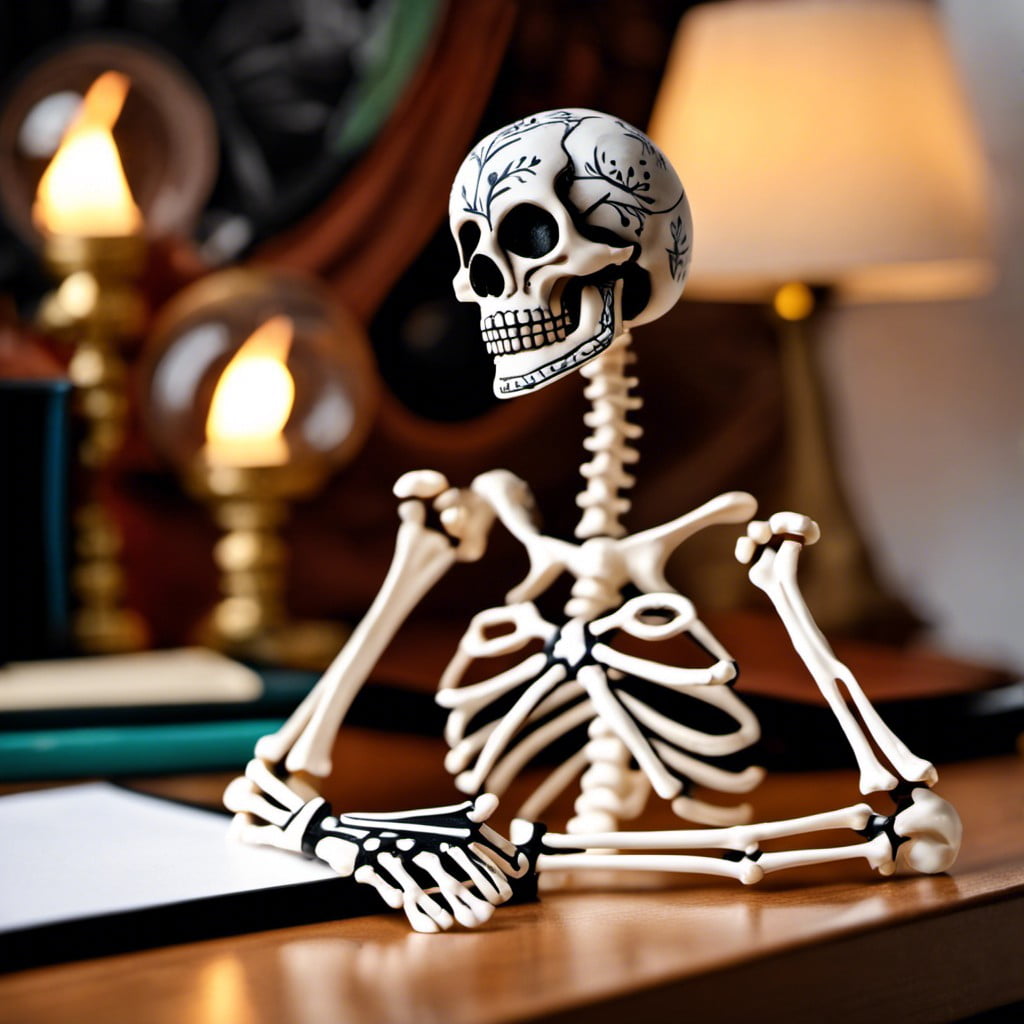
Getting creative with your workstation can add a fun twist to your everyday routine. A poseable skeleton paperweight serves a dual purpose. Not only does it keep your papers in place, it adds a spooky touch to your surroundings.
To create your own, follow these simple steps:
- 1. Purchase a miniature poseable skeleton – these are usually available around Halloween but can also be found in hobby shops.
- 2. Find a base – you can use a small piece of wood, a vintage bookend, or even an ornate coaster. The key is to ensure it is heavy enough to hold down papers.
- 3. Attach the skeleton to the base. You can position it in a sitting down or getting up position, or any other pose that strikes your fancy. Use strong adhesive or hot glue to secure it onto your chosen base.
- 4. Optional: To further customize your paperweight, consider adding props like a tiny book or a minuscule mug to give your skeleton a personality.
Remember, the key here is to have fun and let your imagination run wild. Every time you look at your skeleton paperweight, it should not only serve its practical purpose but also bring a smile to your face.
Halloween Skeleton Fairy Garden
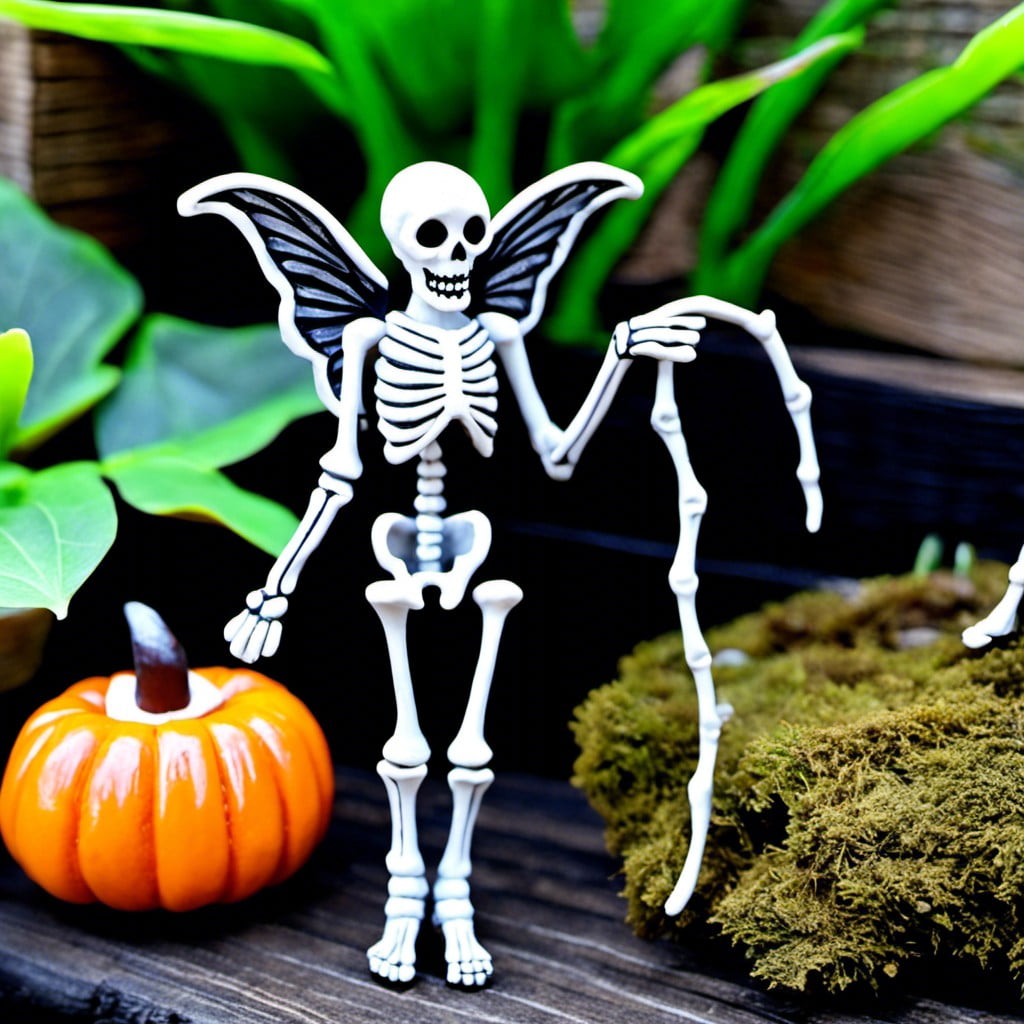
Having the right elements can transform a regular fairy garden into an eerie haunted Halloween masterpiece. Utilize miniature skeletal figures to set up your chilling scene, nestled amongst fairy size gravestones and pumpkin ornaments. Consider opting for moss and dried flowers to add a touch of whimsical wilderness.
Installation is key: properly space out your miniature items for maximum effect. Spotlight your Lilliputian-sized skeleton – it could be enjoying a picnic, or it could be causing a ruckus in the tiny, eerie fairy house. Set up battery-powered LED lights to provide a spooky glow when the sun goes down.
Remember, your imagination is the only limit when it comes to creating your Halloween skeleton fairy garden. Each little detail contributes to the overall eerie vibe, making this a perfect Halloween decoration that can be appreciated both day and night.
Skeleton in a Bathtub Setup
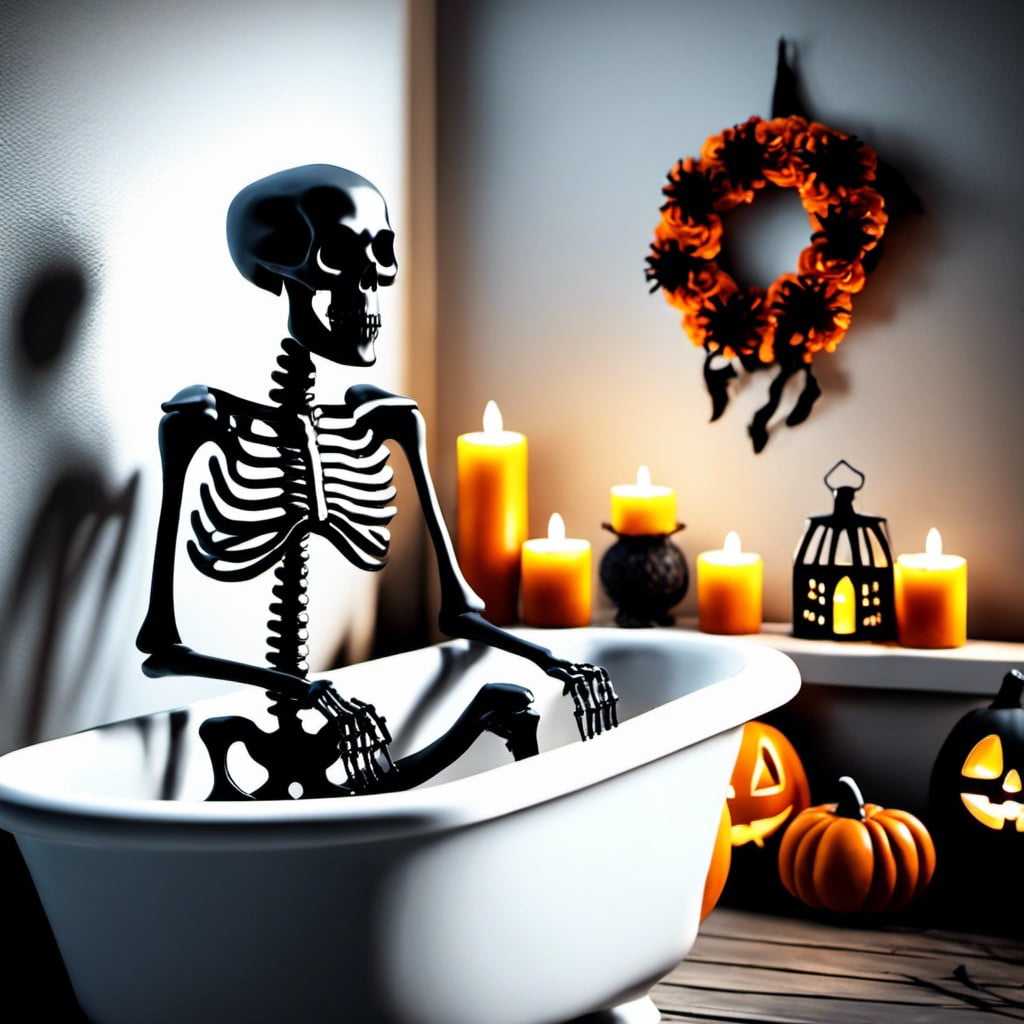
Creating this macabre look is relatively straightforward: begin with a full-sized, poseable skeleton. Position it delicately in your bathtub, perhaps with one hand casually placed over the edge of the tub.
You can also position the head as if it’s peering out towards any bathroom visitors, enhancing the eerie effect.
For added horror, consider using glow-in-the-dark paint or strategically placed LED lights that will make the skeleton glow ominously in the dark.
For a more sinister feel, faux cobwebs strewn across the skeleton give an air of antiquity, as though your boney guest has been bathing far longer than appropriate!
Using water-resistant props can further amplify this scene: rubber ducks, faux soap bars, and even a skull-shaped shampoo bottle can be great additions.
A cautionary note: ensure any electrical elements used within the bathroom setting are safely installed to avoid any real-life horror scenarios.
Remember, the key element here is surprise. For maximum impact, keep the bathroom door slightly ajar, or close the shower curtain just enough to mask the skeletal visitor until the very last moment.
Successful execution ensures a memorable Halloween surprise for your guests.
Haunted Dinner Table With Skeletal Guests
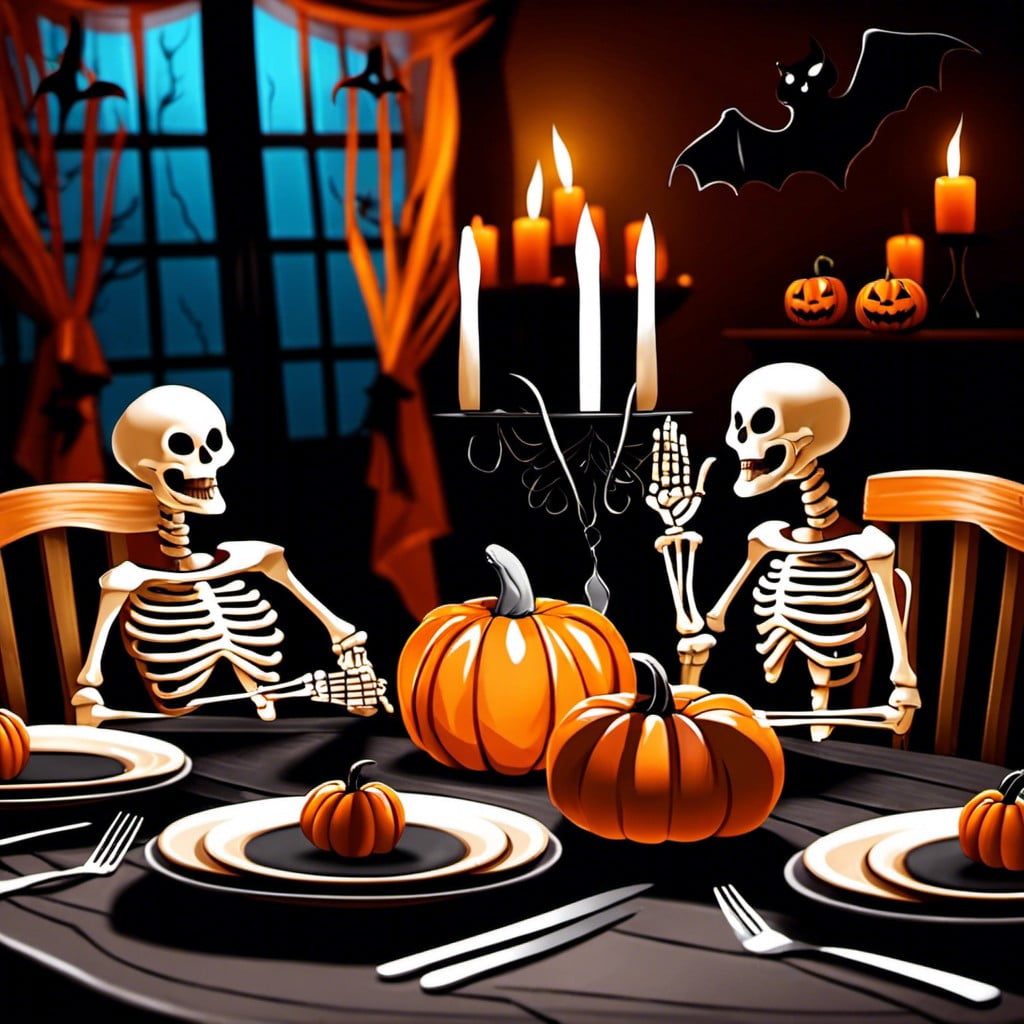
Call upon the macabre side of ambiance to make your dinner party stand out. Assemble skeletal figures around the table, ensuring each guest is greeted by bony counterparts upon arrival.
Fasten crafty hats or wigs to the figures, adding a touch of humor. Place a bone-themed dinner set with skull shaped plates and bone-handled cutlery at each setting to further enhance the scene.
Consider spotlighting the table with dimmed, eerie lighting, and finally, enhance the spooky atmosphere with ghostly sounds playing softly in the background. Ensure the placement is correct – a skeleton shouldn’t be slouching – to maximize the haunting effect.
Halloween Lanterns With Skeleton Silhouettes
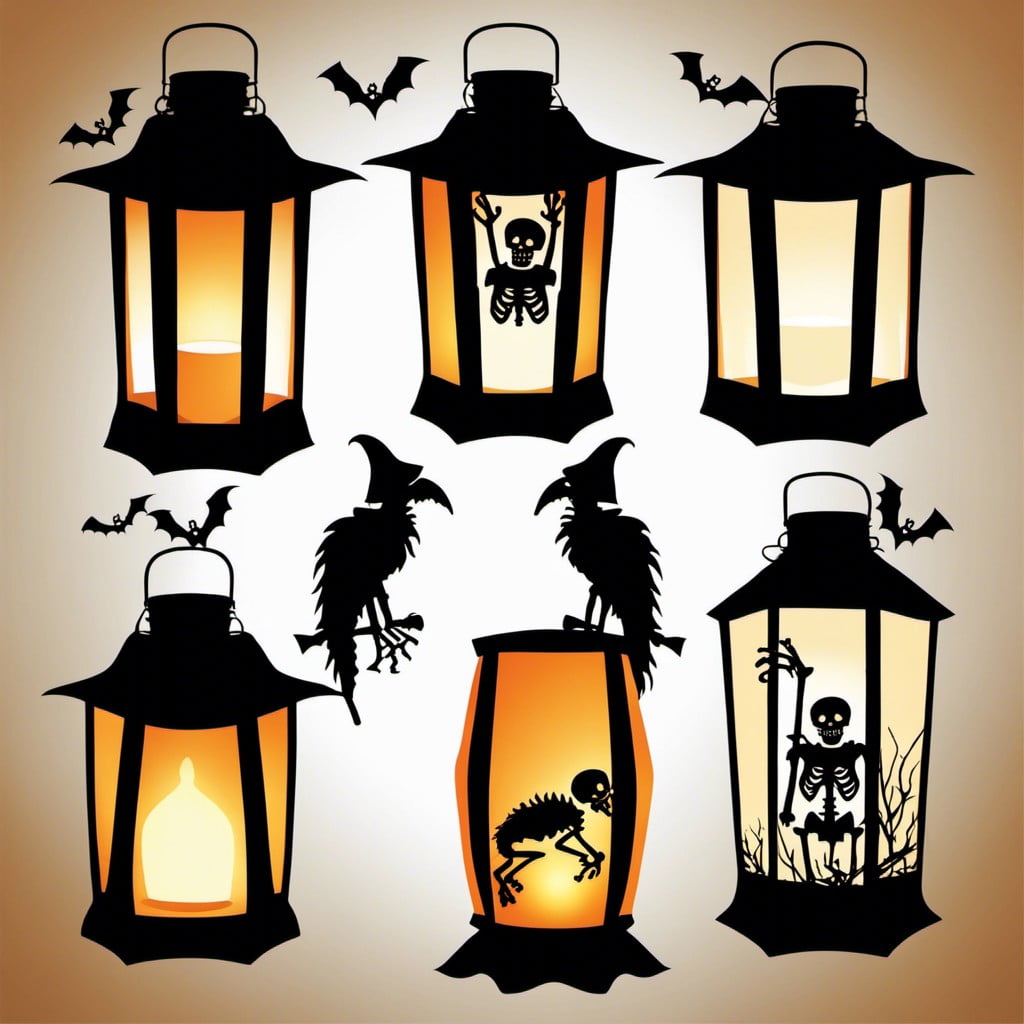
To create eerie ambient lighting, using translucent paper and black vinyl can set the tone for your Halloween-themed space. Follow these steps:
1. Choose a suitable lantern: Find lanterns with glass sides, preferably cube or cylinder. Colored glass like orange and purple enhances the spooky vibe.
2. Design your silhouettes: Online templates are great or invoke your inner artist for custom designs. Ensure the design fits your lantern size.
3. Cut and apply the vinyl: Once your skeleton design is ready and perfectly sized, cut it out and use transfer tape to apply it to the lantern’s glass sides.
4. Install the Light: LED tea lights or string lights provide a safe and suitable light source. Avoid real candles to lower the risk of fire.
Remember, safety first. Children should be supervised during the craft. The final result offers a haunting charm to your Halloween setting. Plus, it’s a fun and budget-friendly DIY project.
Skeleton Candy Bowl Holder
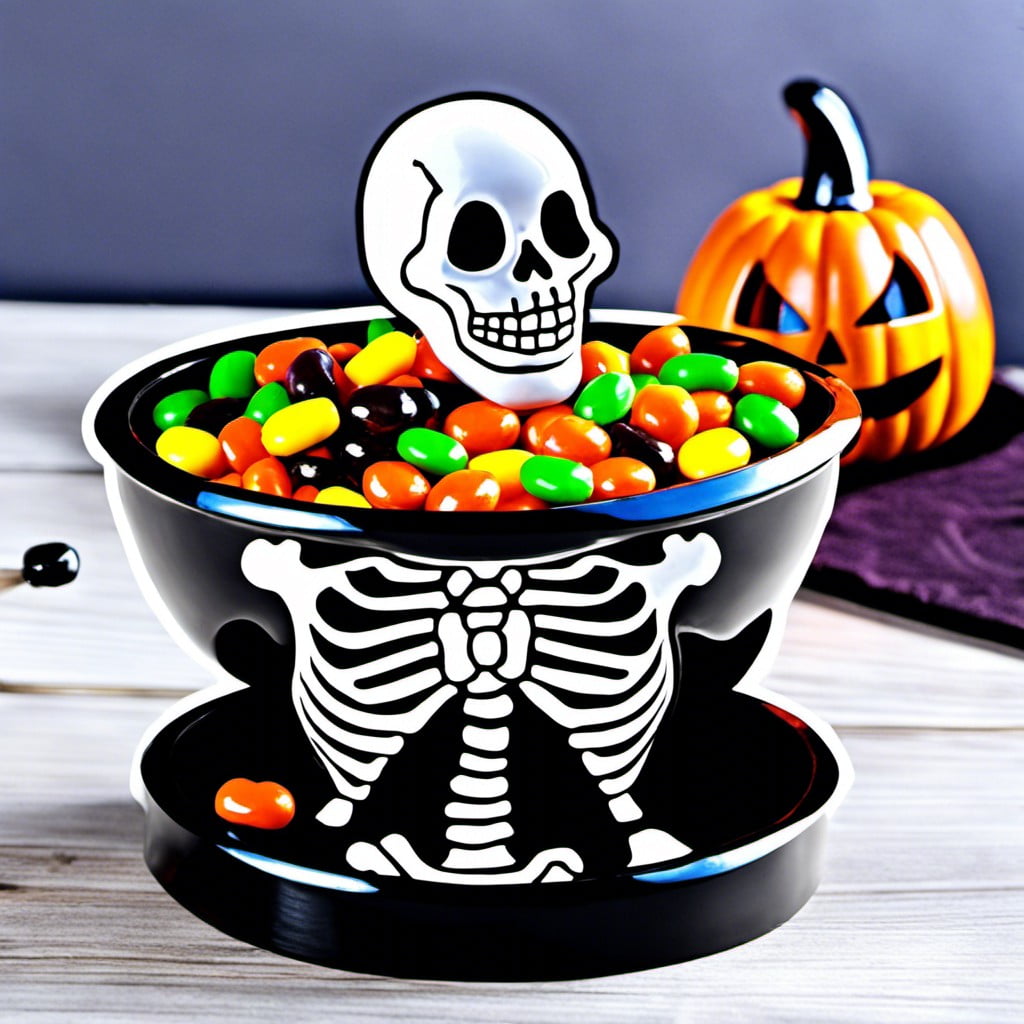
Great for trick-or-treaters or a Halloween party, the skeleton candy bowl holder adds a unique twist. Here’s how you can incorporate it into your decor:
1. Select a Skeleton: Choose from a life-size model or a mini skeleton. Ensure it’s built to hold weight – candy can be heavier than you imagine, especially when the bowl is full.
2. Choose Your Bowl: Glass or metal bowls often work best. They must be deep enough to hold lots of candy but light enough for the skeleton to “hold.”
3. Positioning: The holder can sit on your porch, at the entrance of your home, or even in the living room where the festivities are. Ensure it’s accessible and visible to everyone.
4. Safety First: If you’re using a light-up prop, ensure wiring is safely away from the candy and children’s reach.
5. Candy Choices: Fill it with your favorite Halloween sweets. Individually wrapped varieties tend to be best for sanitation purposes.
6. Theme: Consider adding a small sign or placard with a humorous or spooky saying – such as “Beware: Candy Addict.”
Try these tips to amplify your Halloween fun and give everyone a delightful fright; after all, a skeleton handing you candy is not something you see every day!
Garage Door Skeleton Mural
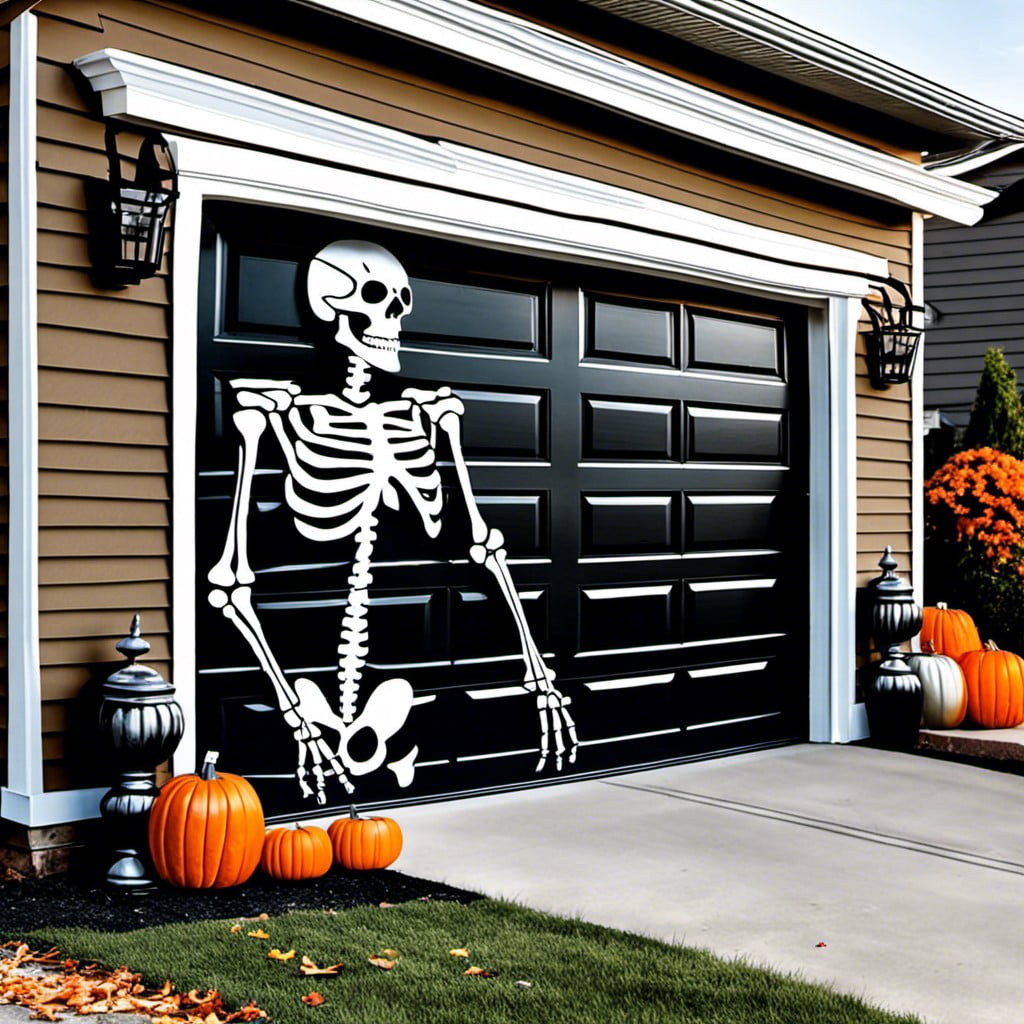
Creating this eerie design can be quite thrilling. Choose a large skeleton decal, ensuring it’s weather-resistant to withstand elements. Once applied, step back and appreciate how dramatically it morphs your garage door into a bone-chilling Halloween spectacle.
Illuminate it for a ghastly night time facade.
Accompany your mural with some environmental decoration. Small faux gravestones or jack-o’-lanterns along the driveway enhance the ghoulish atmosphere.
Whether it’s to startle unsuspecting visitors or entertain trick-or-treaters, your garage door skeleton mural will sure be a spine-tingling showstopper.
Spooky Skeleton Tree Decor
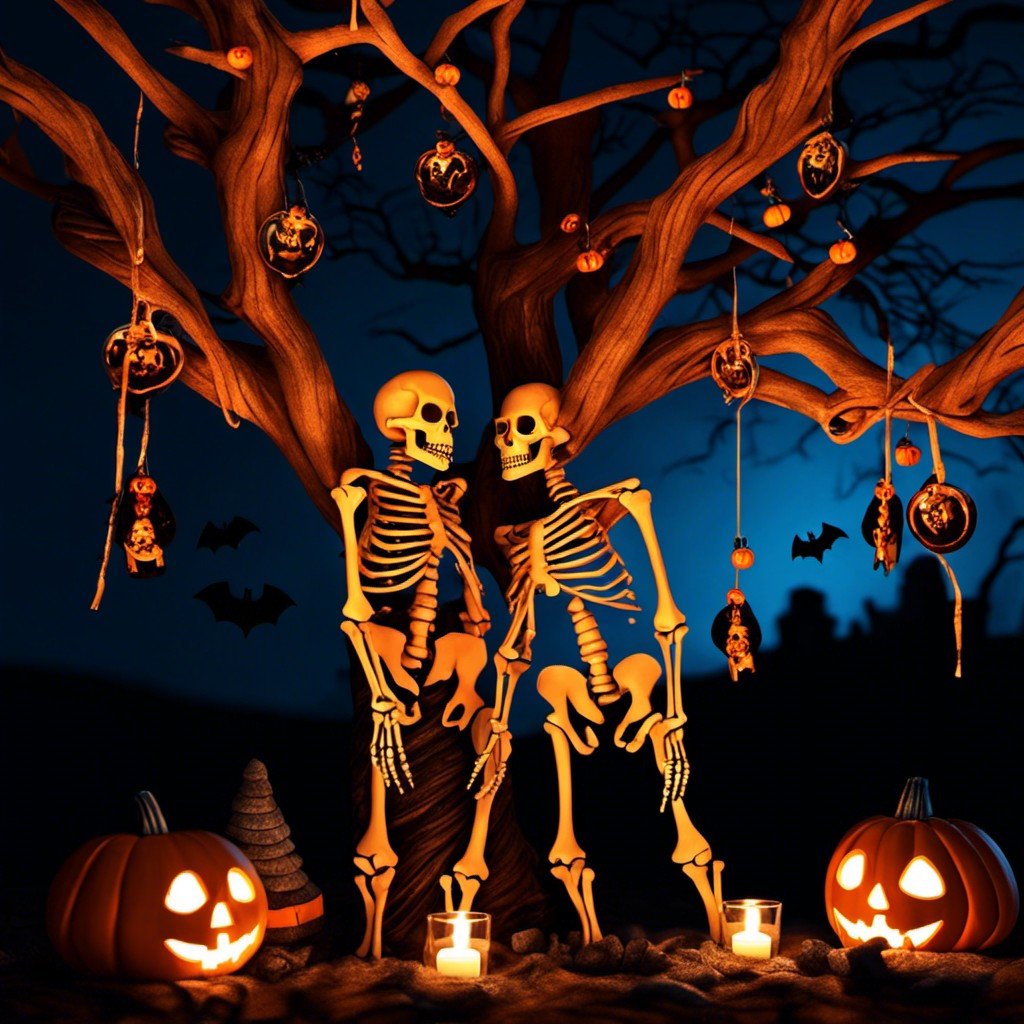
To conjure up an eerie atmosphere, a spooky tree adorned with skeletal decorations can do wonders.
Firstly, make use of various sized bone-themed ornaments, which can be hung with the help of sturdy strings to create a floating effect that’s sure to bewitch the onlookers.
Secondly, white string lights can be wrapped around the tree to enhance visibility, particularly at night.
Lightweight, glow-in-the-dark skulls could be an excellent choice as well, creating a haunting glow that adds to the overall spooky ambiance.
Furthermore, large fabric ghosts or flowing white sheets can be added, giving the impression of apparitions lingering among the skeletal decor.
Be mindful, safety should be a priority when setting up any tree ornament, hence the decorations should be securely fastened.
Remember to arrange everything in a manner that does not obstruct the paths or cause risk during dark hours.
Creative use of this concept not only provides an appealing visual centerpiece but also sets a chilling tone for the Halloween season.
Creepy Corner With Spiderweb and Skeletons
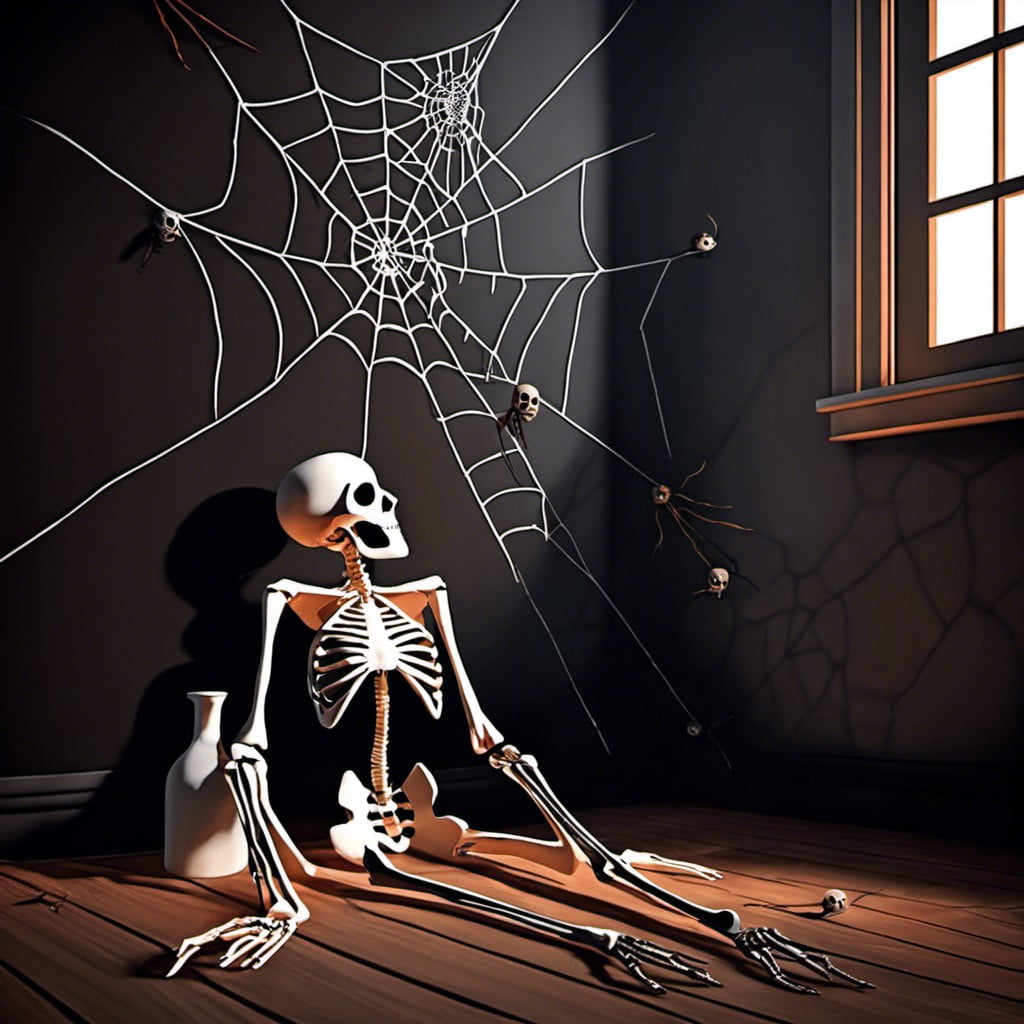
Firstly, select an apt corner of your home that allows for optimal display. Ideally, it should be a less-trafficked area to preserve the integrity of the setup.
Next, ornate the chosen corner with faux cobwebs. The denser the webbing, the more eerie the ambiance. Scatter a few plastic spiders across the web for a dramatic effect.
The next step involves positioning skeletons. Smaller, handheld size skeletons can be placed amidst the web, creating the illusion of being trapped. For even more impact, arrange a larger, life-size skeleton leaning against the corner wall, giving the impression of a looming figure amidst the eerie spiderweb.
Using creative lighting in this scenario significantly enhances the visual impact. Low, ground-level light aimed upward, preferably in soft orange or purple tones, can cast spooky shadows of the cobwebs and skeletons on the nearby walls and ceiling. Battery-operated candles scattered around the area will add an unpredictable, flickering light source, amplifying the creepiness.
Lastly, consider adding creepy sound effects, like gentle whispering or the rustling of spiders. A sound-activated device, subtly hidden within the setup, can startle unsuspecting visitors, intensifying the overall eerie scene. Remember, the balance between visibility and mystery is the key in creating an engaging and creepy corner with spiderweb and skeletons.
Read More Like This
 15 Homecoming Decoration Ideas to Elevate Your Celebration
 15 Christmas Cake Decorating Ideas to Sweeten Your Holidays
 15 Outdoor Party Tent Decorating Ideas for a Magical Celebration
 15 Ideas for Welcome Home Decorations
 15 Cheap Table Decoration Ideas to Elevate Any Gathering
Recap: